Customise roles
MYP contains a standard list of provider roles within your referral network (internal or external).
Create role
- Select ‘Customisation’ from the side navigation menu
- Select ‘Roles’
- Select ‘Create role’
- Enter role name
- Select ‘Save’
Edit + archive role
- Select ‘Customisation’ from the side navigation menu
- Select ‘Roles’
- Identify the relevant role
- Select ‘Edit role’ or ‘Archive’ as required
- Modify details
- Select ‘Save’
Customise positions
MYP contains a standard list of positions that are able to be customised to suit an organisation’s needs. Positions flow through to 94six for position descriptions and are used in PocketWatch to define position in a shift.
Create position
- Select ‘Customisation’ from the side navigation menu
- Select ‘Positions’
- Select ‘Create position’
- Enter position name
- Select ‘Save’
Edit + archive positions
- Select ‘Customisation’ from the side navigation menu
- Select ‘Position’
- Identify the relevant position
- Select ‘Edit position’ or ‘Archive’ as required
- Modify details
- Select ‘Save’
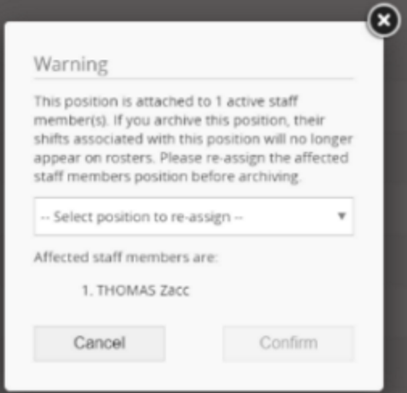
Please note: if archiving a position that is attached to an active staff member, the system will generate a warning – allowing you to cancel the action, or, select a new position to be assigned to the affected staff member/s. Selecting ‘Confirm’ will update the affected staff member/s position and archive the selected position.
NB: It is recommended that only Managers or Executive Managers have the option to ‘Archive’ or ‘Edit’ positions due to the inter-dependence in PocketWatch and 94six.
Customise teams + locations
MYP has the ability to group staff into teams and record staff office locations. ARM reports can be generated using ‘Team’ as one of the filters. The team’s functionality is utilised in the 94six, PocketWatch and GOMS modules.
Create teams + locations
- Select ‘Customisation’ from the side navigation menu
- Select ‘Teams + locations’
- Select the relevant ‘Create team’ or ‘Create location’ button
- Enter team or location name
- Select ‘Save’
Edit + archive teams + locations
- Select ‘Customisation’ from the side navigation memu
- Select ‘Teams + locations’
- Identify the relevant team or location
- Select ‘Edit team’ or ‘Edit location’ or ‘Archive’ as required
- Modify details
- Select ‘Save’
When staff teams change, prompts are displayed in order to re-assign relevant opportunities, projects and tasks. When locations have been created, the location can be selected via the ‘Edit’ button beside the staff member in the ‘Staff’ panel in the self client. Next select ‘Contact options’ and then ‘Edit login details + teams + permissions’