If you have enabled HICAPS on your MYP platform you must create client engagements in the following manner as your service bookings and plan dates will sync automatically from PRODA via HICAPS.
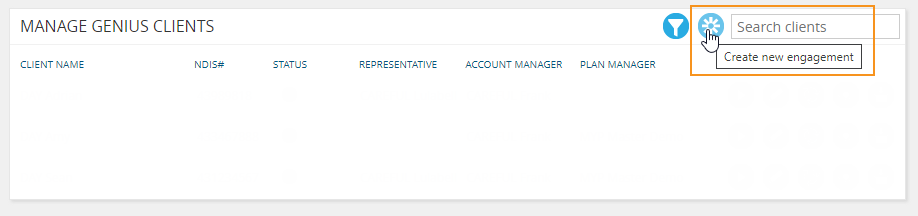
To create a new engagement:
- Select ‘Create new engagement’ in the ‘Manage GENIUS Clients’ panel
- If the client already exists in ARM, search for existing contacts.
- If the client does not exist in ARM, select ‘Create new client’, otherwise select ‘Use existing client’.
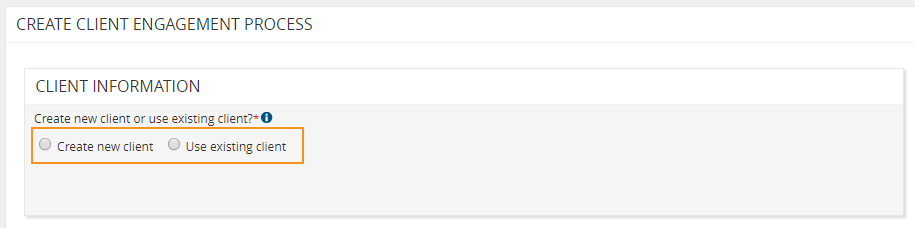
NB: To check if a client is already in the system, check the main search bar. If the name does not appear select the ‘Create new client/contact’ option.
Create new client
- Create as multi-contact group or as an individual
If you want to associate multiple contacts with the client, select Client (multi-contact group). If you do not want to associate additional contacts with the client, select Client (individual). If you select Client (multi-contact group), a default group name will be applied in the client group name field. This can be amended by you (not recommended).
Enter the relevant client information:
- NDIS number
- First name
- Last name
- Phone 1
- Phone 2
- Email
- Date of birth
- Client’s group name (Group clients only)
- Address 1
- Address 2
- Suburb
- Town/city
- State
- Country
- Postcode
- Country
Enter representative information
Enter the relevant representative information:
- Does the client have a representative?
If yes:
- Create new contact or use existing contact
If using existing contact:

If creating a new contact and the contact information is the same as the client’s, select the ‘Copy client’s contact information’ icon.
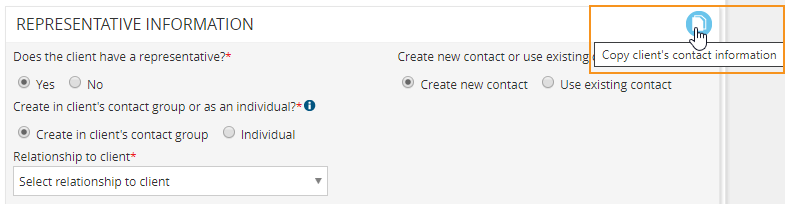
- Select relationship to client from drop-down menu

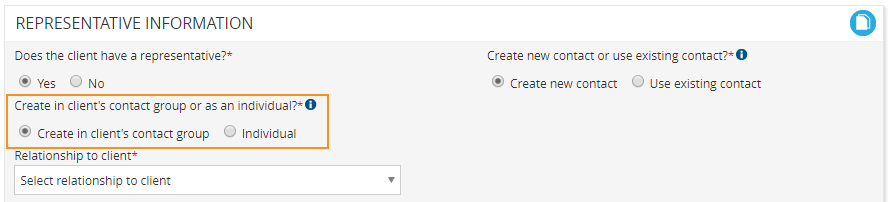
To create a new contact:
- Choose whether to create the contact as a group or as an individual.
If this person has a personal relationship with the client, such as a family member or a guardian, and/or is expected to only represent one client, select ‘Create in client’s contact group’. If this person represents more than one person, for example, a health professional or a support worker, select ‘Individual’.
- Select representative type from drop-down menu
Enter the representative information.
- First name
- Last name
- Phone
- Email
- Address
- Suburb
- Town/city
- State
- Country
- Postcode
If the above address is the same for communication mark ‘Yes’. If ‘No’, enter the communication address.
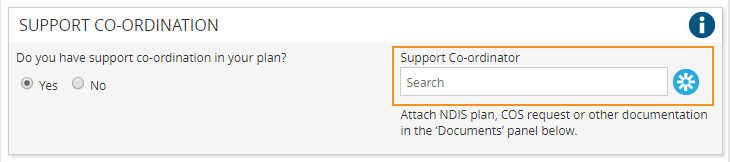
Administer support co-ordination
This contains details about the support coordination for the client’s plan.
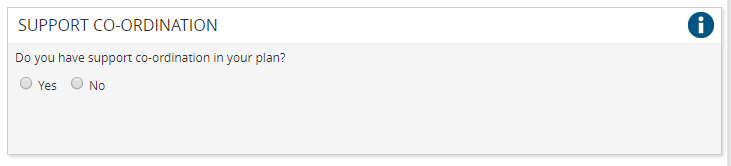
If the client has support co-ordination in their plan, select ‘Yes’.
Search for their support co-ordinator or select ‘Create client’ to create a new contact. Please note you must enter the specific contact, not the organisation they work for.
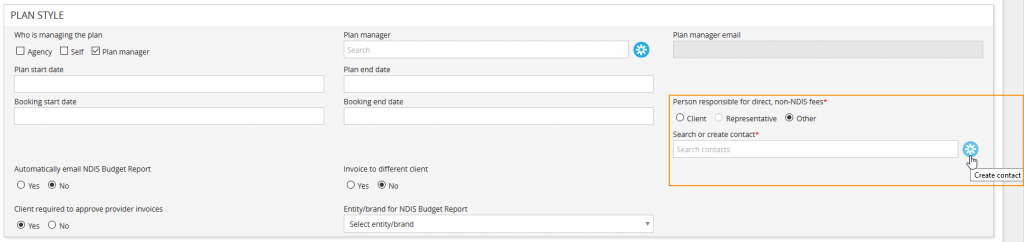
Administer plan style
- Select who is managing the plan
- Agency
- Self
- Plan manager – enter the plan manager organisation or create a new client and enter the account email for plan managed invoices
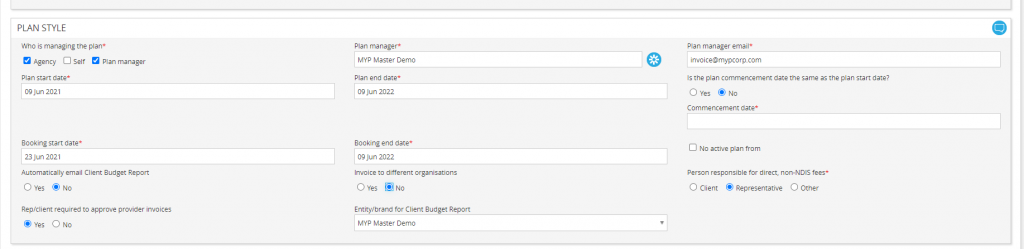
- Enter plan start date + end date
- Enter the booking start + end date
- The plan commencement date is the date when you start managing the client as the plan manager.
- This is because it is possible that a client switches management type (from agency to plan managed), or switches to you from another plan manager amid an active plan. If the plan commenced with your organisation on the same date the plan started, select ‘Yes’ for this option and enter the commencement date.
- If there is no current active plan with dates, ‘No active plan’ can be selected instead which will allow invoice creation for the plan
NB: If ‘No active plan’ is selected, all invoices/claims created will display in red in the invoices panel.
- Select the person responsible for direct, non-NDIS fees
- Client
- Representative
- Other
NB: When selecting ‘Other’, choose an existing contact or create a new contact by selecting ‘Create contact’.
- Choose to automatically email NDIS Budget report or not (this is automated and emailed on the 1st of every month)
- Choose client required to approve provider invoices (allows to opt out of provider invoice approval)
Administer schedule of support
NB: If you are a plan manager, the schedule of support simply outlines your plan management set up costs and the financial administration monthly fee.
You can have a template set up with these two items. To do this:
- Go to the navigation menu and expand GENIUS
- Select Settings
- Expand Client Engagements
- Add Items to the Schedule of Support Template
- Add Financial Administration
- Add Set Up by searching for these in the price book
- Save + Close
- Return to the Client Engagement
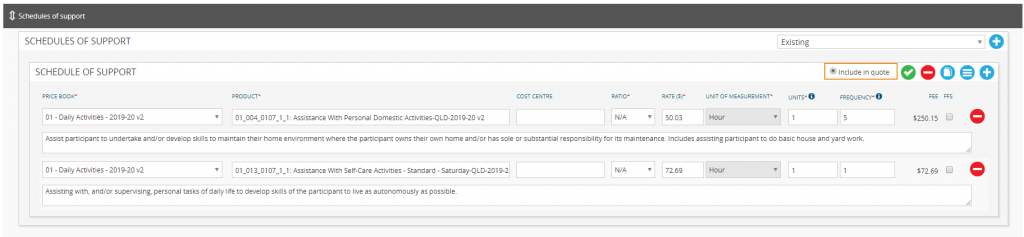
To create a schedule of support:
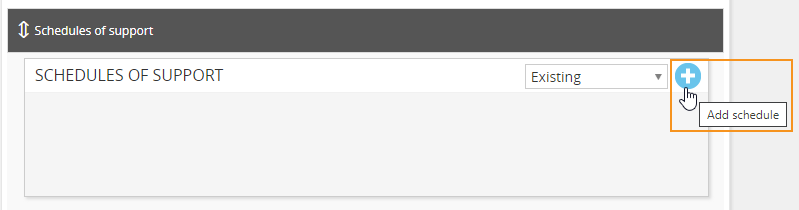
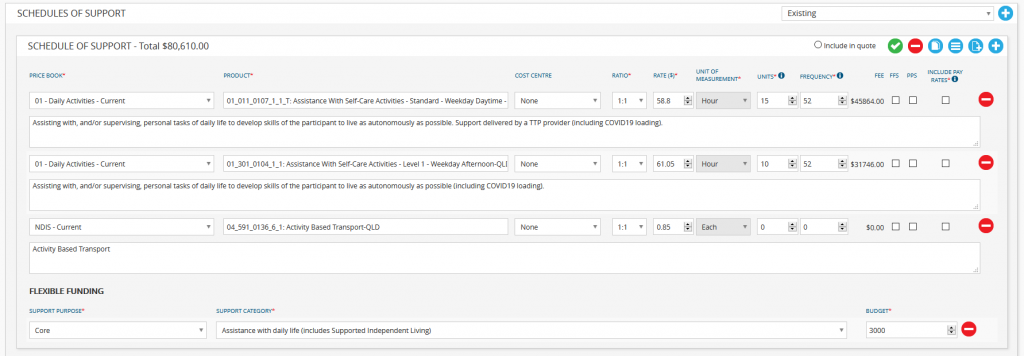
- Select a price book
- Search for a support item
- Add description of support items in the text box
NB: Price books are managed in ARM. Please refer to ‘Customise products, prices + invoicing‘ for further details.
- Select the relevant support item
- Cost centre (if appropriate)
- Unit of measurement
- #units
- Frequency
- Select FFS (Fee For Service), if appropriate
- Select PPS (Pre-Paid Service), if appropriate
- The best process for service bookings to be marked as PPS, is to create them as stated items
NB: Enabling PPS for an item will mean that any invoice solely containing PPS items will automatically be moved to the ‘Paid’ status.
NB: The ratio field is used to communicate to a client which ratio their support will be delivered at. It does not recalculate any rates. Please ensure you are using the correct line item with the appropriate ratio pricing from the NDIS price book. Alternatively, you can manually update the pricing and rate in the schedule to reflect the ratio selected.
- Select ‘Mark as final’ to move from draft to final schedule

To enter a flexible funding item:
- Select ‘Add flexible funding item’
- Enter ‘Support purpose’
- Core
- Capital
- Capacity building
- Select ‘Support category’
- Enter budget figure
Flexible funding will appear in the service agreement. This provides the option to add in line items at zero value to be used in invoices as required per agreement.

- To copy the schedule, select ‘Copy schedule’

- Create a schedule from a template by selecting ‘Create from template’. (This template comes from GENIUS > Settings > Schedule of support)

- To remove the schedule, select ‘Remove schedule’

- To unarchive the schedule, select ‘Archive schedule’
- Select ‘Archive’ or ‘Existing + archived’ from administration status drop-down menu
- Select ‘Unarchive’
- Select ‘Save’ or ‘Save + close’

Adjust line items selected by award
The line items are taken from the client’s schedule of supports and are adjusted automatically by the award rule pay rates (see ‘Link line item pay rates‘).
If the pay rate on a timesheet changes from ‘Normal Weekday rate’ to ‘Afternoon/Evening rate’, the line item will change from ‘Weekday activities’ to ‘Afternoon activities’ when this setting is applied.
Link existing clients not in renewal
- Navigate to GENIUS
- Select ‘Edit engagement’ on the relevant client
- Copy the existing schedule of support or create a new schedule of support
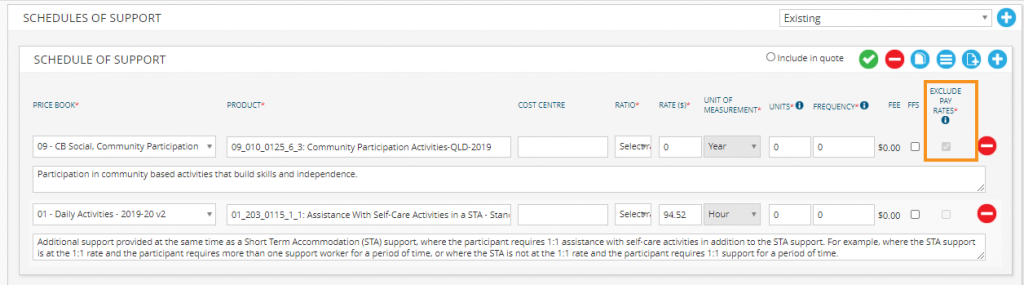
- Select ‘EXCLUDE PAY RATES’
NB: Any line item that has been mapped to a pay rate will be available to select as ‘EXCLUDE PAY RATES’. By default, line items are linked to PocketWatch pay rates. Ticking this option will prevent the specified line item from being linked to its respective pay rate.
- Select ‘Mark as final’
- Select ‘SAVE + CLOSE’ at the bottom of the engagement
NB: All future rostered shifts and roster template shifts with the client attached will use the new schedule of support.
Link existing clients in renewal
- Navigate to GENIUS
- Select ‘Renew engagement’ on the relevant engagement
- Select ‘EXCLUDE PAY RATES’
NB: Any line item which has been mapped to a pay rate will be available to select as ‘EXCLUDE PAY RATES’. By default, line items are linked to PocketWatch pay rates. Ticking this option will prevent the specified line item from being linked to its respective pay rate.
- Select ‘Mark as final’
- Select ‘SAVE + CLOSE’ at the bottom of the engagement
NB: All future rostered shifts and roster template shifts with the clients attached will use the new schedule of support.
Timesheets generated from a roster following these dates will now automatically allocate the units to the line item that directly correlates to the pay rate approved on the timesheet.
Example: If the pay rate selected on the timesheet is ‘Normal rate (Casual)’, the line item will be ‘Monday to Friday 6am-8pm Support Worker’. If the shift finishes after 8pm, the pay rate will change to ‘Afternoon rate (Casual)’ and the line item will automatically change to ‘Weekday Afternoon Evening’.
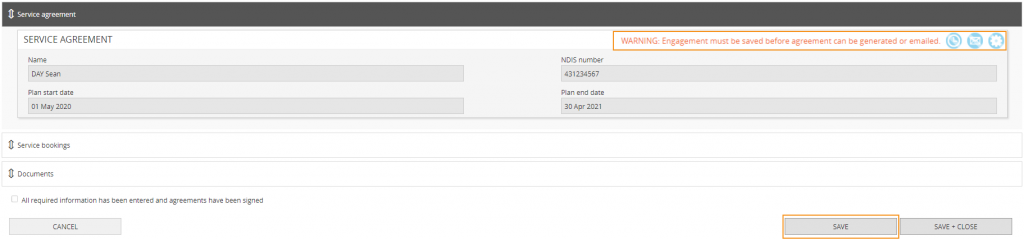
Administer service agreement
The following fields will be prefilled with data entered prior:
- Name
- NDIS number
- Plan start date + end date
To generate an agreement, select ‘Generate agreement’.
- Select ‘Generate agreement’
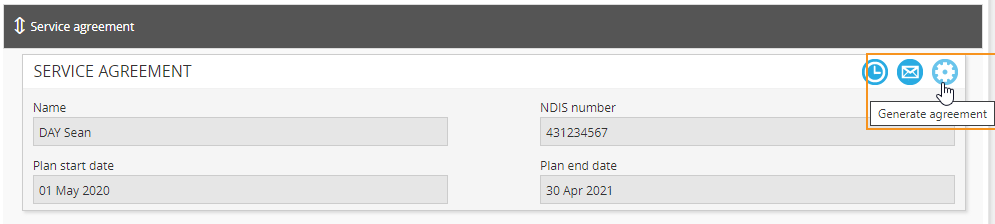
- Select the relevant agreement template from the drop-down menu
- Select ‘Save’
NB: If creating an engagement, ‘Save’ must be selected before agreement can be generated or emailed.
To email agreement to client:
- Select ‘Email agreement to client’

- Select the relevant agreement template from the drop-down menu
- Choose recipient/s
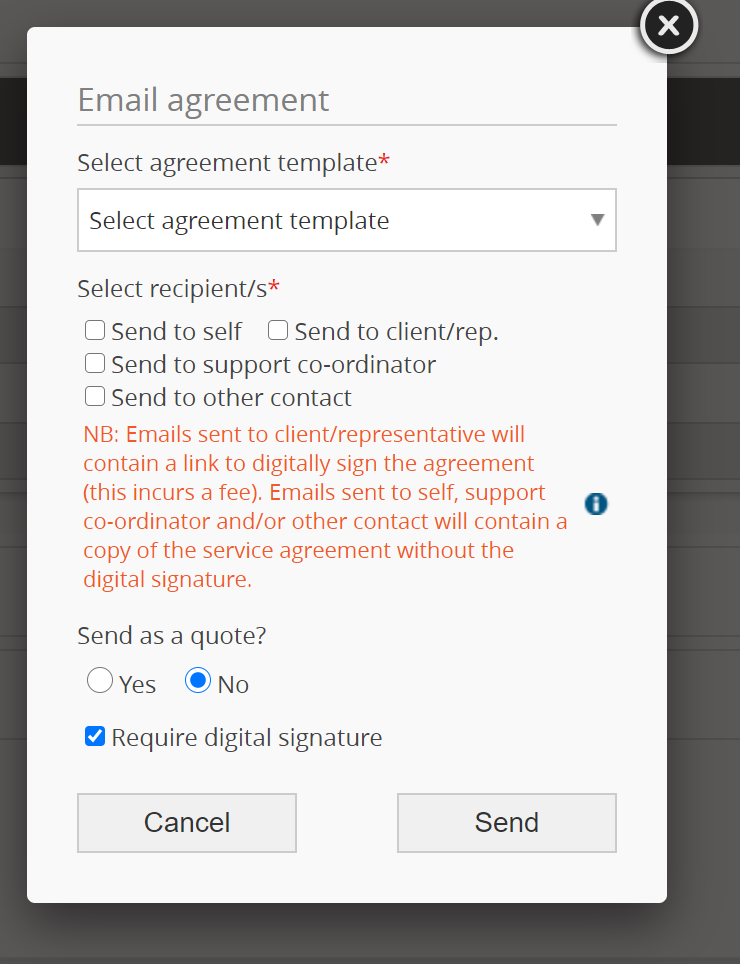
- If a support coordinator has been added to the engagement, you will have the option to send the service agreement to them. Otherwise you can send it to the support coordinator by selecting the ‘Send to other contact’ option.
- Select to send as a quote if required
- Select if a digital signature is required
- If ‘Require digital signature’ is ticked and the template has a signature tag – the documents will be signed
- If ‘Require digital signature’ is ticked and the template has no signature tag – Error message is shown to the client, saying that document needs to be signed
- If ‘Require digital signature’ is not ticked and the template has a signature tag – the signature tag will be left in the document
- If ‘Require digital signature’ is not ticked and the template has no signature tag – the documents are emailed without being signed.
- Select ‘Send’. A green message will display confirming the recipient’s email address.
NB: If a recipient does not have an email address, an error message will display, however the service agreement will be sent to the other recipients with an email address.
Send quote
There is an option to send the service agreement as a quote. The system will use the standard service agreement template with the additional wording – QUOTE ONLY.
When creating a new ‘Schedule of Support’ (SOS) panel there is an option to ‘Include in quote’. If there are multiple schedules of support then only one SOS can be selected which will be then attached to service agreement while sending the agreement as selecting ‘Send as quote’ to ‘Yes’.
If selected as ‘No’, then finalised SOS would be attached to agreement.
The email text for a direct service quote reads:
Hi < Name>
Thank you for the opportunity to provide support services. Please review our service agreement quote attached to this email. If you have any questions at all, please do not hesitate to contact us.
Kind regards
The email text for a plan management quote reads:
Hi < Name>
Thank you for the opportunity to provide plan management services. Please review our plan management agreement quote attached to this email.
As <name>’s NDIS plan will be ‘plan managed’, the providers will not need to be registered with the NDIA and are not required to make a service booking with the NDIA. This means you can use an unregistered provider with an ABN for support services in the plan managed categories of the plan.
If you have any questions at all, please do not hesitate to contact us.
Kind regards
To send as a quote:
- Select ‘Email agreement to client’

- Select the relevant agreement template from the drop-down menu
- Choose recipient/s
- Select send as quote
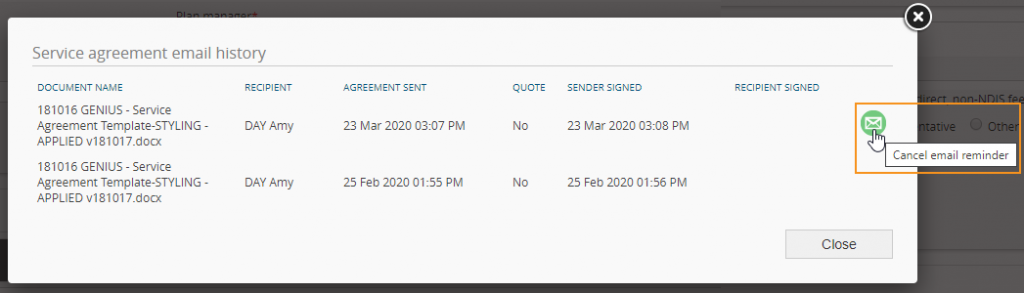
View email history
To view the email history of sent service agreements and quotes select view email history.

The Date of when last agreement was sent + signed is displayed in service agreement panel and summary will be shown in the pop-up for the clients/contacts who have received the service agreement.
NB: Some fields will be blank for emails that were sent prior to 25 September 2019. Emails sent after this date will have the full history.
Stop service agreement reminders
To stop sending a specific reminder for a signature on a service agreement, select the icon for cancel email reminder in the service agreement history pop up.
To stop all email reminders, you must go to ARM > Customisation > Settings via the side navigation menu and at the very bottom of the page there is a setting called ‘Electronic Signature’. Change this option to ‘Never’ and it will stop all reminder emails.
Please note that this will stop ALL email signature reminders to ALL clients.
Administer service bookings
Service bookings track the maximum amount of funds that can be billed for a client. You can save the engagement by clicking Save + Close at the bottom of the page so you are able to go to PRODA and create these.
As PRODA should be the single source of truth for these service bookings, we encourage creating the service bookings in PRODA then allowing the HICAPS sync to bring these service bookings into MYP rather than entering them manually in MYP.
The steps to sync are outlined below. Once this has been completed, the service bookings will be populated in the engagement.
Once your bookings have been synced, you are able to do the following:
Add Prior Spending
When creating an engagement for a client who has come into GENIUS halfway through their plan, you can enter the amount that has already been spent for a category into this column and GENIUS will use this in the pending/spent/balance calculation. It defines what budget is remaining when they start in GENIUS. The actual balance for their budget can be seen on their dashboard.

Allocate Provider Service Agreement budgets
The purpose of this function is to allocate a budget to service providers that may utilize funds from a service booking. It enables the plan manager to review how much funding from a service booking a service provider may have accessed and assists the plan manager engaging early with participant regarding the utilisation of their funds.
NB: This does not Quarantine funds for this provider. It is a tool to assist the plan manager ensuring that funds are being spent in accordance with the plan and in line with expected NDIS plan spending.
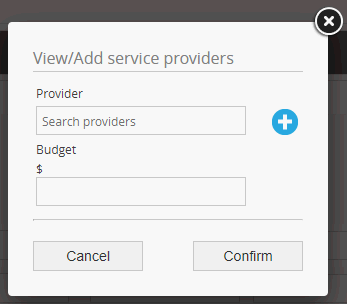
- To view or add a service provider budget, select the ‘View’ icon next to the booking.
- Search for + select a provider
- Enter a budget figure + select ‘Add’
- Select ‘Confirm’
- Add additional service providers to the support purpose by repeating the steps above

- Bookings can be copied by selecting the copy icon
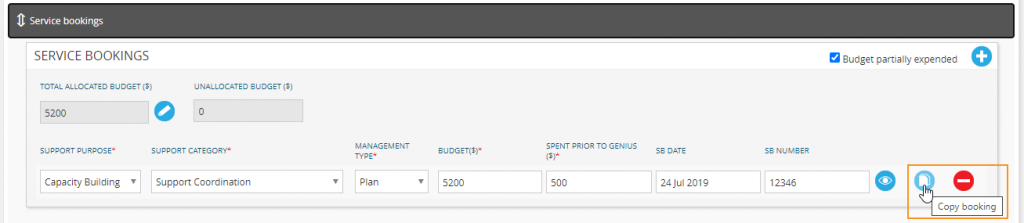
- To remove a booking, select the ‘Remove booking’ icon
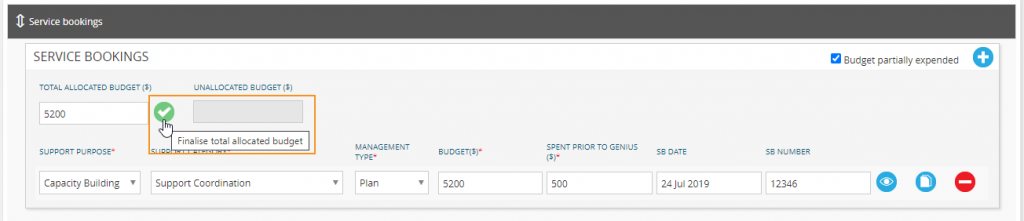
To enter a total allocated budget:
- Enter total allocated budget and select ‘Finalise total allocated budget’
- An unallocated total will automatically be calculated.

NB: If clients are plan managed with another organisation you will still need to enter Service bookings in GENIUS reflecting the service provision you have agreed to with the client. Although the plan manager has made the service bookings on the Portal, you will still need to invoice the plan manager for line items and keep track of the budget in each category.
Administer stated supports
GENIUS allows the option to capture stated support items and the ability for a category to have multiple bookings managed by a combination of Agency, Self and/or Plan.
When viewing invoice/claim details in the Plan Budget panel on a client dashboard, the amount for the category is shown next to the invoice/claim total. The NDIS Budget Report also shows the category amount in the invoice/claim list.
Administer documents
To add a document to the client engagement:

- The document name is the name of the uploaded file and cannot be altered
- Choose the document type
- COS request
- NDIS plan
- Service booking + agreement
- Signed service booking + agreement
- Quote
- Other
NB: Client engagement must be saved before documents can be added.
- To download a document, select ‘Download’.

- To remove a document, select ‘Delete’.
Save + close engagement
- Select ‘Save + close’ and Proceed to Subscribe to HICAPS

Subscribe to HICAPS, onboard and offboard clients
To finalise the engagement and connect the client to HICAPS and (subsequently PRODA) you must complete the following steps for every new client you add to the platform.
- Open the Navigation Menu
- Expand Genius
- Select Settings
- Expand the HICAPS Section
- Click the Subscribe to HICAPS icon
This will open a pop up window.
- Click Subscribe to HICAPS for your relevant group of clients
- Select Confirm.
- Close the window and Save + Close settings page.
After a short period, you should receive a notification in the top right hand corner bell confirming the participant has been successfully onboarded.
Another notification will appear when the service bookings have synced. It will state the plan details have been updated by HICAPS.
A client’s subscription status can be viewed in their engagement.
- A green icon indicates that the client has been onboarded

- An orange icon indicates that the client has not yet been onboarded
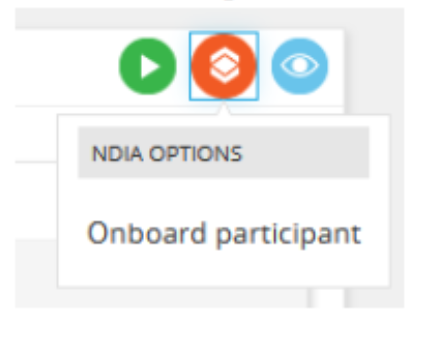
- To offboard a client, click the green icon and select ‘Offboard participant’.
After offboarding a participant, you can archive their engagement. To do so:
- Click the ‘Archive engagement’ icon.
Finalise the client engagement
The final step is to finalise the engagement.
- Open Genius and search for the new participant
- Open their engagement by clicking the pencil icon.
- Review the plan dates and service bookings have been successfully synced by HICAPS from PRODA.
- Scroll to the bottom of the screen and Select ‘All required information has been entered and agreements have been signed’
- Select ‘Save + close’
Review client engagement history
GENIUS will store any changes made to a client’s engagement within the History panel. Whenever a change is made within the engagement, history will be recorded.
You can filter the history by selecting the filter icon in the right-hand corner.

History will also be available through the client’s GENIUS dashboard and ARM Pro History.
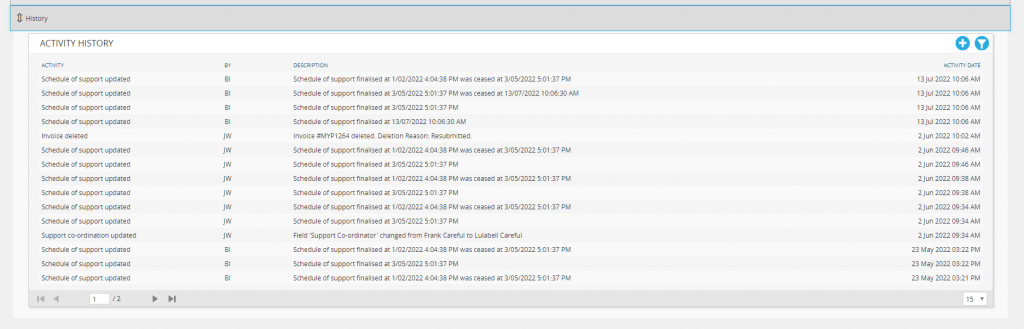 GENIUS Client Dashboard History
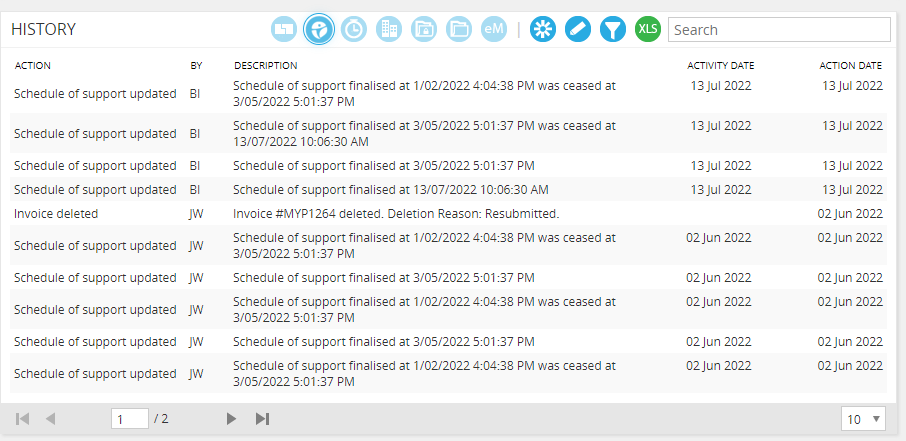 ARM Pro Client History
Managing Client Engagements – Expired Plans
When a client engagement is approaching or reaches its plan end dates, GENIUS will prompt a renewal process. This is indicated by the renewal icon becoming active a number of days (defined in GENIUS > Settings) before the plan ends and enables streamlined updates to a client’s engagement.
If a participant plan expires, you will see the status turn to grey and signal an expired engagement.
No action is required until the renewal icon turns yellow (as shown above).
When the Renewal Icon is yellow, it means a new plan has been added to PRODA and HICAPS has picked up those details, ready to sync with MYP.
Clicking the yellow renewal icon will prompt the engagement to open but this time it will have the new plan dates populating the fields.
Finalise the engagement by adding a schedule of support and marking the box at the bottom of the engagement.
Managing Client Engagements – Extended or Renewed Plans
When a client engagement is approaching or reaches its plan end dates, GENIUS will prompt a renewal process. This is indicated by the renewal icon becoming active a number of days (defined in GENIUS > Settings) before the plan ends and enables streamlined updates to a client’s engagement.
Extending plans is becoming a more common practice by the NDIS. The plan dates will be extended, and the service bookings will be edited to match.
Absolutely no action is required by the Plan Manager in MYP.
The engagement will still turn blue depending on the settings outlined in Genius > Settings but as the HICAPS sync is always active, any changes to plan dates or service bookings will automatically be populated overnight in MYP.
As a result, if a plan is coming up to renewal/expiry and the plan is automatically extended by the NDIS, the engagement will simply sync up to reflect the new dates and will return back to a green, Complete status.