NB: this area is only available for websites with an integrated eCommerce shop. To edit the eCommerce area of your website, you must have relevant Shop Manager permissions (refer to ‘Permissions’ section).
Shop settings
MYP has provided high level information regarding WooCommerce below. In saying this, WooCommerce has extensive documentation found at https://docs.woocommerce.com/documentation/plugins/woocommerce/
The ‘Settings’ area allows important information such as currency options, tax options, and shipping and payment details for online transactions, to be set up and managed.
To manage your settings:
- Select ‘Woo Commerce’ from the left-hand side menu
- Select ‘Settings’
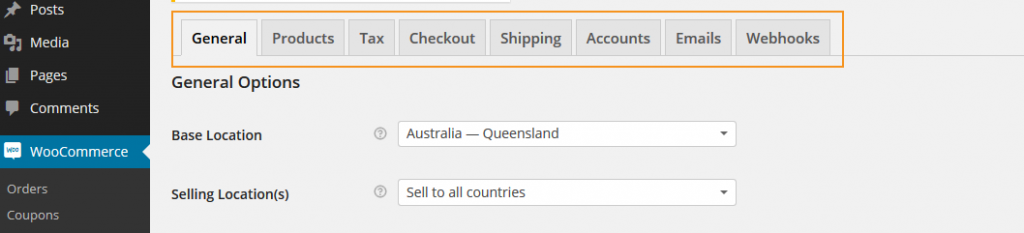
The ‘Settings’ area contains a number of sections:
By default, most of the options in these sections will be set up using standard settings so that you can get your online shop up and running quickly.
However, there are three important sections to check before adding products to your shop. These are areas MYP is unable to complete for you/only general details are able to be added on original set-up.
General options
This section contains information about location and currency. Please check these details are correct and change if required. Select the ‘Save changes’ button at the bottom of the page when finished editing.
NB: the ‘Enable the REST API’ option must not be unchecked or you will lose the integration of your shop with ARM Pro.
Tax
This section contains important tax options that you can edit for the purposes of how your products will display (inclusive or exclusive of tax) and some tax calculator options.
Checkout
This section contains important information about how you will receive your payments.
To set up payment options, scroll down to ‘Payment gateways’ and check which methods of payment you wish to enable and the order in which they will appear on the website checkout page.
To set up any of these payment methods, you will need to add your financial details into the relevant payment option area. To do this, select the ‘Settings’ button aligned with your chosen payment method:

Once the required information is entered/edited in each section, click the relevant ‘Save changes’ button.
Add products
- Select ‘Woo Commerce’ from the left-hand side menu
- Select ‘Products’
- Select ‘Add product’
- Enter product name
- Complete the applicable price information + the SKU (Stock Keeping Unit)
NB: it is essential that the SKU field is completed as this connects the shop product to your ARM Pro pricebook and invoicing.
- Select the ‘Set featured image’ link to upload your product image
- Add a ‘Product short description’ if required
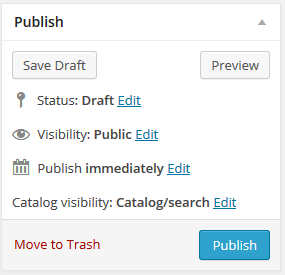
- Make the product live in your website shop by clicking ‘Publish’ on the right-hand side of screen
Integrate with MYP invoicing
Products to be available in your eCommerce shop need to be uploaded via your website.
These products will then be integrated with your ARM Pro pricebook when each is purchased (if they don’t already exist):
- If the ‘SKU’ of the eCommerce product does not match the ‘Product code’ of an existing pricebook product in ARM Pro a new product will be created
- The ‘Product family’ in ARM Pro will be automatically created on the first purchase + named ‘WooCommerce products’
- The ‘Pricebook’ in ARM Pro will be automatically created on the first purchase + named ‘Default pricebook for WooCommerce products’
- When an order is placed via the website eCommerce shop, an invoice will be automatically created in MYP + named in the format ‘WooCommerce order # <order number>’ (e.g. “WooCommerce order #1234)
For more information on ARM Pro pricebooks and invoicing, refer to the ARM Pro myHelp.