QTime offers a more flexible solution needed for support co-ordinators, allied health professionals and others who require the invoice and timesheet functionality that PocketWatch offers. QTime schedules can run concurrently with a standard shift and can be viewed from roster page or individual staff members page.
Enable QTime
- Ensure permissions have been applied (refer to Staff permissions in the ARM myHelp)
- Ensure QTime has been enabled in settings
Create QTime schedule
- Select QTime from myShifts page
 |
View/Add allowances |
 |
Copy schedule + copy time entry |
 |
Remove schedule |
 |
View contact alerts from ARM |
 |
Create a GOMS session |
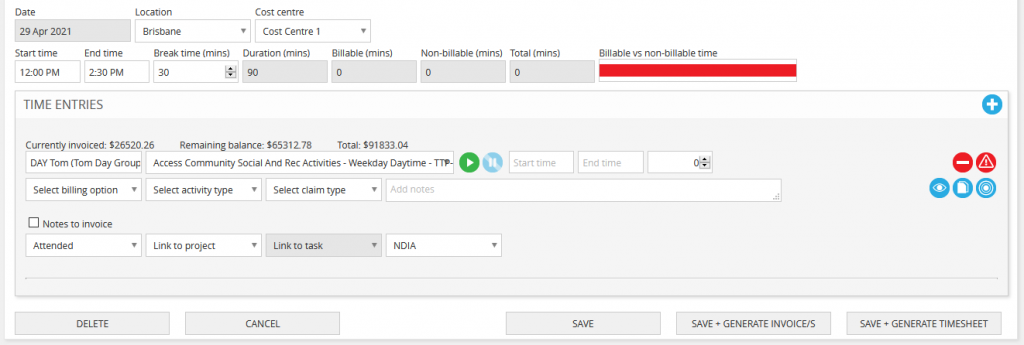
- Create a new schedule
- Enter ‘Location’
- Enter ‘Cost centre’
- Enter ‘Start time’
- Enter ‘End time’
NB: The start + end time can be automatically filled based on the following:
- Enter in start + end times for each staff member via editing a staff member then navigating to ‘Edit login details, teams + permissions’ and adding in that staff members start + end times in the ’94six + PocketWatch staff settings’ area
- If there is no entry for a staff member in that field, the system will use the start + end times set for company hours via PocketWatch > Settings > Global
If neither of the above have been set, the fields will remain unfilled.
- Enter ’Break time’
- Select ‘Add QTime entry’
- Search client
- Select line item
- Only line items in a client’s finalised schedule of support from GENIUS will appear in the drop-down list
- QTime products will also appear in the drop-down list
- Funds remaining in the schedule for selected item will appear if the ‘Show GENIUS schedule of support budget information’ setting is enabled via PocketWatch > Settings > QTime
- Select start on the clock or manually enter time – you can also pause and resume the clock at any time
- Select the billing option
- Select activity type
- Only items defined in PocketWatch > Settings. QTime will appear in the drop-down list. The activity type will flow through to the invoice in GENIUS.
- Select claim type
- Cancellation
- Direct service
- Irregular SIL supports
- NDIA required report
- Non face-to-face services
- Provider travel
- Telehealth
- Add notes
- Up to 7000 characters. Notes added here will appear in the history of a client in ARM under the PocketWatch filter or in a project task if applied.
- Select attendance type
- Did not attend – with notice
- Select cancellation reason
- Did not attend – without notice
- Select cancellation reason
- Link to project
- Only projects applied to a client in ARM will appear in the drop-down
- Link to a task
- A project must be chosen before the task list will pre-populate
When a QTime schedule is linked to a project or task, the notes from the schedule will be recorded in the relevant project/task along with the time recorded (if the project is a time based project).
NB: If notes need to be limited to a specific team a permission limited project must be chosen.
NB: You cannot edit the same QTime schedule in multiple tabs/windows to ensure that the correct data is saved.
Add allowances
To add allowances to a QTime schedule:
- Select ‘View Allowance’
- Select ‘Add Allowance’
- Enter in KM allowance
- Enter in KMs
- Select ‘Use as timesheet unit’ if applicable

Select invoice type
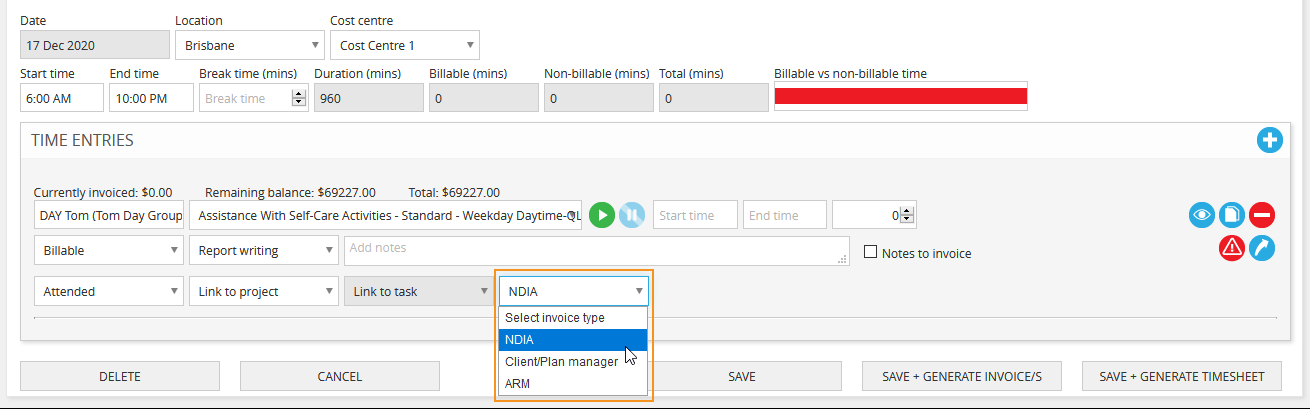
- NDIA – invoice will auto create in the invoice to NDIA panel in GENIUS
- Client/Plan Manager – Invoice will auto create in invoice to Client/Plan Manager panel in GENIUS
- ARM – Invoice will create in the client invoice panel in ARM
- Select ‘Save’

NB: If items are defaulting to ARM invoices, please review your invoice templates. Navigate to ARM Pro > Customisation > Products + Prices > Customise invoice templates. Select ‘Edit’ again the relevant templates and deselect ‘Add to QTime’. This will stop the items defaulting to ARM.
Generate invoice
- Select ‘Save + generate invoice/s’
A note with time stamp will generate and the schedule will be locked.

Generate timesheet
- Select ‘Save + generate timesheet’
A note with time stamp will generate and the schedule will be locked.

On time sheet approval invoices will generate as per standard PocketWatch process.
NB: QTime timesheets can only be approved by managers for the staff member that created the timesheet + must have the ‘Create + edit timesheets (direct reports)’ permission enabled.

When the timesheet generated for a QTime schedule has been approved the schedule is disabled and cannot be modified. A timesheet can be modified if the permission ‘Edit Qtime schedule’ is enabled and the timesheet is still awaiting approval. QTime timesheets + allowances are included in the timesheet report.
Copy QTime schedule
- Select ‘Copy’
- Make relevant updates
- Select ‘Save’

Create QTime schedule for other staff member
- Choose the staff member from the drop-down list on mySHIFTS page
Create QTime schedule in retrospect
- Create from the retrospect date via rosters
Generate QTime report
- Select PocketWatch > Reports
- Select ‘QTime Report’ from the drop-down menu