Administer invoice to NDIA
To create an invoice to NDIA:
- Select the ‘Invoice to NDIA’ tab
- Select ‘Create’
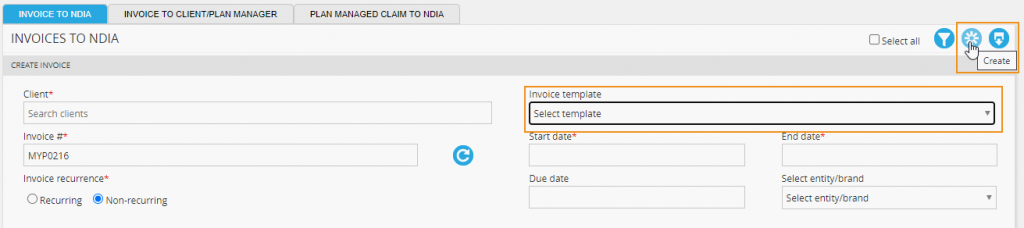
- Search for the client
- Choose invoice templates
NB: Invoice templates are created in ARM. Please refer to ‘Customise products, prices + invoicing‘ for further details.
- Enter invoice number
- Select Start + end period
- Select ‘Recurring’ or ‘Non-recurring’ to invoice recurrence
- If recurring, choose the frequency – daily, weekly, fortnightly, monthly or yearly
- Select the start date for the recurrence
- Select the end date for the recurrence, if applicable
NB: When you set-up recurring invoices with a monthly recurrence, the start date is the date you want the recurrence to start from. If the recurrence was originally set-up before the 31st of May as a monthly recurrence, the next invoice will have generated 30 days later on the 30th of June. The original invoice will then have been set to ‘Non-recurring’, with the new invoice being the new relay date. The next invoice will then recur 30 days from 30th of June, i.e. recurring on the 30th of July.
NB: Recurring invoices will continue recurring up until the plan end date (unless a specific end date has been specified). Past the end date, all recurring invoices for the client will stop. Once a plan is renewed, the recurring invoices can be recreated for the new plan period.
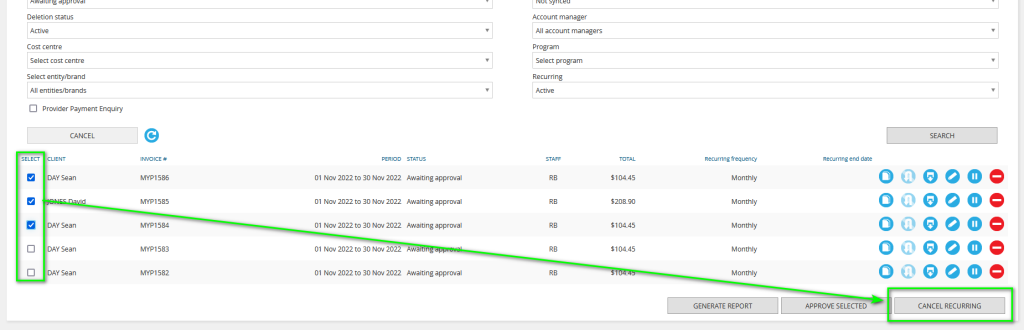
To cancel a recurring invoice, filter for the recurring invoices in the ‘Recurring status’ filter and select the relevant invoices. Click ‘Cancel recurring’ to stop the recurrence.
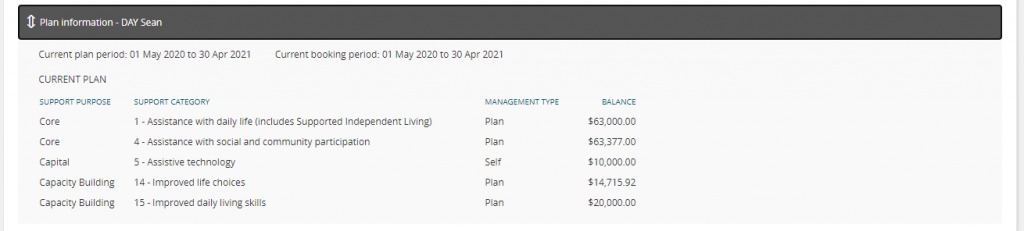
To review plan information for a client, select the plan information tab.
To add line items:
- Select a price book from drop-down
- Enter product/code
- Enter quantity
- Update tax rate
NB: Tax codes can’t be customised in MYP. The default tax codes used are:
- GST free income
- GST on income
- GST free exports
- BAS excluded
The default for all NDIS line-items is GST Free income. You can change the default tax code through ARM Pro > Customisation > Products + prices > Customise invoice settings. This will then update any new products created in ARM Pro to use this tax code when used on invoices.
- Add any additional notes
- Cost centre will pre-populate from client schedule of support
- To add additional line items, select ‘Create’

Once an invoice has been created, the following options are available:
- Copy invoice
- Resubmit invoice
- Download invoice
- Edit invoice
- Remove invoice
- Hold invoice
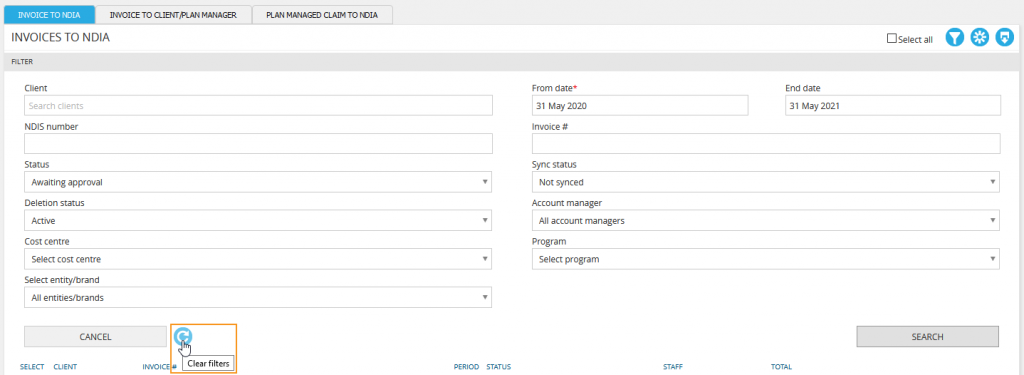
To filter invoices to NDIA, select the filter icon.
Options include:
- Client
- From date
- End date
- NDIS number
- Invoice #
- Status
- All
- Awaiting approval
- On hold
- Sync status
- Deletion status
- Account manager
- Cost centre
- Program
- Select entity/brand
- To clear the filter, select the clear filter icon
To download previous bulk uploads:
- Select ‘Download last 20 bulk uploads’ icon
- Review list of previous bulk uploads and click on the relevant file to download

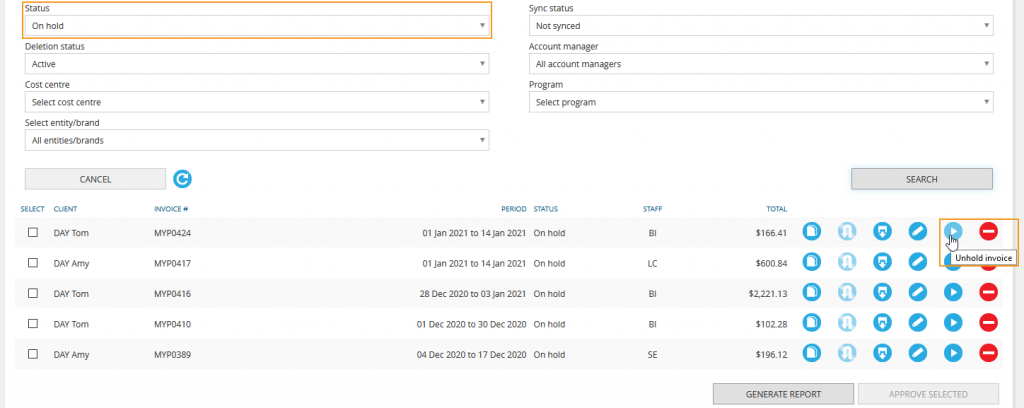
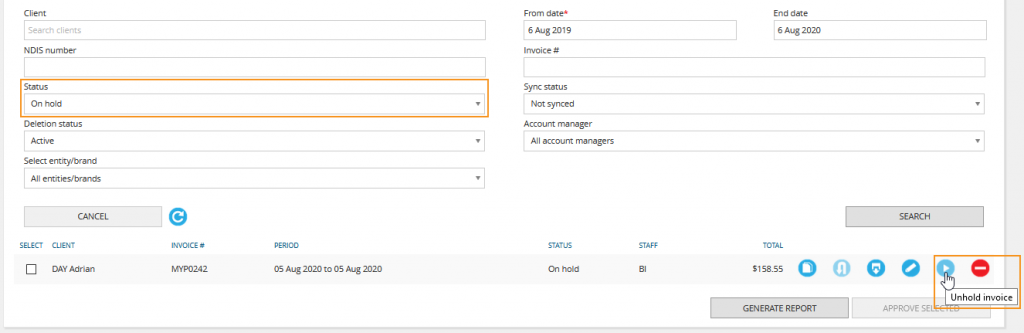
To remove a hold from an invoice:
- Select ‘Filter’
- Choose ‘On hold’
- Select ‘SEARCH’
- Choose the relevant invoice
- Select ‘Unhold invoice’
To bulk send invoices :
A send bulk email icon will be enabled when multiple invoice/s are selected, It will stay visible but disabled. Clicking on this button will follow the logic given below to determine who to send the email to:
- If client has a plan manager, then the invoice will be sent to the plan manager’s email.
- If a client does not have a plan manager (but has a representative), then all non-NDIS invoices will be sent to the representative.
- If a client does not have a plan manager (but has a representative), all NDIS invoices will be sent to the representative.
- If a client does not have a plan manager or a representative (they are self-managed), all invoices (both NDIS + non-NDIS) will be sent to the client.
To resubmit claims:
Invoices to NDIA and Plan Managed Claims can be resubmitted at the ‘NDIA claimed’ and ‘NDIA reconciled’ stage. When clicking ‘Resubmit’, a pop-up will appear asking if you would like to resubmit ‘all’ or ‘gap’ and if you have permissions to delete the original invoice/claim.
- Select the ‘Resubmit’ icon. This icon will stay greyed out.

Clicking ‘resubmit’ open a popup with options:
- Resubmit gap – this is the current functionality, where we only include line items that have a gap.
- Resubmit – create a new copy at awaiting approval stage. The existing claim remains unchanged.
- Cancel and resubmit – delete the existing claim, create a new copy at awaiting approval stage

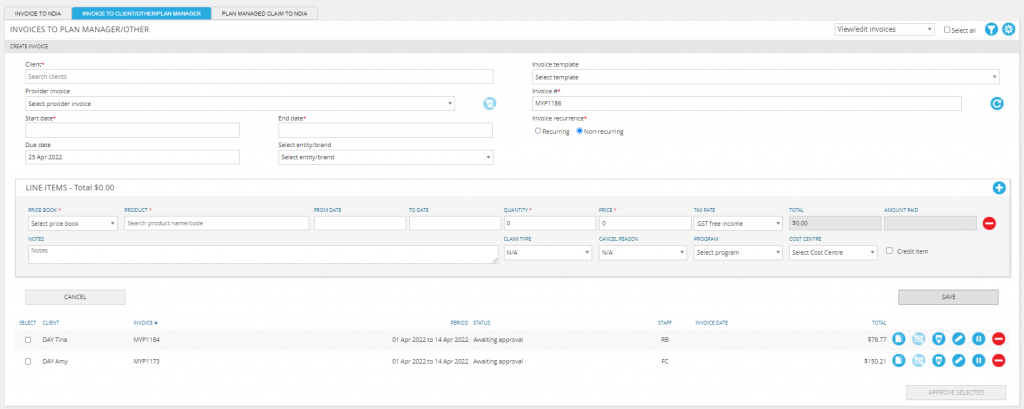
Administer invoices to client/other/plan manager
To create an invoice to a client/other/plan manager:
- Select the ‘Invoice to client/other/plan manager’ tab
- Select ‘Create’

- Search for the client
- Choose Invoice templates
NB: Invoice templates are created in ARM. Please refer to ‘Customise products + prices‘ for further details.
To review plan information for a client, select plan information:
- Enter invoice number
- Select start + end period
- Select ‘Recurring’ or ‘Non-recurring’ to invoice recurrence
- If recurring, choose the frequency – daily, weekly, fortnightly, monthly or yearly
- Select the start date for the recurrence
- Select the end date for the recurrence, if applicable
NB: When you set-up recurring invoices with a monthly recurrence, the start date is the date you want the recurrence to start from. If the recurrence was originally set-up before the 31st of May as a monthly recurrence, the next invoice will have generated 30 days later on the 30th of June. The original invoice will then have been set to ‘Non-recurring’, with the new invoice being the new relay date. The next invoice will then recur 30 days from 30th of June, i.e. recurring on the 30th of July.
NB: Recurring invoices will continue recurring up until the plan end date (unless a specific end date has been specified). Past the end date, all recurring invoices for the client will stop. Once a plan is renewed, the recurring invoices can be recreated for the new plan period.
To add line items:
- Select a price book from drop-down
- Enter product/code
- Enter quantity
- Update tax rate
- Add any additional notes
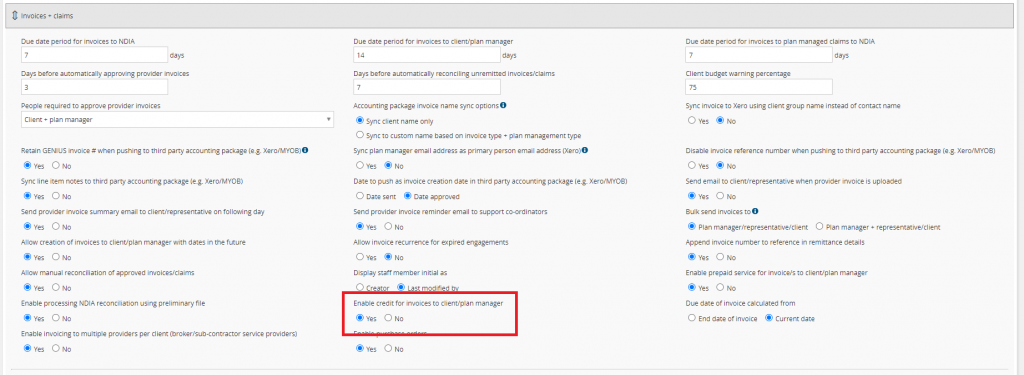
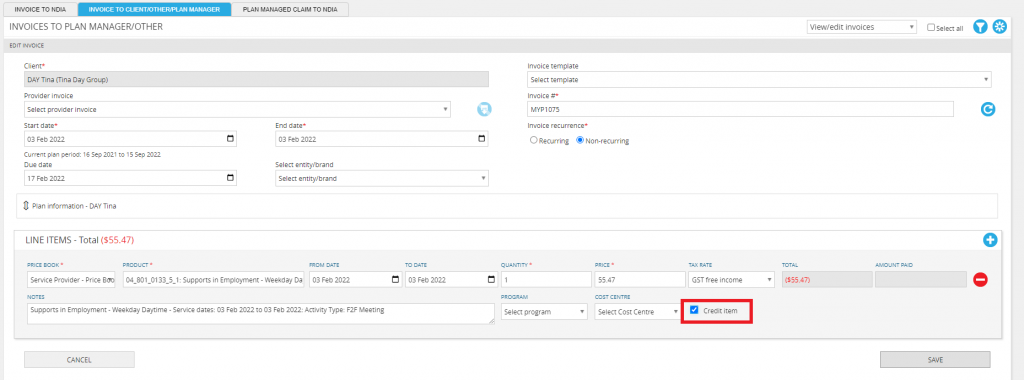
- If client has a credit, select ‘Credit item’ to omit item cost being deducted from the participant’s budget
- This does require the ‘Enable credit for invoices to client/other/plan manager’ setting enabled in GENIUS > Settings with the ‘Administer credit invoices’ permission enabled for the staff member
- To add additional line items, select ‘Create’

Once an invoice has been created, the following options are available:
- Copy invoice
- Send invoice
- Download invoice
- Edit invoice
- Hold invoice
- Remove invoice
NB: Invoices emailed to plan managers create a history note in the plan manager’s client history panel.
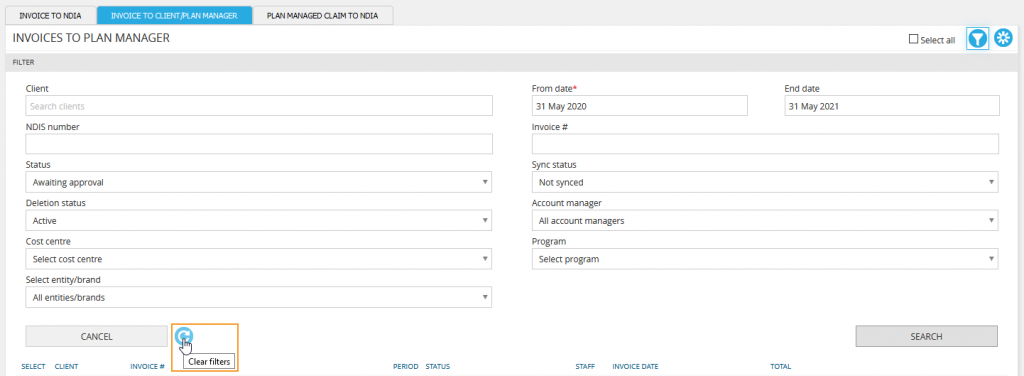
To filter invoices to client/other/plan manager select the filter icon.
Options include:
- Client
- From date
- End date
- NDIS number
- Invoice #
- Status
- All
- Awaiting approval
- On hold
- Sync status
- Deletion status
- Account manager
- Cost centre
- Program
- Select entity/brands
To clear the filter, select the clear filter icon.
To remove a hold from an invoice:
- Select ‘Filter’
- Choose ‘On hold’
- Select ‘SEARCH’
- Choose the relevant invoice
- Select ‘Unhold invoice’
To view removed Invoices/Claims, use the deletion status filter.
Administer credit invoices to client/other/plan manager
In some situations, you may need to provide a credit to a client/other/plan manager for services provided. To enable credit invoices, staff require the permission to Administer credit invoices.
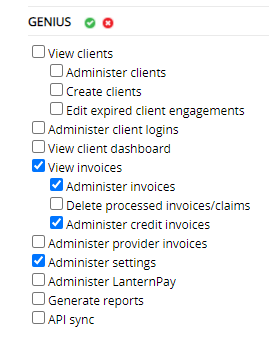
Once this permission is given, staff with permission administer settings can enable credit invoices through GENIUS Settings.
When credit invoices have been enabled, staff with permission to administer credit invoices will have the option to select ‘Credit invoice’ when creating and issuing an invoice as per Administer invoices to client/other/plan manager.
A credit invoice will return spent funding to a client’s budget and provide an audit trail of credits provided.
Administer invoices for plan managed claims to NDIA
To create an invoice for plan managed claims to NDIA, a provider invoice must first be uploaded.
Administer provider invoices
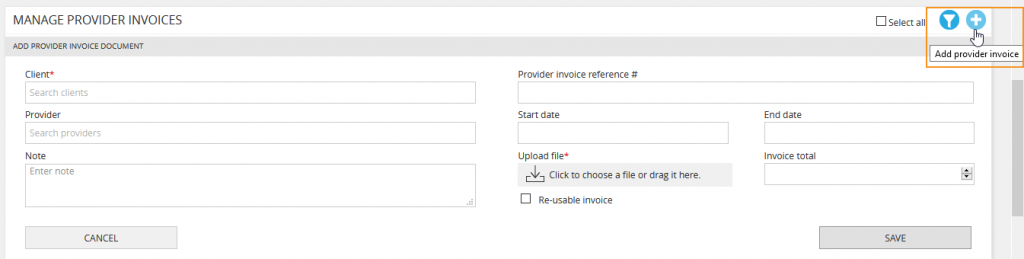
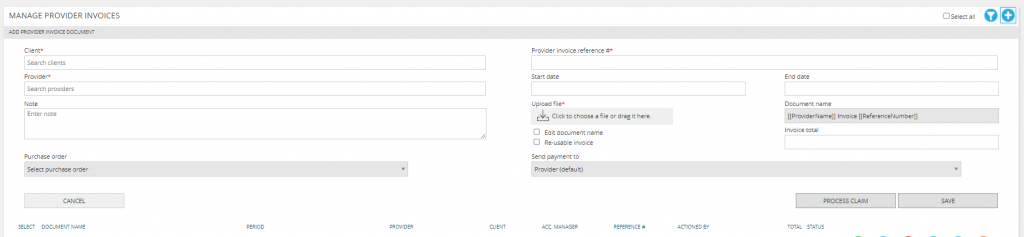
To add a provider invoice:
- Navigate to the ‘MANAGE PROVIDER INVOICES’ panel at the bottom of the main GENIUS dashboard
- Select ‘Add provider invoice’
- Search for the client
- Search for the provider
- Enter the provider invoice number
- Upload the provider invoice
- Enter the start + end dates
- Enter the invoice total
- Enter any relevant notes
- Select ‘SAVE’
Once an invoice has been uploaded you can:
- Approve the invoice
- Place the invoice on hold
- Delete an invoice
- View an invoice (PDF only)
- Download an invoice
- Archive an invoice
- Add notes to an invoice
To place an invoice on hold:
- Select ‘Hold invoice’
- Enter reason for the hold
- Select ‘Confirm’
NB: Only invoices that have not been approved can be placed on hold.
Create plan managed claim to NDIA
To create a claim:
- Select the ‘PLAN MANAGED CLAIM TO NDIA’ tab
- Select ‘Create’

- Select the provider invoice from the drop down
NB: By clicking on the ‘View invoice’ button you can view a pop-up preview for PDF provider invoices. This allows you to instantly view the file without having to download it to your computer as well as being able to print directly from the pop-up. This is only available for provider invoices that have been uploaded as a .pdf file.
NB: By clicking on the ‘Filter’ button you can narrow down the invoices in the ‘Provider invoice’ drop-down based on the account manager.

- Search for the client
- Search for the provider
- Enter provider invoice number
- Select invoice template if applicable. Invoice templates allow you to pre-fill the line items. They can be created via ARM > Customisation > Products + prices > Customise invoice templates
- Enter claim number (This cannot be the same number as the Invoice Number)
- Select start + end period
- Enter due date for Xero Clients (MYOB clients should leave this field blank). These due dates can be preset within the invoice + claims settings
- If no ABN is found for the provider, the ABN exclusion reason will default to ‘EXCLS: ATO Excluded Supply’. If an ABN is needed, edit the provider in ARM to include the ABN (Refer to ‘Add provider ABN‘).
- If the claim is a reimbursement for a participant, select ‘Send payment to client’. The ABN exclusion reason will default to ‘REIMB: Participant Reimbursement’.
- Any errors that prevent a user from approving an invoice/claim will be shown as a warning when saving the invoice/claim when it is in the ‘Awaiting approval’ stage.
- To avoid claiming the same invoice sent multiple times from a client or provider, you will receive a warning if the provider invoice reference # is already linked to a claim.
NB: If you have accidentally approved a claim, you can ‘Unapprove’ before they are claimed.
To add invoice documents:
NB: Claim must be saved before documents can be added.
To review plan information for a client, select plan information:
To add line items:
- Select a price book from drop-down
- Enter product/code
- Enter quantity
- Update tax rate
- Add any additional notes
- To add additional line items, select ‘Create’
To enter notes:
- Select ‘Notes’
- Select ‘Add notes’

To view or print invoices:
- Select ‘Invoice’
- Select ‘Print’

Once an invoice has been created, the following options are available:
- Copy invoice
- Resubmit invoice
- Download invoice
- Edit invoice
- Hold invoice
- Remove invoice
To edit a claim:
- Select ‘Edit’
- Make any relevant changes
- Select ‘SAVE’
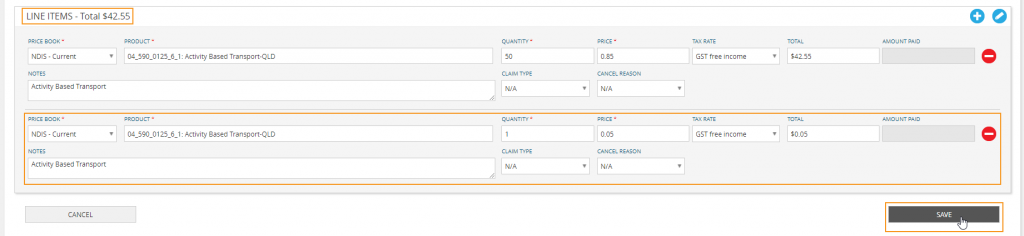
To edit the total of a line item within a claim (to adjust rounding differences):
- Select ‘Edit total’ to active the TOTAL field

- Make any adjustments needed to the total amount. The gap amount will appear in red next to the total.
- Select ‘Add gap line item’ to add the gap to the invoice. This will update the total to include the gap.

To remove a hold from a claim:
- Select ‘Filter’
- Choose ‘On hold’
- Select ‘SEARCH’
- Choose the relevant invoice
- Select ‘Unhold invoice’
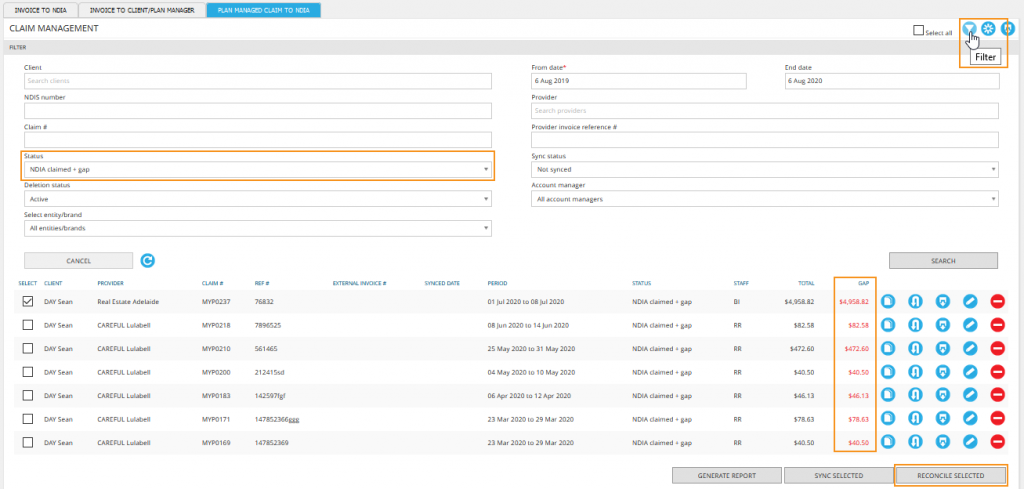
- Invoices to NDIA and plan managed claims that have a ‘NDIA claimed + gap’ status can be manually set to ‘NDIA reconciled’. Select the gap invoice/claims to be reconciled and click the ‘Reconcile Selected’ button.
To filter invoices for plan managed claim to NDIA, select the filter icon.
Options include:
- Client
- From + End Date
- Invoice #
- NDIS Number
- Provider
- Claim#
- Provider invoice reference #
- Status
- All
- Awaiting approval
- On hold
- An info button in the status column will display the reason for a rejected invoice
- Sync status
- Deletion status
- Account Manager
- Select entity/brands
To clear the filter, select the clear filter icon.
Manually reconcile invoices
There are four ways you can reconcile invoices:
- You can upload the remittance advice from the NDIA which will automatically reconcile any GENIUS invoices that have been uploaded in bulk to the NDIA.
- If the NDIA has not provided a remittance advice, you can download the remittance template by clicking GENERATE REPORT > Download .csv template. Complete the template with the necessary details and then upload it under the ‘NDIA Reconciliation Report’ option in ‘Generate report’ pop-up.
Invoices that are in the ‘NDIA claimed + gap’ status can be reconciled in the below two scenarios:
- Manually mark it as ‘NDIA reconciled’ using the ‘Write off invoice gap’ button. This feature should only be used when the gap payment in the invoice is to be written off, because it will only reconcile the amount actually paid by the NDIA. For example, if a $100 invoice is in the ‘NDIA claimed + gap’ status and only $50 is paid by NDIA, the invoice will be marked as ‘NDIA Reconciled’ with only $50 payment.
- Resubmit the gap amount either by full amount or the gap amount.
NB: Before resubmitting, we always recommend you to confirm that a reconciliation process using a remittance file is completed. When resubmitting the full amount, you have the option to delete the original invoice right away on the pop-up. When resubmitting the gap amount, however, please do not delete the original invoice. Instead, use the ‘Write off invoice gap’ button to write off the original gap (which has become $0 after the gap resubmission).
- ‘Approved’ invoices that have been directly claimed from the portal, or have been already been paid by the client/other/plan manager instead of being processed via GENIUS, can be manually reconciled without generating a bulk upload file:
- Temporarily enable the setting in GENIUS > Settings > Invoices + claims > Allow manual reconciliation for approved invoices/claims.
- Identify the approve invoice/claim using the filter > Select the applicable invoices and select ‘RECONCILE SELECTED’.
- Disable the setting in GENIUS > Settings > Invoices + claims > Allow manual reconciliation for approved invoices/claims.
Administer invoices out of engagement
Invoices to NDIA, invoices to client/other/plan manager and plan managed claims can now be saved in the ‘Awaiting approval’ stage even if the client does not have a current engagement. These invoices will not be able to be approved but you can create/edit them as necessary and approve them when the client’s plan has been renewed. Schedule of support items from expired engagements can also now be used in PocketWatch. The option to place an invoice on hold can be applied by selecting the hold icon.
Administer invoices + claims processed in error
If you have made a claim in error, staff with the permission to ‘Delete processed invoices/claims’ can delete the claim made. Prior to any invoice being deleted, staff must enter a reason for why they are deleting the invoice. These notes are stored in the client’s history in ARM Pro.
To delete an erroneous claim:
- Navigate to ‘NDIA Claimed’
- Delete claim
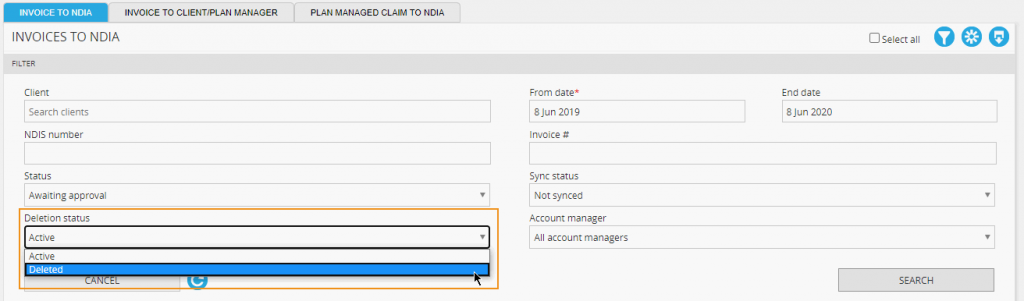
Deleted claims can be reviewed by applying filters:
- Filter by Status
- Select ‘Deleted’ from the ‘Deletion Status’ drop-down
- Select ‘SEARCH’
This will show claims which have been deleted.
Administer purchase orders
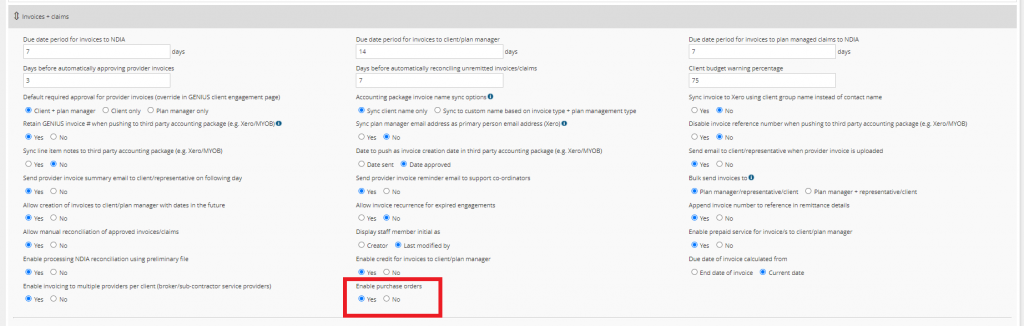
Purchase orders are used by some organisations to track purchases made from other providers on the behalf of a client. To enable purchase orders:
- Navigate to GENIUS Settings
- Select ‘Invoices + Claims’
- Enable purchase orders
When purchase orders have been enabled, users with permission to administer purchase orders can create, view and approve purchase orders through the Invoice to client/other/plan manager tab.
To create a purchase order:
- Select ‘View/Edit purchase orders’ in the Invoice to Client/other/plan manager tab
- Select ‘Create purchase order’ and complete the details of the order
The purchase order will be created as a draft. Click ‘Send’ to issue the purchase order to the nominated provider.
When a purchase order has been fulfilled, it can be claimed and reconciled through GENIUS in the manage provider invoice panel.
- Select ‘Upload purchase order’ and upload the provider invoice
- Select ‘Create invoice’ in Invoice to client/other/plan manager and choose the provider invoice uploaded in the previous step
- Approve, send and reconcile the invoice following the steps outlined in ‘Administer invoices to client/other/plan manager’