If you are a Plan Manager using HICAPS for the processing of claims, the workflow is as follows:
- Upload your provider invoice via the ‘Plan Managed Claim to NDIA’ panel by clicking the ‘Create claim’ icon
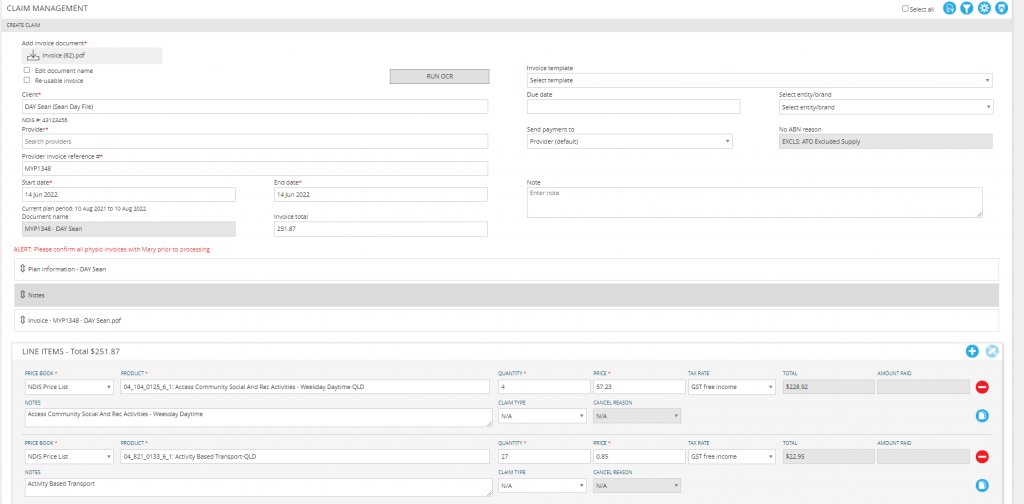
- Select ‘Add invoice document’ then click ‘Run OCR’
- Confirm that all client and provider details are correct
- If no ABN is found for the provider, the ABN exclusion reason will default to ‘EXCLS: ATO Excluded Supply’. If an ABN is needed, edit the provider in ARM to include the ABN (Refer to ‘Add provider ABN‘)
- Please note: If OCR is unable to locate an ABN in MYP or unable to read an ABN on an invoice, it will not choose a Service Provider Name for the claim
- If the claim is a reimbursement for a participant, select ‘Send payment to client’. The ABN exclusion reason will default to ‘REIMB: Participant Reimbursement’.

- Enter any claim notes if applicable
- Confirm all relevant line-items have populated
- Plan information can be viewed by clicking the Plan Information expandable panel
- PDF invoices can be viewed immediately by clicking the Invoice expandable panel
- Amend any incorrect claim details, e.g. line-item codes, item quantities or dates if required
Once all claim details have been entered, you can either Save + Hold a claim for future review or Save + Approve to proceed with the claim.
- Clicking Save + Hold will provide the option to either on hold as draft for further amendments (e.g., after confirming details with provider) or hold for plan manager (e.g., invoice uploaded by administration assistant for second approval by plan manager)
- Claims can be placed on hold and are not available for processing until after the hold is removed.
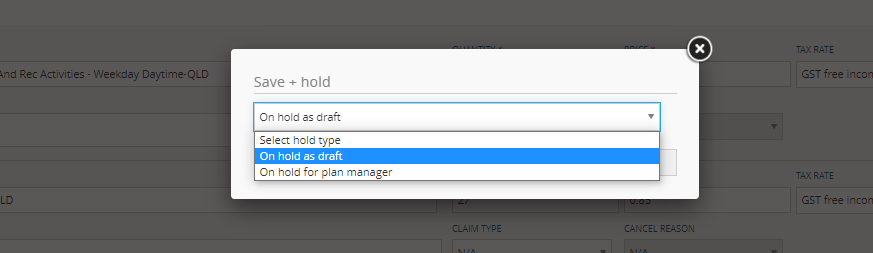
NB: To remove a claim from hold, filter to the invoice status ‘On hold as draft’ or ‘On hold for plan manager’ and process the claim by either approving or deleting it.
- Clicking Save + Approve will submit the claim to HICAPS
- The exception to this is if the client is required to required to approve the claim, in which case the claim won’t be submitted until the client approves the claim
NB: If you have enabled client approval of provider invoices via GENIUS > Settings, the claim will default to ‘Awaiting client approval’. This can still be approved by you as the plan manager on their behalf by changing the invoice status filter to ‘Awaiting client approval’.
Invoice and Claim statuses
Once the claim is created, it will progress through the filter statuses as follows:
- Status – Awaiting client approval
- Claim has been made where client approval is required for invoice to be processed
- Claim will move to ‘Approved’ when client approval is received
- Status – Awaiting client and plan manager approval
- Claim has been made where client and plan manager approval is required
- Plan managers can approve the claim from this status to move the claim to Invoice status – Awaiting client approval
- If client approval is not required, the claim will move to Invoice Status – Awaiting plan manager approval
- Status – Awaiting plan manager approval
- Claim has been made and requires plan manager approval
- Claim will move to ‘Approved’ and submit to HICAPS submission when approved
- Status – On hold by client
- Client has put a claim on hold from their online dashboard
- Plan manager can remove a hold and approve the claim from this status
- Status – On hold for Plan Manager
- Plan manager can remove a hold and approve the claim from this status
- Status – On hold as draft
- Plan manager can edit the claim in this status and either approve the claim or keep it on hold
- Status – Client Rejected
- Claim has been rejected by the client. A rejection reason will be captured in the claim notes.
- Status – Not Ready for Claim
- This means that the invoice has been approved by all relevant parties but is pending the next pickup by HICAPS for submission
- To do this, the Plan Manager should select the claim and Approve.
- Status – Approved
- A claim in this status means it has not been picked up by HICAPS. This could be caused by the participant not being connected to HICAPS.
- Un-Approve the claim (it will return to the Not Ready for Claim status) and then go to GENIUS > Settings > HICAPS > Subscribe to HICAPS to onboard the client.
- Once successfully synced, return to the claim panel and locate the claim in Not Ready for Claim. Open to edit and then Approve the claim.
- Status – Submitted to HICAPS
- HICAPS have received your claim and is currently submitting it to the NDIA
- Status – NDIA Claimed
- HICAPS has successfully submitted your claim to the NDIA
- Status – NDIA Reconciled
- HICAPS has successfully claimed and received confirmation of payment for your claim
- Payment to providers will be made within the next 48 hours
- Status – NDIA Claimed + Partly Paid
- HICAPS has successfully claimed to NDIA but have only received a partial payment
- Claims can be resubmitted from this status by selecting the ‘Resubmit’ icon
- Resubmitting a claim will create a new claim, starting the process over, for either the full or outstanding gap amount.
- Status – NDIA cancellation requested
- If a claim has been made in error, a cancellation request can be sent to HICAPS by locating the claim and selecting the ‘Cancel Claim’ button.
- A claim not eligible for cancellation will have a greyed-out cancellation icon
- Cancelling a claim will send a cancellation request through to HICAPS and cancellations will be processed within 48 hours. HICAPS will confirm if the cancellation was successful.
- A claim cancellation request will be available Status – NDIA cancellation requested
- Status – NDIA cancelled
- Once the claim is cancelled, it will be available in Status – NDIA Cancelled
- Status – NDIA rejected
- Claims rejected by the NDIA will return to Status – NDIA rejected.
- These will need to be reviewed and actioned accordingly by the Plan Manager.
Cancelling a claim
If a claim has been made in error, a cancellation request can be sent to HICAPS:
- Filter for your claim using the Status drop down. You may want to target the search by adding a client and provider.
- Open the submenu using the three dot icon.
- Select ‘Cancel claim’
- A claim not eligible for cancellation will have a greyed-out cancellation icon
- Cancelling a claim will send a cancellation request through to HICAPS and cancellations will be processed within 48 hours
- A claim cancellation request will be available in Status – NDIA Cancellation Requested
- Once the claim is cancelled, it will be available for viewing in Status – NDIA cancelled

There will not be cut-off times for funding decisions to be made by NDIA, as this is processed in real time. However, HICAPS still has a settlement cut-off time (4pm Sydney time) to schedule provider payments. Please thoroughly consider the below 4 scenarios before using the cancellation button:
- ‘NDIA reconciled’ in GENIUS, but LP has not attempted to pay the provider (before the settlement cut-off time)
- Use the cancel button in GENIUS, so PRODA can process the cancellation immediately, before LP schedules provider payment. Please do not process a refund in PRODA manually.
- ‘NDIA reconciled’ in GENIUS, but LP has scheduled to pay the provider next day (after the settlement cut-off time)
- Wait for the provider to be paid, then request a full refund from the provider. Once the refund is received, use the cancel button in GENIUS. Please do not process a refund in PRODA manually.
- ‘NDIA reconciled’ in GENIUS, and the provider has been paid by LP.
- Request a full refund from the provider first. Once the refund is recieved, use the cancel button in GENIUS. Please do not process a refund in PRODA manually.
- Cancel partial claim: Request a full refund from the provider first. Once the full refund is recieved, use the cancel button in GENIUS. Please do not process a refund in PRODA manually. Then resubmit the correct amount.
NDIA Claimed + Partly paid
If a claim has been returned as partially paid, it can be resubmitted by opening the submenu and clicking the resubmit icon:

- Filter Status – NDIA Claimed + Partly paid
- Select the resubmit icon and choose whether to resubmit all or gap only
- Resubmitting all will recreate the claim for the total amount on the claim
- Resubmitting the gap only will recreate the claim with only the outstanding gap amounts
- Complete the relevant amendments to progress the claim
- Click Save + Approve to complete the resubmission
- HICAPS will receive the new claim as per the new claims process
- Return to the claim and select it, this will enable the “Write Off Invoice Gap” button. Click this to finalise the claiming process and remove the claim from the “NDIA Claimed + Partly Paid” status.
NDIA Rejected
Claims rejected by the NDIA will return to Status – NDIA Rejected
- Filter for claims using the Status – NDIA Rejected
- Click ‘Edit’ to review the rejection reason. If it has been rejected by the NDIA, there will be a reason displayed in red in the affected line item.
- Action accordingly and then select ‘Resubmit’ to resubmit the claim following the resubmit claim process steps
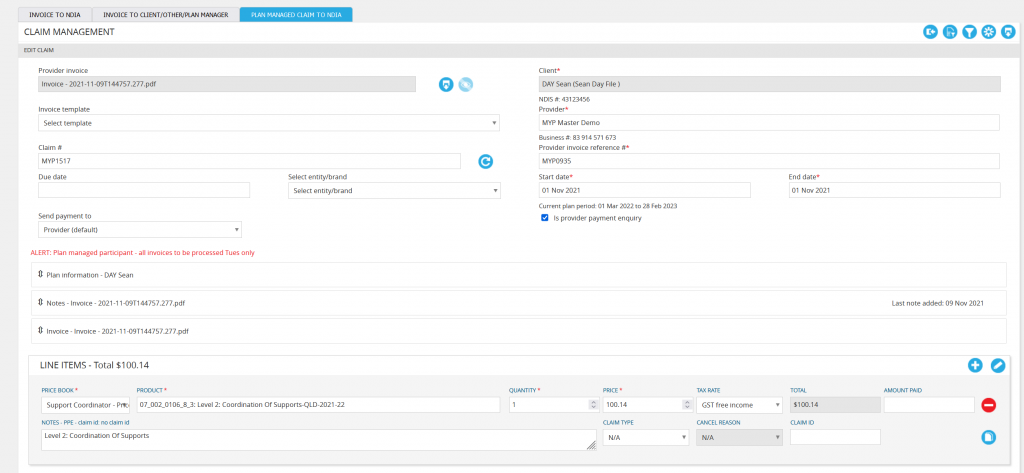
Provider Payment Enquiry (PPE)
Provider Payment Enquiries (PPE) can be made through GENIUS. To create an enquiry:
- In Plan Managed Claim to NDIA, select ‘Create Claim’
- Select ‘Is provider payment enquiry’. Two new fields will display
- Enter all relevant claim details except for Claim ID + Paid amount
- Click Save
To record that a PPE has been lodged with PRODA:
- Make your claims in PRODA
- When you have a claim ID, select the filter icon and choose ‘Provider Payment Enquiry’
- Select ‘Search’. Your enquiry will be displayed
- Edit the enquiry and enter in the claim ID
When payment is made, repeat above steps but this time enter the amount paid.
- In Plan Managed Claim to NDIA, select ‘Create Claim’
- Select ‘Is provider payment enquiry’.
- Enter all relevant details except for Claim ID + Amount paid
- Click Save + Hold to save it as draft
- Make your claim in PRODA
- When you have a claim ID, select the filter icon and choose ‘Provider Payment Enquiry’
- Select ‘Search’. Your enquiry will be displayed
- Edit the enquiry and enter in the claim ID
- Click Save + Hold to save it as draft.
When payment is made, edit the query and enter the amount paid > Save > Approve.