PocketWatch has a series of settings and categories that are applied throughout in relation to:
- Global
- Allowances
- Attributes
- Availability
- Award rules
- Cost centres
- Custom field
- Employment Hero
- formSPACE
- GENIUS
- Notifications
- Pay periods
- Pay rates
- Payroll processing rules
- Positions
- Public holidays
- QTime
- Rosters
- Send client logins
- Shift cancellation reason
- Shift tags
- Simple check in/check out
- Sleepover shifts
- Tasks
- Timesheets
Enter times
It is possible to enter times in PocketWatch other than the options shown in the drop-down menu.
Inputs the textbox can take and auto formatting is as follows.
| Input |
Output |
| 1234a |
12:34am |
| 1234p |
12:34pm |
| 456 |
04:56am |
| 1656 |
04:56pm |
| 1:1 P |
1:10pm |
| 1:9 A |
1:09am |
| 8:59 |
8:59am |
| 12030 |
1:20:30am |
NB: Select enter after adding the text.
Access global settings
To access ‘Global’ settings:
- Select PocketWatch > Settings from the side navigation menu
- Select ‘Global’
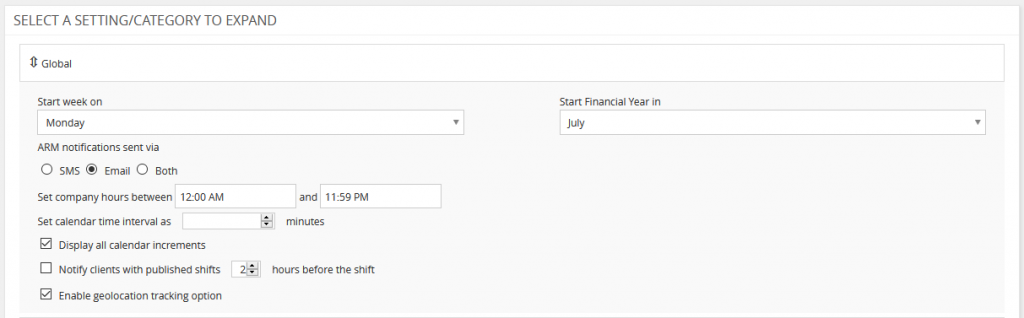
- Select week start from the drop-down – this will set the calendar to start at this day
- Select start financial year from the drop-down
- Select ARM notifications sent via
- Set company hours between ‘x’ and ‘x’
- Set calendar time interval as ‘x’ minutes
- Select to display all calendar increments – will display the calendar in 30 minute increments instead of 1 hour
- Select to notify clients with published shifts ‘x’ hours before shift
- Select to enable geolocation tracking option
- Select ‘Save’
Utilising SMS functionality (AU Only)
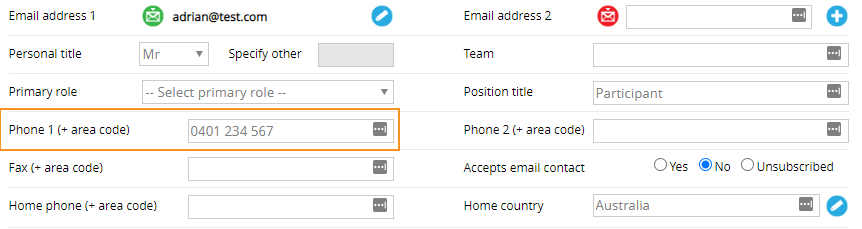
The subscriber is charged $0.09 + GST per 1 SMS. The cost of an SMS is dependent on the length of message. DO NOT REPLY messages are sent via +6181073966. Messages requiring a response are sent via +61481073999, and, (unless there have been multiple requests) messages are received on the number set in ARM at ‘Phone 1’. If an Australian mobile format is not found, no SMS will be sent.
NB: A report on SMS usage can be found in ARM under ‘Reports’.
SMS messages are as follows:
You have been added to the following shift:
Start: xStartx
End: xEndx
Roster: xRosterx
Position: xPositionx
Client/s: xClientsx
Address: xAddressx
The following shift has been cancelled:
Start: xStartx
End: xEndx
Roster: xRosterx
Position: xPositionx
Client/s: xClientsx
Address: xAddressx
The following shift has been published:
Start: xStartx
End: xEndx
Roster: xRosterx
Position: xPositionx
Client/s: xClientsx
Address: xAddressx
This shift has already been filled:
Shift details (filled):
Start: xStartx
End: xEndx
Shift notification:
Start: xStartx
End: xEndx
Roster: xRosterx
Position: xPositionx
Client/s: xClientsx
Address: xAddressx
You have been requested for the following shift:
Start: xStartx
End: xEndx
Roster: xRosterx
Position: xPositionx
Client/s: xClientsx
Address: xAddressx
Reply to accept.
NB: Replying will assign the staff member to a shift automatically and give them a notification if they have been assigned or the shift is already full. There is no option to reply No or to receive a response in return.
The following shift has been unpublished:
Start: xStartx
End: xEndx
Roster: xRosterx
Position: xPositionx
Client/s: xClientsx
Address: xAddressx
Staff xStaffNamex has been added to the following shift with warnings.
Warnings: xWarningsx
Shift details:
Start: xStartx
End: xEndx
Roster: xRosterx
Position: xPositionx
Client/s: xClientsx
Address: xAddressx
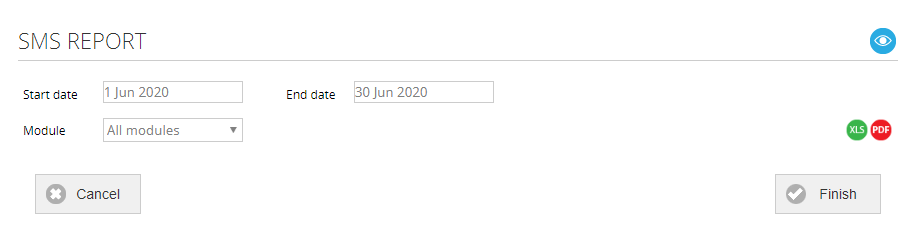
Generate SMS Report (ARM and ARM Pro only)
The SMS Report is for billing purposes only and is a record of sent SMS.
To access ‘SMS Report’:
- Select ‘Reports’
- Select ‘SMS Report’
- Select start + end date
- Select ‘PocketWatch’ from the drop-down
NB: The SMS Report will not appear unless an SMS has been sent.
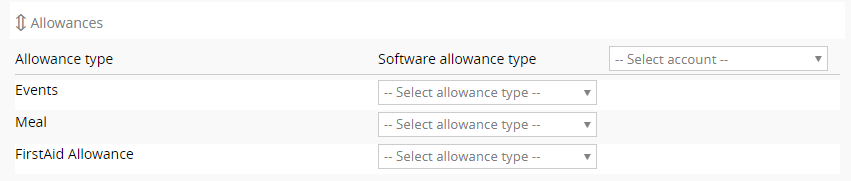
Access allowances settings
To access ‘Allowances’ settings:
- Select PocketWatch > Settings from the side navigation menu
- Select ‘Allowances’
- Enter appropriate name to rename kilometre allowances
- Select ‘Default kilometre allowance’ category from the drop-down
- Enter claim units
- Enter maximum number for total claim per shift/QTime entry
- Enter required number for reimbursement per unit (KM, etc.)
- Select ‘Allowances can be added to a checked out shift’ if applicable
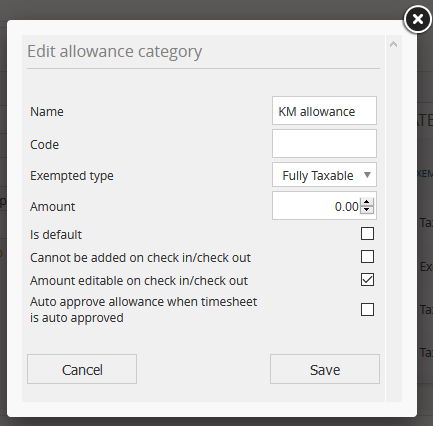
To create a new allowance categories:
- Select ‘Create’
- Enter ‘Name’
- Enter ‘Code’
- Enter ‘Exemption type’
- Enter ‘Amount’
- Mark any of the following if relevant
- Is default
- Cannot be added on check in/check out
- Amount editable on check in/check out
- Auto approve allowance when timesheet is auto approved
- Select ‘Save’
Integrate allowances in MYOB/Xero
Subscriptions with Xero integration can synchronise allowances. Xero allowances will be synced when allowances are enabled in the sync.
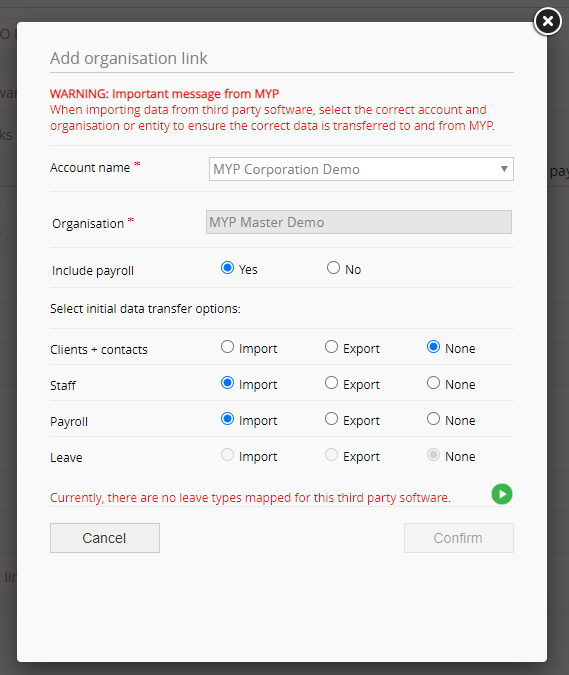
Imports defined in the API settings structure panel will be synchronised according to the mappings under the API settings allowances section.
To set up all the allowances (New Payroll Categories) in MYOB AR:
- Click Payroll categories in MYOB AR, you will then be prompted with Payroll category List
- Create new ‘Wages’ type Payroll category by clicking ‘New’ button
You will then be prompted with Wages Information window.
- Give corresponding name to the Wages Name field
- Select appropriate STP category
- Select ‘Hourly’ as ‘Type of wages’
- Select ‘Fixed hourly rate of:’ option add’$1.0000’(enter correct amount) as hourly rate
- Make sure to assign this newly created wage to all your employees
- Click on ‘Exempt’ button if this allowance is exempt from any tax deductions
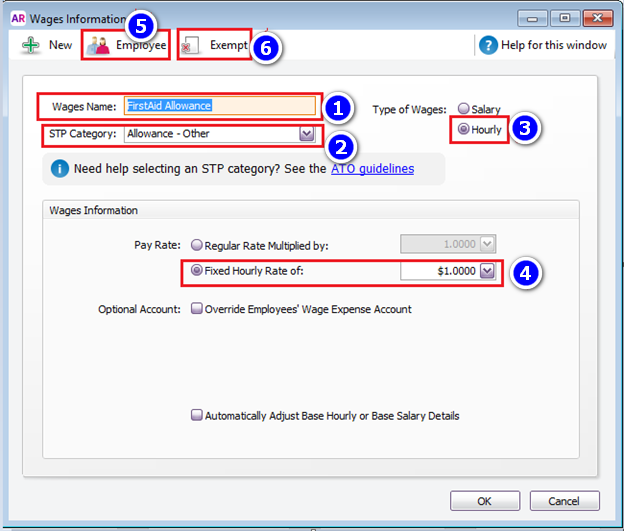
Repeat for each allowance.
To create the API for allowances:
- Select ARM > Administration > API settings
- Select ‘Allowances’
- Select account from the ‘Account drop-down’ list
- Map the PocketWatch allowance category to the MYOB payroll category
- Select ‘Save’
NB: PocketWatch Allowances will sync with timesheets each day.
Sample screenshot from MYOB with a PW allowance sync.
NB: All screenshots from MYOB are representative only and subject to change. They are provided as a guide to support your MYP implementation. It is strongly recommended you review the official documentation from MYOB.
Access attributes settings
Attributes can include any features that are requirement for rostering in a shift for example first aid certificate, manual licence, specific skills such as sign language etc. Attributes can also be applied to a contact. For example, a contact who has mobility issues may require a support worker with specific attributes.
To access ‘Attributes’ settings:
- Select PocketWatch > Settings from the side navigation menu
- Select ‘Attributes’
To create attribute:
- Select ‘Create’
- Enter the attribute name
- Select ‘Save’ in the pop-up
- Select ‘Save’
To delete attribute:
- Select ‘Delete’
- Select ‘Save’
To edit attribute:
- Select ‘Edit’
- Enter edits
- Select ‘Save’ in the pop-up
- Select ‘Save’
To add attribute to contact:
- Search the Client in ARM
- Select ‘Edit’ next to the contact
- Select ‘PocketWatch Settings’
- Select appropriate attribute
- Select ‘Save’
Access availability settings
To access ‘Avaliability’ settings:
- Select PocketWatch > Settings from the side navigation menu
- Select ‘Availability’
- Select the Availability calendar schedule
- Select ‘Save’
Access award rules settings
To access ‘Award rules’ settings:
- Select PocketWatch > Settings from the side navigation menu
- Select ‘Award rules’
- Select whether to recalculate timesheets created 48 hours prior
- This will apply to all timesheets for a particular staff member where award rule/s assigned to them have the ‘Hours to next shift’ parameter. The recalculation will affect already approved timesheets if a staff member meets the conditions for a broken shift.
- Select ‘Save’
Access cost centres settings
Cost centres are created as standard options to choose in a drop-down in the roster and timesheets page.
To access ‘Cost centres’ settings:
- Select PocketWatch > Settings from the side navigation menu
- Select ‘Cost centre’
To create cost centre:
- Select ‘Create’
- Enter the cost centre name
- Select ‘Save’ in the pop-up
- Select ‘Save’
To delete cost centres:
- Select ‘Delete’
- Select ‘Save’
To edit cost centre:
- Select ‘Edit’
- Make changes
- Select ‘Save’ in the pop-up box
- Select ‘Save’
MYOB cost centre to invoice
PocketWatch pushes the client cost centre from the timesheet to the invoice line item on approval. Also, syncing this invoice to MYOB, pushes the cost centre to MYOB invoice job number.
This requires updating the client cost centre in the PW timesheet’s time allocation section (with a MYOB job number), hours and payrate.
PW timesheet (when updated with the correct cost centre per client and approved) pushes the cost centre to the relevant invoice line item. Pushing this invoice to MYOB would also push the cost centre as ‘Job number’.
In a case where the pushed cost centre does not exist in MYOB Jobs list at the time of sync, it is ignored and the invoice is pushed without a cost centre.
Administer custom field settings
To access ‘Custom field’ settings:
- Select PocketWatch > Settings from the side navigation menu
- Select ‘Custom field’
There are two custom field options (one for the roster page and one for the shift page) that allows for the creation of customised field options.
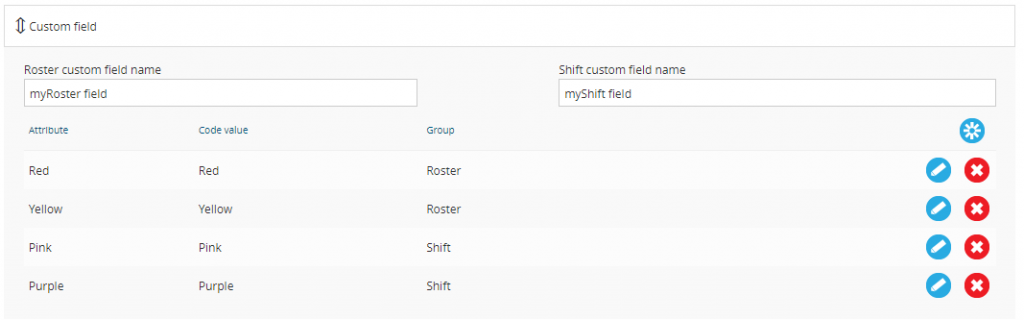
These options are then available to be chosen via the roster and /or shift pages.

Access Employment Hero settings
If you are using Employment Hero you will need to turn the “Enable work types on rosters and shifts” to on by clicking the checkbox.
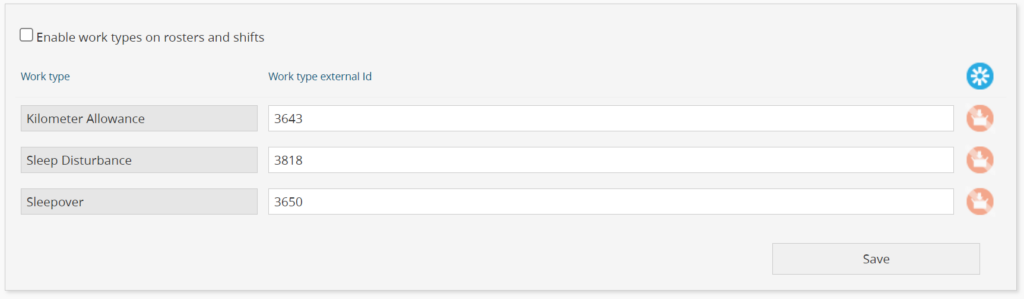
You will then be able to configure the names of the work types and the external ID for importing.
These can then be entered into template shifts and roster shifts in the deep edit function for any shift that requires a Work Type, that is not the default for that staff member.
Leave Work Types are pulled from the Leave Code set in 94six. Any Approved leave will insert what exists in the Leave Code field for that Leave type as the ‘Work Type External ID’ for EHP timesheet imports.
Access formSPACE settings
- Select PocketWatch > Settings from the side navigation menu
- Select ‘formSPACE’
When a form template has been applied to PocketWatch the following setting options can be chosen:
- Allow formSPACE forms to be created within a shift
- Allow existing formSPACE forms to be viewed within a shift
- Allow existing formSPACE forms to be viewed X hours before the shift starts
Access GENIUS settings
To access ‘GENIUS’ settings:
- Select PocketWatch > Settings from the side navigation menu
- Select ‘GENIUS’
- Set the default value of NDIS line item – Recommended value is 0
Invoices generated from PocketWatch can be consolidated in GENIUS by set rules. These are divided by PocketWatch shifts and QTime schedules.
- PocketWatch Consolidate GENIUS line item by (this affects how line items appear in the invoices upon timesheet approval)
- Product name, price + price book (default)
- Service date
- Cost centre
- Program
- Cost centre + program
- QTime Activity
- QTime Consolidate GENIUS line item by (this affects how line items appear in the invoices upon timesheet approval)
- Product name, price + price book (default)
- Service date
- Cost centre
- Activity
- Activity + service date
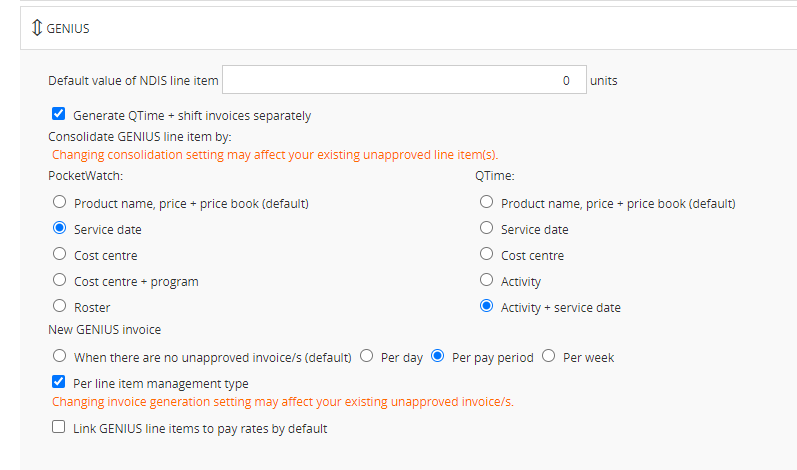
NB: Changing consolidation setting may affect your existing unapproved line item(s).
- New GENIUS invoice per
- When there are no unapproved invoice/s (default)
- Per day
- Per pay period
- Per week – this will prompt you to select which day of the week a new invoice will be generated on.
- Select whether a new invoice will be generated per line item management type – this will divide plan and self managed services into separate invoices.
NB: Changing consolidation setting may affect your existing unapproved invoice(s).
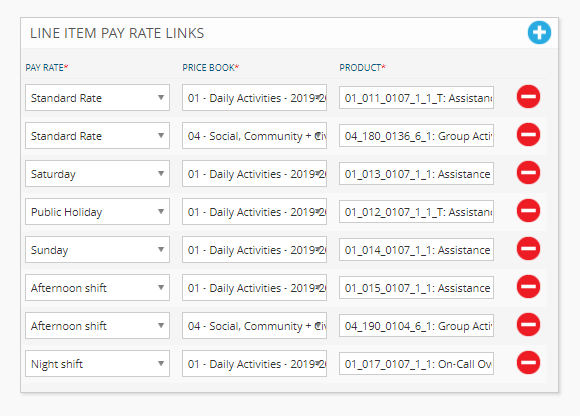
- Choose whether to link GENIUS line items to pay rates by default – if enabled, you must defined the line item pay rate links
- Add line item pay rate links
- Pay rate
- Price book
- Product
- Add line item allowance links
- Allowance
- Price book
- Product
- Add line items to exclude on cancellation – these items will not be included in the generated invoice
Link line item pay rates
To automatically adjust a line-item selected based on the award. The line-items are taken from the client’s schedule of supports and are adjusted by the award rule pay rates (see ‘Adjust line items selected by award‘).
E.g. If the pay-rate used on the timesheet changes from Normal Weekday rate to Afternoon/Evening rate, the line-item should change from Weekday Activities to Afternoon Activities.
Access notifications settings
To access ‘Notifications’ settings:
- Select PocketWatch > Settings from the side navigation menu
- Select ‘Notifications’
- Enable/disable shift reminders to clients
- Select shift notification type
- Email – sends an email notification
- myNotification – adds a notification in the myNotification panel at the top of the MYP application
- Disable – stops any notification
- Staff member shift attendance outside of time window alert
- Email – sends an email notification
- myNotification – adds a notification in the myNotification panel at the top of the MYP application
- Disable – stops any notification
- Enable/disable daily line item push results
- Enable/disable daily timesheet approval results
- Select ‘SAVE’
Access pay periods settings
To access ‘Pay periods’ settings:
- Select PocketWatch > Settings from the side navigation menu
- Select ‘Pay periods’
Set weekly pay period:
- Select ‘Weekly’
- Select the correct day of the week from the drop-down menu
- Select the start date
- Select ‘Save’
Set fortnightly pay period:
- Select ‘Fortnight’
- Select the correct day of the fortnight from the drop-down menu
- Select the start date
- Select ‘Save’
Set monthly pay period:
- Select ‘Monthly’
- Select the correct day of the month from the drop-down menu
- Select the start date
- Select ‘Save’
NB: Pay period selection matches between PocketWatch settings pay period and 94six payroll profiles.
NB: PocketWatch settings are stored in session and may require logging out to see the update.
Access pay rates settings
To access ‘Pay rates’ settings:
- Select PocketWatch > Settings from the side navigation menu
- Select ‘Pay rates’
To add pay rate:
- Select ‘Create’
- Enter the pay rate name
- Enter the code
- Select whether per hour amount or multiplier
- Enter the amount
- Select overtime, if applicable
- Select ‘Save’ in the pop-up
- Select ‘Save’
To delete pay rate:
- Select ‘Delete’
- Select ‘Save’
To edit pay rate:
- Select ‘Edit’
- Enter edits
- Select ‘Save’ in the pop-up
- Select ‘Save’
NB: Specific staff rate details are added via:
- Select ‘ARM’
- Navigate to the staff panel in the self-client
- Identify the relevant staff and select ‘Edit’
- Select ‘Contact options’
- Select ‘Edit login details+ teams + permissions’
- Scroll down to PocketWatch Settings
Rates are used to calculate the cost of a shift. If an API is used then pay rates do not need to be added.
Sample pay rates:
| Evening rate |
1.125 |
| Evening rate (casual) |
1.375 |
| Night rate |
1.15 |
| Night rate (casual) |
1.4 |
| Normal rate |
1 |
| Normal rate (casual) |
1.25 |
| Overtime after 2 hours rate |
2 |
| Overtime first 2 hours rate |
1.5 |
| Public holiday rate |
2.75 |
| Saturday rate |
1.5 |
| Sunday rate |
2 |
NB: Multipliers are a guide and may not be accurate for all organisations.
Integrate pay rates in MYOB/Xero
Subscriptions with MYOB/Xero integration can synchronise Pay rate.
Xero pay rates and MYOB wages will be synced each when pay rates are enabled in the sync.
Imports defined in the API settings structure panel will be synchronised according to the mappings under the API settings pay rates section.
Names will not be synchronised. Xero pay items defined as rate per unit are assumed to be $/hour.
NB: Staff member standard rates will also be synchronised in the daily process according to the mappings in the staff links section. Pay rate field is filled from XERO ordinary time rate therefore should be left blank if using XERO and will be auto filled. This field is pushed from XERO only.
Access payroll processing rules
This setting has been designed specifically if an organisation does not pay staff for break times designated in a shift. For example, rostered from 9.00am to 5.00pm with a 45-minute break, the total paid time would be 7¼ hours.
To access ‘Payroll processing rules’:
- Select PocketWatch > Settings from the side navigation menu
- Select ‘Payroll processing rules’
- Select ‘Breaks are not paid’ means ‘Break time (in minutes) indicated in the shift, will be subtracted from the final timesheet hours’
- In the case of multiple award rates, the time will be subtracted from the lowest rate time block
- Apply the break time to the exact midpoint of the shift
- Apply the break time to the assigned split
- Leave breaks are not paid unchecked means ‘Staff members are entitled to be paid for the full hours, regardless of break time’ (default)
NB: Specify ‘zero minutes’ break time to indicate the break is paid.
- Select shift overtime calculation
- Overtime that begins in one split WILL NOT continue into the next split if it begins in a new pay period
- Overtime that begins in one split WILL continue into the next split regardless of pay period
Access positions settings
Position is determined by the position titles defined in ARM and are automatically created under position.
To access ‘Postitions’ settings:
- Select PocketWatch > Settings from the side navigation menu
- Select ‘Position’ and click on the link to navigate to ARM
- Alternatively, navigate to ARM Pro > Customisation > Positions
NB: Staff are only eligible for positions that are defined in their position section on the administer staff page, as well as the position defined in the position title section. Only open shifts in those positions will appear on the myShifts page. A warning will appear when adding a staff member to a shift to a position they are not assigned to. ARM, 94six and PocketWatch are all in sync in relation to creating, editing or deleting a position.
Access public holiday settings
Public Holidays can be set based on location, recurrence and penalty rates to be applied.

To access ‘Public holidays’ settings:
- Select PocketWatch > Settings from the side navigation menu
- Select ‘Public holiday’
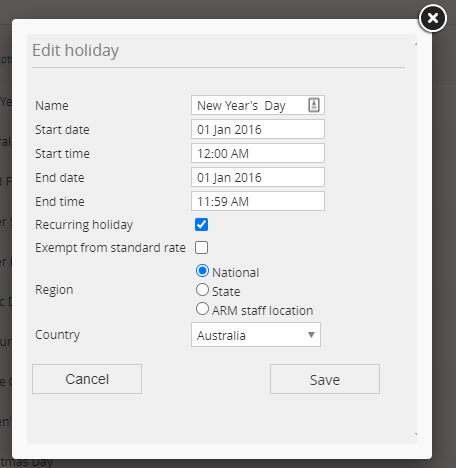
- Select ‘Create’
- Enter ‘Name’
- Select ‘Start date’
- Select ‘Start time’
- Select ‘End date’
- Select ‘End time’
- Select ‘Recurring holiday’, if relevant
- Select ‘Exempt from standard rate’, if relevant
- Select ‘Region’
- National
- State
- ARM staff location
- Select ‘Save’
NB: The ‘Exempt from standard rate option’ removes the holiday from the list of public holidays that are checked through the ‘is Public Holiday award rule parameter’. There is the option under shift parameters called ‘is on public holiday’. When an award rule is defined using this parameter, it will only check shifts that are not exempt from the standard rate.
To create public holiday based on staff location:
- Select ‘ARM staff location’
- Select relevant locations

To delete public holiday:
- Select PocketWatch > Settings from the side navigation menu
- Select ‘Public holiday’
- Select ‘Delete’
- Select ‘Save’
To edit public holiday:
- Select PocketWatch > Settings from the side navigation menu
- Select ‘Public holiday’
- Select ‘Edit’ on relevant holiday
- Enter edits
- Select ‘Save’
Access QTime settings
- Select PocketWatch > Settings from the side navigation menu
- Select ‘QTime’
- Select ‘Enabled’
- Select ‘Default cost centre’
- Show GENIUS schedule of support information
- Selecting this option will track budgets by using the data from service bookings. The service booking amounts will reflect what is allocated to the self-client as a provider service agreement budget. When the self-client is added as a service provider in the service booking, the funds will be taken from the provider service agreement budget in the client dashboard. If no service provider is added, the budget will be taken from the subscriber organisation, which is also displayed on the plan budget in the client dashboard.
- Push QTime notes to invoice by default
- Selecting this option will push QTime notes to invoices by default. This can be unselected on individual time entries in a QTime schedule. If an activity type is selected in a QTime schedule, the notes will always push to invoices.
- Autosave QTime schedules
- Generate QTime + shift invoices separately
- Selecting this option will move QTime line items into a separate invoice from timesheet line items
Create QTime activity types
Create QTime activity types for a staff member to apply in a QTime schedule. They flow through to the QTime report and appear against a line item in an auto created invoice in GENIUS.
To create QTime activity:
- Select ‘Create’
- Enter reason
- Select ‘Save’
To edit a QTime activity:
- Select ‘Edit’
- Make updates
- Select ‘Save’
To delete a QTime activity:
- Select ‘Delete
- Select ‘Save’
Access roster settings
To access ‘Roster’ settings:
- Select PocketWatch > Settings from the side navigation menu
- Select ‘Rosters’
- Enter required weeks for rosters with templates to show shifts up to ‘x’ weeks ahead
- Select ‘Show shift cost’ if required
NB: Both the shift cost permissions must also be assigned to an individual staff member.
- Select ‘Show only permitted rosters in drop-downs’
NB: When the View Rosters permission is in place this will limit Roster view to only rosters that a staff member is a Roster Manager for or that they are included in.
- Select ‘Display assets on the roster + roster template calendar’ if applicable
- Select ‘Display mandatory attributes on the roster template calendar’ if applicable
- Select ‘Display staff + client initial on roster calendar’ if applicable
- Select ‘Display staff + client initial on the roster template calendar’ if applicable
- Select ‘Exclude roster managers from eligible staff lists’ if applicable
- Select ‘Exclude staff on leave and staff with an existing concurrent shift being rostered’ if applicable
- Select ‘Save’
Access send client logins settings
Client login allows a client to:
- View shifts
- Cancel shifts
- Request shifts
To access ‘Send client logins’ settings:
- Select PocketWatch > Settings from the side navigation menu
- Select ‘Send client login’
- Search ‘Client’
- Select the appropriate organisation from the drop–down
- Search ‘Contact’
- Select the appropriate client from the drop–down
- Select ‘Send login emails’

NB: Access to PocketWatch may also be provided via GOMs or GENIUS. Only one login needs to be sent but access to each module may be provided.
The client will receive an email with the following wording:
Welcome
XOrganisationx has given you access to PocketWatch on their site.
To log in, you will need to insert the following email and password:
Email: client@email.com
Password: Password.1
To begin, please click the link below.
https://global.mypcorp.com/PocketWatch
If you have any questions, please do not hesitate to contact xstaffx on xorganisation xphonenumberx or xstaffemaillx.
Kind regards
Access shift cancellation reason settings
Create shift cancellation reasons for a staff member to cancel a shift. When a roster manager cancels a shift a drop down will appear with this list of reasons. They flow through to the shift cancellation report.
To access ‘Shift cancellation reason’ settings:
- Select PocketWatch > Settings from the side navigation menu
- Select ‘Shift cancellation reason’
To create cancellation reason:
- Select ‘Create’
- Enter reason
- Select ‘Save’
To edit cancellation reason:
- Select ‘Edit’
- Make updates
- Select ‘Save’
To delete cancellation reason:
- Select ‘Delete
- Select ‘Save’
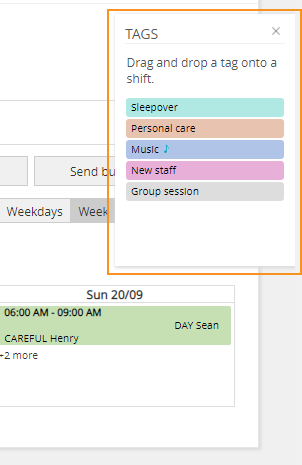
Create shift tags
This functionality allows users to create tags for shifts at the roster template or the shift level.
To create shift tag:
- Select ‘Create’
- Choose tag colour
- Suggestions for colours that compliment user interface are as follows
- Aqua R 176 G 232 B 228
- Orange R 232 G 196 B 176
- Blue R 176 G 196 B 232
- Green G 180 G 232 B 176
- Pink R 232 G 176 B217
- Grey R 221 G 221 B 221
- Enter tag name – emojis are supported
- Choose to automatically apply to all new shifts
- Select ‘Save’
Access shifts settings
To access ‘Shifts’ settings:
- Select PocketWatch > Settings from the side navigation menu
- Select ‘Shifts’
- Enter required hours to allow clients to cancel shifts up until ‘x’ hours before the shift
- Enter required hours to allow staff to request shift changes up until ‘x’ hours before the shift
- Define late check in when checked in ‘x’ mins after shift start time
- Define late check out when checked out ‘x’ mins after shift end time
- Enable creation of GOMS session on shift check in
- Enable creation of GOMS session on shift check in for each client (mobile device friendly)
- Enable whether a GOMS session needs to be completed before check out
- Enable displaying client additional information on shift check in/check outWhen enabled this setting pushes the content from the additional information field of key contacts from ARM
- Disable budget warning alert on shift check in/check out
- Default shift cost centre in allowances. When enabled, this setting creates a field for the cost centres for an allowance.
- Select record Adhoc Transport on shifts to add a button on check in page to allow a staff member to capture transport details.
- Enter required minutes to allow staff to start shift (check in) from ‘x’ mins before and ‘x’ mins after
- Enter required minutes to allow staff to end shift (check out) from ‘x’ mins before and ‘x’ mins after
NB: The check in time only supports AU and UK addresses. It is essential that correct country and state is selected when creating rosters or roster templates. These are required fields to support differing time zones and daylight saving.
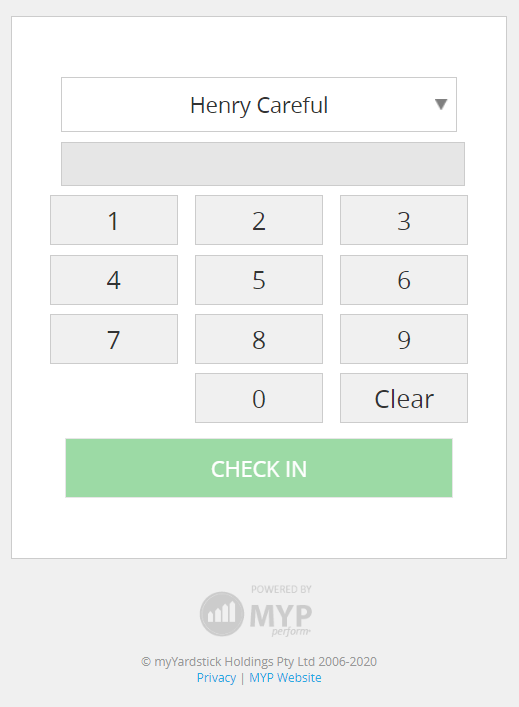
Access simple check in/check out settings
This functionality allows users to check into and out of a PocketWatch shift via their pin login instead of having to log into MYP and navigate to their shift page. The simple check in/check out page link is auto generated from ’Global settings’.
To provide access to the simple check in check out option:
- Search for the staff member in ARM
- Select ‘Edit’ next to the contact
- Select ‘Contact options’
- Select ‘Edit login details+ teams + permissions’
- Scroll down to ‘PocketWatch Settings’
- Select ‘Enable simple check in/check out’
QR code simple check in/check out
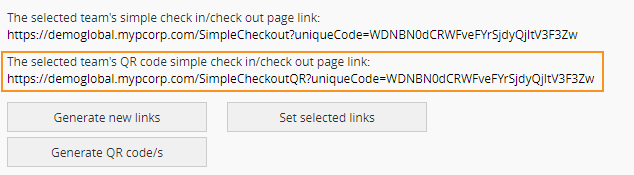
This functionality allows users to check into and out of a PocketWatch shift via a QR code instead of having to log into MYP and navigate to their shift page. The QR code simple check in/check out page link is auto generated from ’Global settings’.
To enable the QR simple check in/check out:
- Select PocketWatch > Settings from the side navigation menu
- Select ‘Simple check in/check out’
- Select ‘Enable simple check in/check out’
- You can select a certain team to enable this option for or you can enable this for all staff via the drop-down
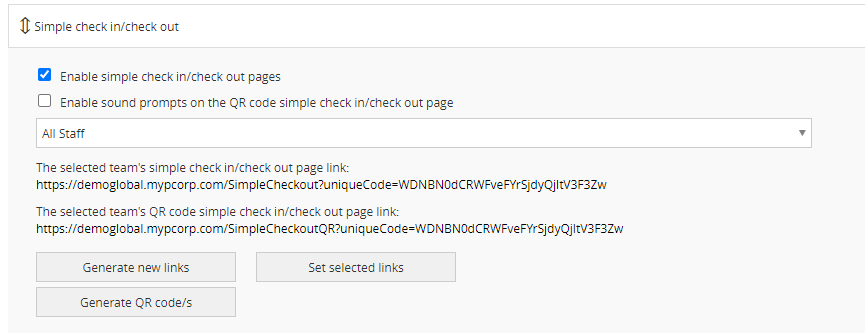
- After selecting the desired team or ‘All staff’, select ‘Generate new links’
- Select ‘Set selected links’ to save
To print the QR codes:
- Select ‘Generate QR code/s’
- Select relevant team or ‘All staff’ from the drop-down
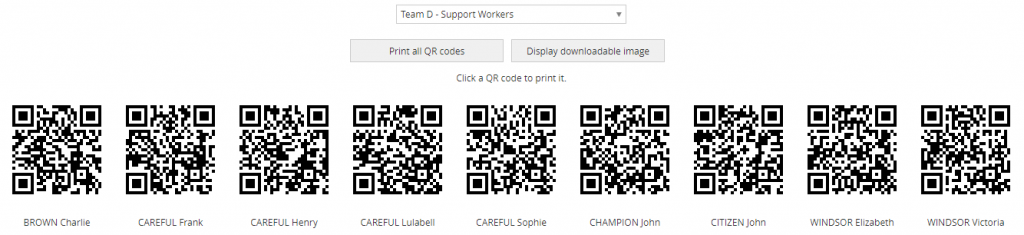
- Select ‘Print QR code/s’
- Print the document and separate the QR codes
To use simple check in/out:
- Click on the ‘QR code simple check in/check out page’ link
- Hold the QR code in front of the computer webcam or tablet camera to check in/check out
NB: If you are using the ‘All Staff’ page to check in/check out using QR codes, each staff member will need to have the ‘Enable simple check in/check out’ permission enabled.
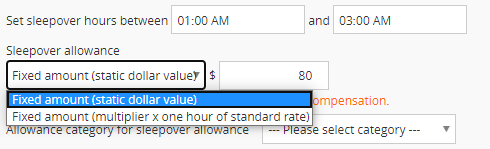
Access sleepover shifts settings
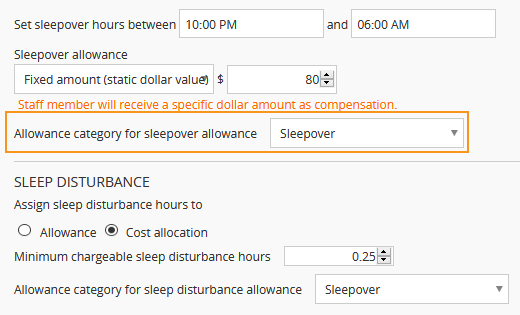
Sleepover hours can be set between a certain time period.
To access ‘Sleepover shifts’ settings:
- Select PocketWatch > Settings from the side navigation menu
- Select ’Sleepover shifts’
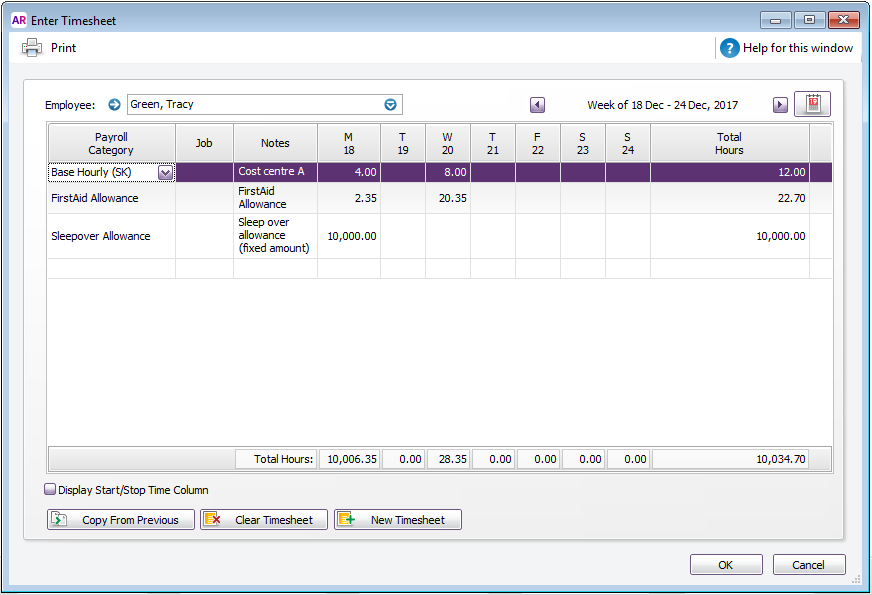
Allowance can be determined as a:
- fixed amount (static dollar value) i.e. Staff member will receive a specific dollar amount as compensation.
- fixed amount (multiplier x one hour of standard rate)
A multiplier of the standard rate (as indicated) will be calculated at timesheet submission.
Sleepover example:
If the sleepover time has been determined as 10:00pm – 6:00am in the settings, if a shift starts at 9:00pm and ends 3:00am next day, and has sleepover option ticked, instead of awarding 6 hours, it will award 1 hour (9:00pm-10:00pm) and 10:00pm-3:00am will be replaced with sleepover allowance.
The category for the sleepover allowance must be defined in the allowances section of settings. (refer Allowances). Select the appropriate category from the list as it will be used when sleepover allowance is automatically generated.
NB: The standard rate (for that staff member) must be configured in ARM in order for this to work.
Set custom sleepover periods when more than one sleepover period needs to be defined.

To create custom sleepover period:
- Select ‘Create’
- Enter name
- Enter start and end time
- Select ‘Save’
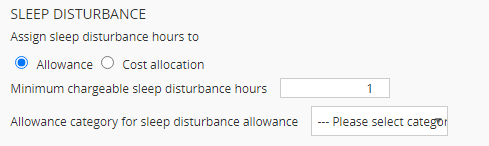
Sleep disturbance allowance
Sleep disturbance allowance can be set for staff member to be paid for periods when required to attend to client during a sleepover.
- Select PocketWatch > Settings from the side navigation menu
- Select ‘Sleepover shifts’
- Select whether to allocate sleep disturbance hours to ‘Allowance’ or ‘Cost allocation’
- Set minimum chargeable sleep disturbance hours
- Select allowance category
Sleep disturbance example:
If the minimum chargeable sleep disturbance hours have been determined as 0.5, and the staff member attends to the client for 15 minutes during the sleepover, then the staff member will be paid for the minimum 0.5 hours at award rate in addition to sleepover allowance. If there is a second sleep disturbance of 10 minutes during the same sleepover shift, for a total of 25 minutes’ sleep disturbance, then one payment of 0.5 hours sleep disturbance allowance applies for the total disturbances. If multiple sleep disturbances occur during the same sleepover shift, totalling over 0.5 hours, then the total of accrued sleep disturbance minutes will be paid at award rate in addition to sleepover allowance.
The category for the sleep disturbance allowance must be defined in the allowances section of settings.
A timesheet cannot be approved if the sleep disturbance entries within the timesheet have empty fields, or if either the start or end date of the disturbance falls outside of the duration of the timesheet.
Access tasks settings
Tasks can include specifics that are requirement for rostering in a shift for example lock up, manage meals etc.
To access ‘Tasks’ settings:
- Select PocketWatch > Settings from the side navigation menu
- Select ‘Tasks’
To create task:
- Select ‘Create’
- Enter the function name
- Select ‘Save’ in the pop-up
- Select ‘Save’
To delete task:
- Select ‘Delete’
- Select ‘Save’
To edit task:
- Select ‘Edit’
- Enter edits
- Select ‘Save’ in the pop-up
- Select ‘Save’
To view task:
- Tasks assigned to a shift can be viewed in the check in and check out pop-up for the shift.
Tasks can be added from the main edit shift page by clicking the shift tasks button.
Access timesheets settings
To access ‘Timesheets’ settings:
- Select PocketWatch > Settings from the side navigation menu
- Select ‘Timesheets’
- Default timesheet page view
- Show all
- Paginated (Edit client NDIS item)
- Set default timesheet window from ‘x’ weeks before and ‘x’ weeks after current period
- Include timesheet clients in timesheet sync (MYOB only)
- When enabled, this setting syncs the timesheet clients to the MYOB timesheet as ‘Notes’. For multiple clients, a comma separated list is created.
- Recalculate cost allocation when aligning timesheet hours on the timesheets page
- Recalculate allowances when aligning timesheet hours on the timesheets page
- Distribute total timesheet hours evenly across clients on shift check out
- Log when staff member checks in before ‘x’ mins and after ‘x’ mins
- Log when staff member checks out before ‘x’ mins and after ‘x’ mins
Timesheet checkout rules:
- Select whether to automatically adjust timesheet hours to align with shift hours
- Select whether to use approval conditions
- Require manual approval for all timesheet submissions
- Payroll staff need to review the entry for approve/reject (no automation).
- No additional workflow rules will be applied
- Auto-approve the entry, without any validation (not recommended)
- Useful for special circumstances (or testing), no gating is applied to submissions.
- Timesheet entries will be aligned automatically to shift hours (previous values are recorded/audited)
- Auto-approve the entry, except when certain conditions are true
- Specify conditions which triggers manual review (but anything else gets auto-approved)
- Timesheet entries will be aligned automatically to shift hours (previous values are recorded/audited)
If ‘Automatically adjust timesheet hours to align with shift hours’ and ‘Use Approval Conditions’ checkbox is selected then:
- If conditions are not met, the time sheet is not auto aligned and manual approval is required.
- If conditions are met, the time sheet is auto aligned and auto approved timesheet checkout rules.
For example:
Settings: Select Automatically adjust timesheet hours to align with shift hours and Use Approval Conditions.
Check in 60 mins before the shift starts, Select the timesheet checkout event as ‘Auto-approve the entry, except when certain conditions are true’.
Shift Time: 9AM to 5PM
Situation: The staff checked in at 7:30AM, then timesheet is not aligned and will require manual approval. If staff checked in at 8:30, then timesheet is aligned to shift time and auto approved.
- Require manual approval for all timesheet submissions
- Payroll staff need to review the entry for approve/reject (no automation).
- No additional workflow rules will be applied
- Auto-approve the entry, without any validation (not recommended)
- Useful for special circumstances (or testing), no gating is applied to submissions.
- Timesheet entries will be aligned automatically to shift hours (previous values are recorded/audited)
- Once timesheets are approved a name and timestamp is applied to the approved by column.
- Specify conditions which triggers manual review (but anything else gets auto-approved).
- Timesheet entries will be aligned automatically to shift hours (previous values are recorded/audited)
Below table outlines what each approval condition does.
| Parameter |
Description |
Scenario |
| [ ] Additional hours more than [ ] hours |
If the additional hours are more than what is stated in the setting, the system will not auto approve the timesheet |
If you add 2 hours in the setting. Staff member worked 2 hours over their rostered required hours, the system will not trigger an auto approval process of timesheet. |
| Start time [ ] mins before and [ ] mins after shift start |
If staff member check in with in the above stated time period, the system will approve automatically approve the timesheet |
If “Start time [10] mins before and [10] mins after shift start” with a rostered shift starting at 10:00 AM and if staff member check in before 9:50 AM or after 10:10 AM, the system will not auto approve the timesheet. |
| End time [ ] mins before and [ ] mins after shift ends |
If staff member check out with in the above stated time period, the system will automatically approve the timesheet |
If “End time [10] mins before and [10] mins after shift start” with a rostered shift ending at 3:00 PM and if staff member check out before 2:50 PM or after 3:10 PM, the system will not auto approve the timesheet. |
| Distance allowance requested (If enabled) |
If staff member has added the allowance on their shift, the system will not automatically approve the timesheet. |
If staff have claimed any number of kilometres on their shift, the timesheet will not auto approve. |
| Distance allowance more than [ ] unit/s |
If the allowance is more than what is stated in the setting, the system will not automatically approve the timesheet. |
If “Distance allowance more than [25] unit/s and the staff member adds in 26 KM in the shift allowance, the system will not trigger the auto approval process. |
| Other allowance requested |
If staff member has added any allowance, other than the default KM allowance, the system will not auto approve the timesheet |
Staff has claimed a meal allowance on their shift. The timesheet will not be auto approved. |
| Other allowance more than $ [ ] |
If staff member has added any allowance exceeding the defined amount, other than the default KM allowance, the system will not auto approve the timesheet |
Staff has claimed a meal allowance exceeding [10] unit/s. The timesheet will not be auto approved. |
| Auto approval is enabled for all allowances |
If enabled, allowances will automatically approve when a timesheet passes above conditions. |
Staff member has checked in and out on time, and their timesheet is auto approved. Any allowances added within the parameters will also be approved. |
| Sleep disturbance values are valid |
Automatically approve timesheets that include sleep disturbances with valid values. |
Staff member has recorded sleep disturbances on their shift. Within the timesheet, these entries are deemed valid because the fields are not empty and the start and end dates do not exceed the duration of the timesheet. The timesheet will be auto approved. |
NB: Leaving these settings blank means ‘anytime’ or ‘any amount’ is allowed.