The Integrated Plan Management Solution (IPMS) offers back to front automation to make NDIS administration even easier. IPMS from MYP and HICAPS offers the following features:
- Automated plan and budget set up + sync from PRODA
- Automated invoice validation, tracking + reporting on claim status
- Automated bulk claiming with PRODA
- Automated provider payment processing, tracking + reporting of payments
- Automated remittances sent to providers + plan management reporting
Process overview for going live with IPMS:
- Subscription through MYP marketplace
- MYP – Onboarding + setup begins
- Banking forms completed and returned to HICAPS for processing
- Export clients to HICAPS
- Notification through my Notifications
- Claiming can begin
This timeline is approximately 4 weeks dependent on the efficiency of bank application.
The timeline for claim payments are as listed below:
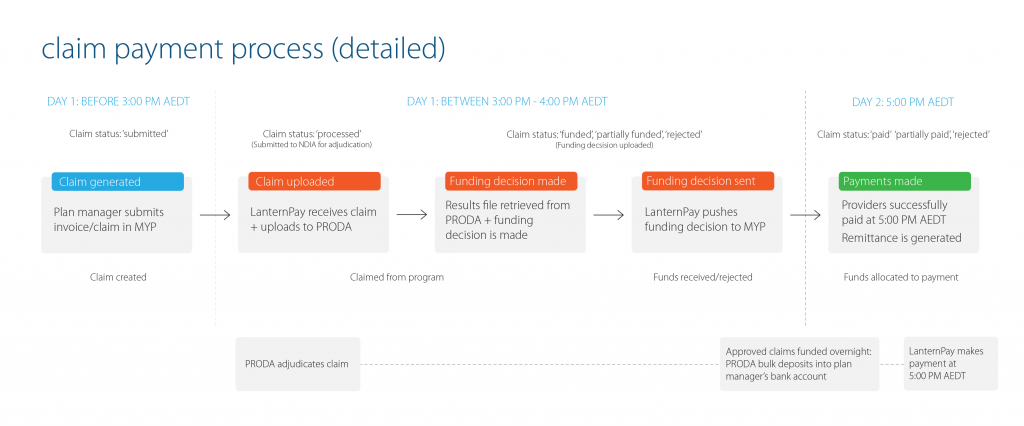
- The status change in GENIUS is the next day if the claim was submitted before 3:00pm.
- The syncing process occurs at 5:00pm the day it was moved to reconciled or claimed + gap.
- NDIA claimed to NDIA reconciled or NDIA claimed + gap come in between 8:00am -11:00am each day for invoices submitted to the NDIS on the previous day.
- Sync to accounting software is between 5.00pm – 5.30pm each banking day. This represents all the funds being sent from the Plan Managers account out to the providers for the claims HICAPS submitted the day before to the NDIS.
Administer HICAPS settings
Administer HICAPS permissions
Update staff permissions to include Administer HICAPS:
- Select ‘ARM Pro’
- Navigate to the staff panel in the self-client
- Select ‘Create contact’ in the staff panel to create a new staff
- Complete details
- Select ‘Contact options’ and allocate permissions or apply a permissions template via the ‘Edit login details+ teams + permissions’ or apply a permissions template
- Select ‘SAVE’
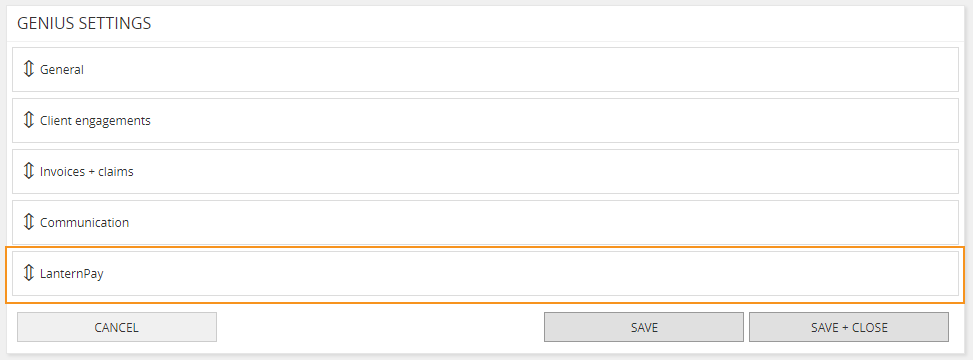
Review HICAPS settings in GENIUS
- Select ‘GENIUS’ from the side navigation menu
- Select ‘Settings’
- Select ‘HICAPS’
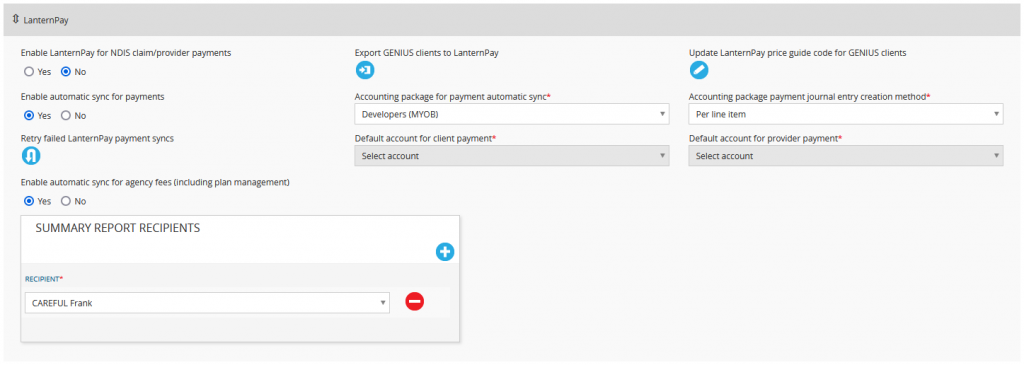
- Enable ‘HICAPS for NDIS claim/provider payments’
- Export GENIUS clients to HICAPS (used to onboard new clients into HICAPS )
- Update ‘HICAPS price guide code for GENIUS clients’
- Enable automatic sync for payments to your accounting software
- Select the accounting package for the automatic sync from the drop down
- Select the accounting package payment journal entry creation method
- Per claim
- Per line item
- Per day (recommended)
- Retry failed HICAPS payment syncs
- Select default account for client payment
- Select default account for provider payment
- Enable ‘Automatic sync for agency fees (including plan management)’
- Add staff members to receive the Summary Report
- Select ‘SAVE + CLOSE’
Update clients + contacts
Update provider fields in ARM
Providers in ARM need to have their bank details entered in the ‘Edit Client’ page. This can also be completed via an ARM import. If you require support for the data import raise a ‘Date upload quote/request’ ticket.
For providers the following fields are required:
- Business number (ABN)
- Relationship
- Client email
- Account name
- BSB
- Account number
To update fields:
- Search for the relevant provider
- Select ‘Edit’ in the client panel
- Complete
- Relationship
- Client email
- BSB
- Account name
- Account number
- Select ‘SAVE’
NB: If ‘Enable automatic sync for agency fees (including plan management)’ is set to ‘Yes’, bank account details will need to be entered into the self-client (the organisation’s client in ARM) for the agency fees to be deposited into the correct account.
Update client/participant fields in ARM
Clients/participants in ARM need to have their personal details entered in the ‘Edit contact’ page. This can also be completed via an ARM import. If you require support for the data import raise a ‘Date upload quote/request’ ticket.
For clients the following fields are required:
- NDIS number
- First name
- Last name
- Date of birth
To update fields:
- Search for the relevant client
- Select ‘Edit’ in the contact panel
- Complete
- Contact NDIS number
- First name
- Last name
- Birthday
- Select ‘SAVE’
NB: Select export data to run a report to determine any missing fields.
- Select ‘ARM Pro’ from the side navigation menu
- Select ‘Export data’
- Select ‘Client’
- Select ‘Spreadsheet’
- Select ‘Client’ + download to review provider details
- Select ‘Contact’ + download to review client/participant details
Update GENIUS engagements
In the client information panel, ensure the HICAPSprice guide code has been selected.

Complete the following panels:
- Support coordination
- Plan style
- Schedules of support
- Service agreement
NB: Ensure all clients with an engagement have the correct Plan Manager name or change the management style to ‘Agency’ or ‘Self’ in their MYP record. This will ensure no request for onboarding is sent to HICAPS for clients who do not need to be onboarded.
In the plan style section:
- Select who is managing the plan
- Agency
- Self
- Plan manager – enter the plan manager organisation or create a new client and enter the account email for plan managed invoices
Set-up API links
If using Xero or MYOB, account links need to be configured in ARM > API Settings > GENIUS account links.
- Link Plan Manager – Account name in the third-party software
- Link Providers – Account names in the third-party software
- Update GENIUS setting ‘Enable automatic sync for payments’ ‘Yes’,
- ‘Accounting package for payment automatic sync’ select relevant account
- ‘Accounting package payment journal entry creation method’ select relevant method
- Select ‘SAVE’
Export clients to HICAPS
NB: Notify MYP of HICAPS readiness and the team will enter the HICAPS keys to link the systems. This must be completed prior to an export of clients to HICAPS .
To export clients to HICAPS:
- Select ‘GENIUS’ from the side navigation menu
- Select ‘Settings’
- Select ‘HICAPS’
- Select ‘Export clients to HICAPS’
NB: You have the option to export all GENIUS clients not in HICAPS or selected clients only. You will receive an email when this is completed showing the results of the export. You will also receive a myNotification when clients have completed the onboarding process in HICAPS.
- Select account to export GENIUS clients to
- Select ‘Export all GENIUS clients’ or
- Select ‘Export selected GENIUS clients
- Search for + select client(s) you want to export
- Select ‘Confirm’
GENIUS sends a request to HICAPS to onboard the selected clients. A confirmation email will be sent listing the number of clients who have been exported. Clients who are missing any compulsory fields will be listed as unsuccessful with the relevant error message. HICAPS will process the clients and retrieve the plan information from PRODA. GENIUS will generate a myNotification will be generated for each client who has been successfully onboarded. Any service bookings and engagement start and end date corrections will be updated or added automatically.
Once the request has been received by HICAPS, you can expect to view their service bookings and begin invoicing within 24 hours. If you do not receive a successful onboarding notification for the participant, they have not been onboarded. Common reasons for onboarding failures include:
- Incorrect NDIS number
- No service bookings in PRODA
Review the client information and make the relevant adjustments before exporting again.
Update plans
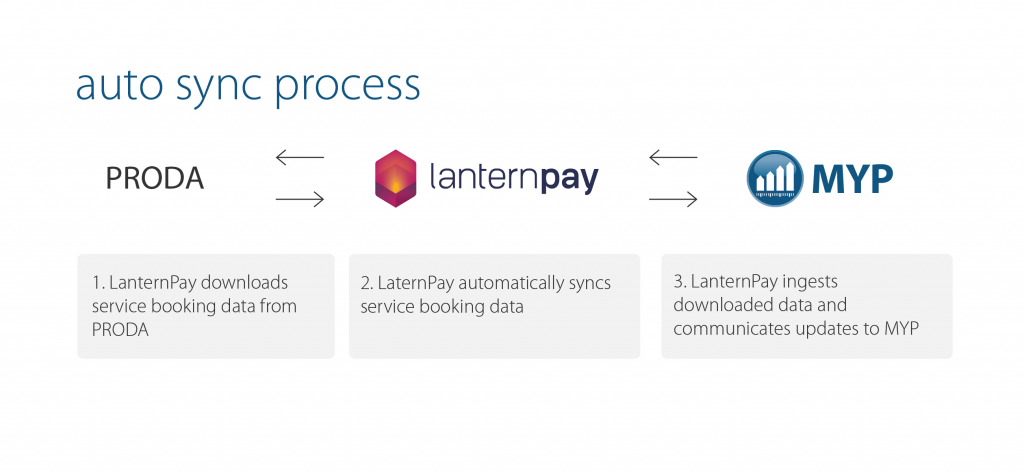
Service bookings and plan dates are synced automatically each morning. If any changes have been made a myNotification will be triggered and the updated data will be reflected in the GENIUS engagement. Therefore there is no need to send manual update request as changes will automatically apply within 24 hours.
If you have updates are needed for an inactive plan, an onboarding failed due to no active service bookings or a participant is exiting, a manual ‘Update/sync plan’ is required.
Please refer to the link below to access HICAPS website > Locate the ‘Plan Sync errors’ section > Select ‘Click here’ to lodge a plan detail review request form with HICAPS directly:
https://lanternpay.force.com/help/s/article/Daily-Sync-of-all-active-Participant-Plans
NB: Please do not select the ‘Contact Support’ button for plan sync.
To import data from HICAPS:
- Select ‘GENIUS’ from the side navigation
- Select ‘Edit’ against relevant client
- Select ‘HICAPS’ options
- Select ‘Import data from HICAPS’
GENIUS client and plan details will be imported from HICAPS. This page will refresh with updated data once the import is complete. Service bookings may be overwritten or removed. Please ensure you have saved any changes before continuing.
NB: You can expect to see the updated plan reflected in GENIUS every 24 hours.
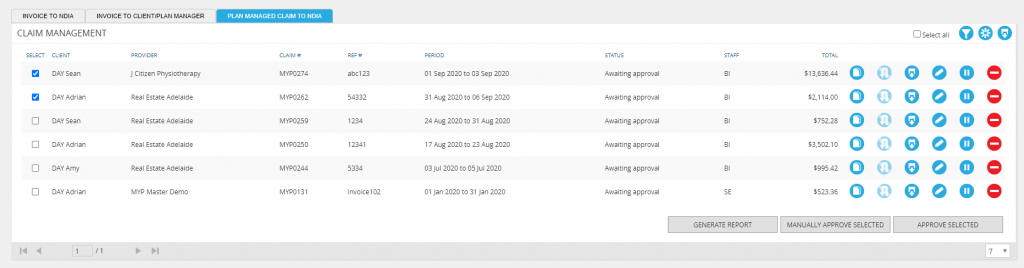
Manage claims
Process plan managed claims
To begin the claims process:
- Select ‘GENIUS’ from the side navigation menu
- Select ‘Settings’
- Select ‘HICAPS’
- Set ‘Enable HICAPS for NDIS claim/provider payments’ to ‘Yes’
NB: Any clients who have been onboarded in HICAPS will use the HICAPS process when creating claims. Clients not onboarded in HICAPS will continue to follow the ‘Bulk upload’ process.
- Follow normal process for creating + approving claims
The following steps are automated and no further action is required unless the claim needs to be resubmitted or cancelled.
- After approval, claims will be in the ‘Submitted to HICAPS’ status
- When HICAPS confirms the claim has been received, the status changes to ‘NDIA claimed’. The date and time the claim has been received will display under ‘HICAPS submitted’.
- Once NDIA makes a funding decision, the claim will move to either ‘NDIA reconciled’, ‘HICAPS rejected’ or ‘NDIA Claimed + Gap’
- Invoices moved to ‘NDIA reconciled’ can then be synced to Xero or MYOB (integration required) by selecting invoices and selecting ‘Sync selected’
- Invoices moved to ‘HICAPS rejected’ have either been partly paid, with an outstanding gap amount, or, entire invoice rejected. These invoices can then be managed by selecting the ‘resubmit’ icon, editing (if required) and saving – resubmitted invoice will then be available via the ‘Awaiting approval’ status
- Invoices in ‘NDIA Claimed + Gap’ mean some payment has been received, but there is a gap amount. Any necessary adjustments can be made and then the claim can be resubmitted.
- If the ‘Enable automatic sync for payments?’ GENIUS setting is set to ‘Yes’, journal entries will be created in the nominated accounting package when providers are paid
Process invoices to NDIA
To begin the invoicing process:
- Select ‘GENIUS’ from the side navigation menu
- Select ‘Settings’
- Select ‘HICAPS’
- Set ‘Enable automatic sync for agency fees (including plan management)’ to ‘Yes’
NB: Any clients who have been onboarded in HICAPS will use the HICAPS process when creating claims. Clients not onboarded in HICAPS will continue to follow the ‘Bulk upload’ process.
- Follow normal process for creating + approving invoices
The following steps are automated and no further action is required unless the claim needs to be resubmitted or cancelled.
- After approval, invoices will be in the ‘Approved’ status
- When HICAPS confirms the invoice has been received, the status changes to ‘Submitted to HICAPS’
- When HICAPS have successfully submitted your claim, the status changes to ‘NDIA Claimed’
- Once NDIA makes a funding decision, the claim will move to either ‘NDIA reconciled’, ‘HICAPS rejected’ or ‘NDIA Claimed + Gap’
- Invoices moved to ‘NDIA reconciled’ can then be synced to Xero or MYOB (integration required) by selecting invoices and selecting ‘Sync selected’
- Invoices moved to ‘HICAPS rejected’ have either been partly paid, with an outstanding gap amount, or, entire invoice rejected. These invoices can then be managed by selecting the ‘resubmit’ icon, editing (if required) and saving – resubmitted invoice will then be available via the ‘Awaiting approval’ status
- Invoices in ‘NDIA Claimed + Gap’ mean some payment has been received, but there is a gap amount. Any necessary adjustments can be made and then the claim can be resubmitted.
- If the ‘Enable automatic sync for payments?’ GENIUS setting is set to ‘Yes’, journal entries will be created in the nominated accounting package
Cancel claims
To cancel a claim:
- Select the ‘Cancel’ button on a claim
- An email is triggered to the HICAPS customer operations team requesting the invoice be cancelled. The claim status moves to ‘HICAPS cancellation requested’. A myNotification will be generated HICAPS once the cancellation has been processed. The claim moves to ‘HICAPS cancelled’ status and the claim will no longer be included in the client’s ‘Spent’ amount on the client dashboard.

Manual approval
To manually approve a claim:
- Select the claims to be manually approved.
- Select ‘Manually approve selected’. This will move claims to ‘Approved’.
- The claim can then be processed manually. Follow the normal process for creating + approving claims (See ‘Administer invoices for plan managed claims to NDIA‘).
Administer sync fails
If the sync to Xero/MYOB fails for a configuration reason (for instance, there is an API mapping missing or the selected Xero/MYOB account does not accept journal entries) a myNotification will be generated.
To resolve sync issues:
- Update the mappings in the ARM API settings page via ARM Pro > Administration > API settings
- Select ‘Retry failed HICAPS payment sync’ via GENIUS > Settings > HICAPS
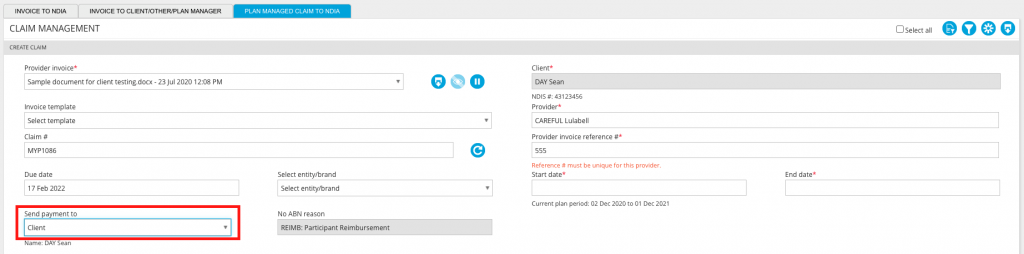
Manage reimbursements
Reimbursements can now be made to clients via the ‘PLAN MANAGED CLAIM TO NDIA’ tab.
To process a reimbursement, create your claim as per the standard process but select ‘Send payment to client’ dropdown to send the payment to the client. The ‘No ABN reason’ field will be automatically populated as ‘REIMB’.
Once the claim is approved, HICAPS will process the reimbursement.
Generate HICAPS reports
GENIUS HICAPS Summary report
Select the relevant filters:
This will create a report with the following columns:
- Submitted Date/Time
- Claim #
- Client
- NDIS #
- Provider
- Sections for each of the following actions
- Submitted to HICAPS
- NDIA Claimed
- NDIA Reconciled (including Sync Date/Time)
- NDIA Claimed + Gap (including Sync Date/Time)
- HICAPS Cancellation requested
- HICAPS Cancelled