The settings area of GENIUS is divided into multiple sections:
- General
- Client engagements
- Invoices + claims
- Communication
- Cost centres
Edit general settings
- Navigate to GENIUS > Settings > General via the side navigation menu
- Select if your organisation is a registered provider
- Select if your organisation is a registered plan manager
- Enable multiple entities/brands (additional brands are managed via ARM > Customisation > Brand, style + shortcuts)
- Enable override pricing, if applicable
- Choose myDocs category for new GENIUS documents
NB: This can be a category defined in myDocs but the default is an automated GENIUS category.
NB: A $2 (+GST) fee per month per plan managed client applies when enabling the OCR functionality.
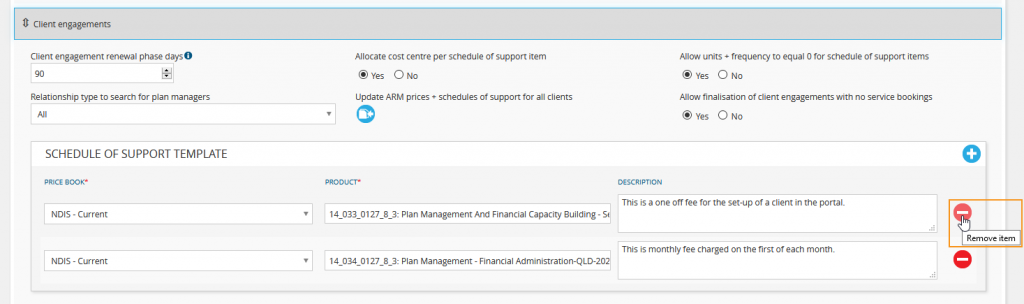
Edit client engagement settings
- Navigate to GENIUS > Settings > Client engagements via the side navigation menu
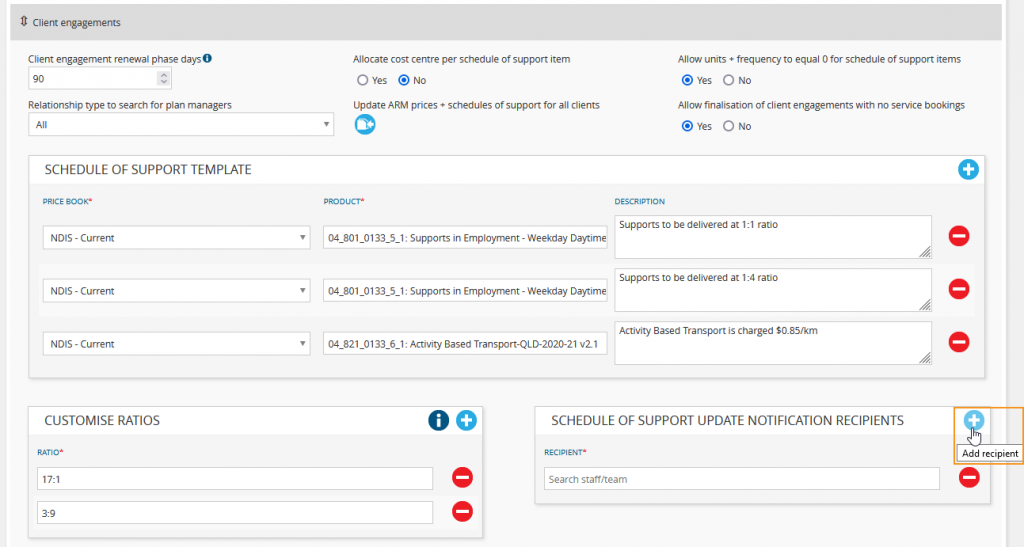
- Enter the client engagement renewal phase number of days
- This is the number of days before the service booking end date that the client engagement should be renewed.
- Allocate cost centre per schedule of support item
- Allow units + frequency to equal 0 for schedule of support items
- Relationship type to search for plan managers
- Update all schedules of support for all clients (only for use when updating to a new year pricelist)
This will update the most recent price books in ARM to use the latest prices provided by the NDIS.
All active schedules of support will be copied and ceased. These copies will be updated and finalised using the new prices. If no items in an active schedule can be updated, then the schedule will not be ceased or copied. If the schedule contains items with customised prices and the price has changed in the update, the existing schedule will not be ceased and new schedule will be saved as a draft.
All PocketWatch rosters, templates and future shifts will be updated to use these new finalised schedules.
To receive an email that outlines the changes the update will make in ARM and GENIUS without applying the updates, click the ‘Preview’ button.
It is strongly recommended that you generate this preview before completing the update, as these changes are not reversible.
An email will be sent on completion outlining the changes made in the system. Depending on the number of clients you have in GENIUS, this may take some time.
- Allow finalisation of client engagements with no service bookings
Administer schedule of support templates
- Navigate to GENIUS > Settings > General via the side navigation menu
- Select the ‘Add support item’ icon
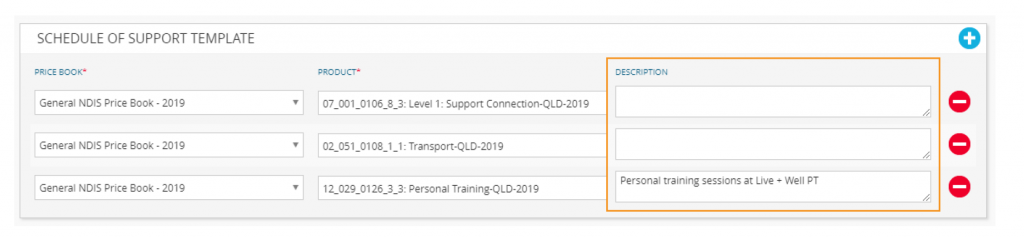
- Choose a price book
- Select the support item from the menu
- Enter a custom description if required. These custom descriptions will be used when creating a schedule of support from the template.
To remove a support item, select the ‘Remove support item’ icon.
NB: All support items are added to price books via ARM.
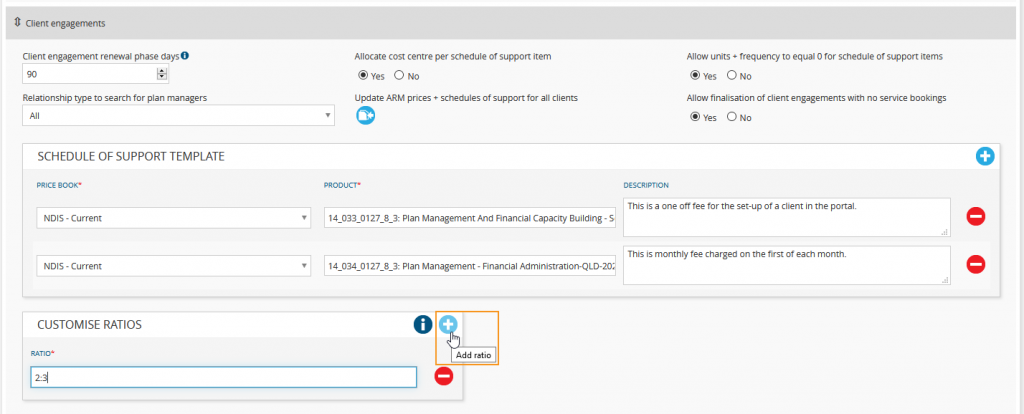
Customise ratios
- Navigate to GENIUS > Settings > Client engagements via the side navigation menu
- Select the ‘Add ratio’ icon
- Enter the custom ratio
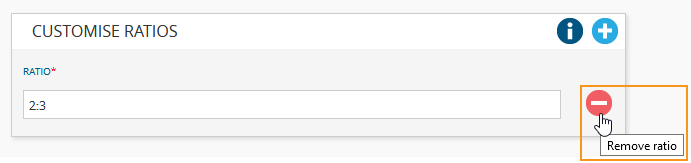
To remove a custom ratio, select ‘Delete ratio’ icon.
NB: The default ratios are 1:1, 1:2, 1:3, 1:4 and 1:5. N/A option should be selected where ratios are not applicable.
Custom ratios are used in combination with fractioned pricing, and when set-up can be selected on a client’s schedule of support. If a fractioned price product is used, it will automatically calculate the fee based on the selected ratio.
Add schedule of support update notification recipients
- Navigate to GENIUS > Settings > Client engagements via the side navigation menu
- Select the ‘Add recipient’ icon
- Search the staff member or team to receive notifications when changes are made to schedules of support
Edit invoices + claims settings
- Navigate to GENIUS > Settings > Invoices +claims via the side navigation menu
- Enter the number of days from current date invoices to NDIA are due
- Enter the number of days from current date invoices to client/plan manager are due
- Enter the number of days from current date plan managed claims to NDIA are due
- Enter the number of days before automatically approving provider invoices
- Days before automatically reconciling unremitted invoices/claims
- Enter a client budget warning percentage
- Select who needs to approve provider invoices
- Choose an accounting package invoice name sync option
- Sync invoice to Xero using client group name instead of contact name
- Sync client name only
- Sync to custom name based on invoice type + plan management type
NB: Selecting the ‘Sync to custom name based on invoice type + plan management type’ will impact the way data syncs to invoices in Xero or MYOB AR Live. The impact will be as follows:
- If a client has a plan manager, all NDIS invoices will sync under the name of the plan manager
- If a client does not have a plan manager (but has a representative), all non-NDIS invoices will sync under the name of the representative
- If a client does not have a plan manager (but has a representative), all NDIS invoices will sync under the name of the representative
- If a client does not have a plan manager or a representative (they are self-managed), all invoices (both NDIS + non-NDIS) will sync under the name of the client
- If a client is agency managed (NDIA) only, NDIS invoices will sync under the name of the client
- Retain GENIUS invoice # when pushing to third party accounting package (e.g. Xero/MYOB)
NB: MYOB does not allow invoice numbers greater than 8 characters. If the invoice number in GENIUS exceeds 8 characters, a new invoice number will be generated in MYOB regardless of the option selected.
In GENIUS, the new MYOB invoice number will be recorded in ‘EXTERNAL INVOICE #’, and the original GENIUS ‘INVOICE #’ will not change.
NB: GENIUS previously allowed special characters which were causing issues in reconciliation. Invoice numbers are now trimmed to remove any special characters. i.e. Invoice # : MontagueArts&^#*.()CraftSocietyMbrship4B{}}{‘ is renamed to ‘MontagueArtsCraftSocietyMbrship4’ while generating the bulk upload file from Invoice to NDIA and Plan managed claim.
- Sync plan manager email address as primary person email address (Xero)
Setting this option to ‘Yes’ will change the way the primary person details get populated in Xero. The rules are as follows:
- If plan manager is assigned:
- Sync key contact first name + last name as primary person first name + last name
- Sync plan manager email address as primary person email address
- If plan manager is not assigned:
- Sync key contact first name, last name + email address as primary person first name, last name + email address
- If key contact is not found, it will randomly pick the primary contact and apply the rules above.
- Disable invoice reference number when pushing to third party accounting package (e.g. Xero/MYOB)
- Sync line item notes to third party accounting package (e.g. Xero/MYOB)
- Select the date to push as invoice creation date in third party accounting package (e.g. Xero/MYOB)
- Date sent
- Date approved
- Service end date
- Choose whether to send an email to client/representative when provider invoice is uploaded
- Choose whether to send the provider invoice summary email to client/representative on the following day
NB: Enabling ‘Send provider invoice summary email to client/representative on following day’ will send all provider invoices uploaded that day to the clients/representatives in bulk overnight, instead of triggering separate emails each time a provider invoice is uploaded.
- Choose whether to send provider invoice reminders to support co-ordinators
- Select who to bulk send invoices to
- Plan manager/representative/client
- Plan manager + representative/client
This option determines who receives invoices when the ‘SEND SELECTED’ button is clicked in the ‘INVOICES TO PLAN MANAGER’ panel.
If ‘Plan manager/representative/client’ is selected, the invoice will be sent to the plan manager. If there is no plan manager, it will be sent to the representative and if there is no representative it will be sent to the client.
If ‘Plan manager + representative/client’ is selected and the plan manager is the self-organisation, the invoice will be sent to the self-organisation and a copy will be sent to the representative/client. If the plan manager is not the self-organisation, the logic from the first option applies.
- Allow creation of invoices to client/plan manager with future dates
- Allow invoice recurrence for expired engagements
- Append invoice number to reference in remittance details
- Allow manual reconciliation of approved invoices/claims
- Display staff member initial as
- Enable prepaid service for invoice/s to client/plan manager
- Enable credit for invoices to client/plan manager
- Due date of invoice calculated from end date of invoice
- Enable invoicing to multiple providers per client (broker/sub-contractor service providers)
- Rename provider invoice when uploaded
- Enter in the default file name format using the tags
| Tag |
Description |
| [[ReferenceNumber]] |
Invoice’s reference number |
| [[ClientName]] |
Client’s full name |
| [[ProviderName]] |
Provider’s full name |
Edit communication settings
- Navigate to GENIUS > Settings > Communication via the side navigation menu
- Select to add recipient signature tag to schedule of support when emailing agreement
- Select to add sender signature tag to schedule of support when emailing agreement
- Select to email signed documents to signatory on completion
Customise agreement templates
- Navigate to GENIUS > Settings > Communication via the side navigation menu
- Select the ‘Add’ icon
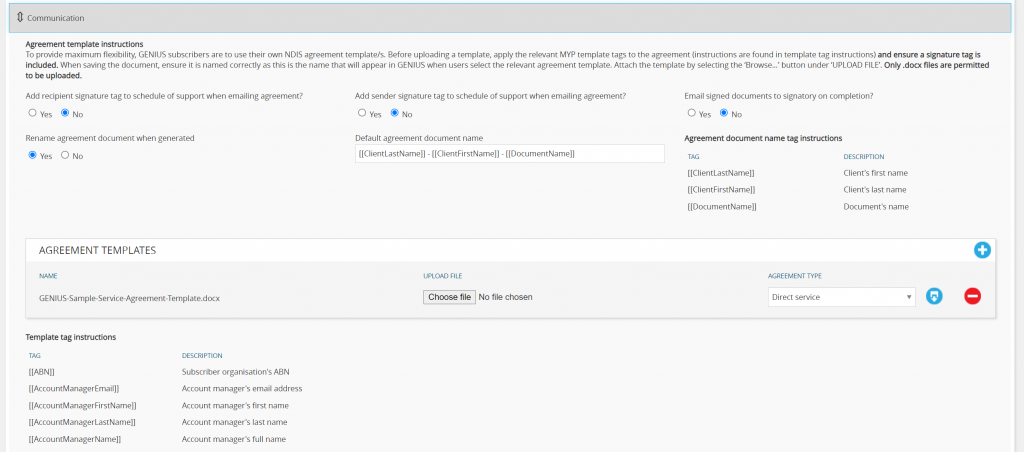
To provide maximum flexibility, GENIUS subscribers use their own service agreement template/s. A service agreement template must be saved in .docx format. GENIUS subscribers can upload as many service agreement templates as they like.
Before uploading a template, GENIUS subscribers can use the relevant MYP template tags in their agreement template. These tags will be replaced in your document when the agreement is generated using data from ARM Pro + GENIUS.
| Tag |
Description |
| [[ABN]] |
Subscriber organisation’s ABN |
| [[AccountManagerEmail]] |
Account manager’s email address |
| [[AccountManagerFirstName]] |
Account manager’s first name |
| [[AccountManagerLastName]] |
Account manager’s last name |
| [[AccountManagerName]] |
Account manager’s full name |
| [[AccountManagerPhone]] |
Account managers’ phone number |
| [[AccountManagerPhone2]] |
Account manager’s phone number 2 |
| [[AccountManagerRole]] |
Account manager’s role in your company |
| [[BookingEndDate]] |
Booking end date as defined in the engagement formatted as dd mmm yyyy, e.g., 01 Jan 2020 |
| [[BookingStartDate]] |
Booking start date as defined in the engagement formatted as dd mmm yyyy, e.g., 01 Jan 2020 |
| [[ClientName]] |
Client’s group name |
| [[ContactDateOfBirth]] |
Client’s date of birth |
| [[ContactEmail]] |
Client’s email address |
| [[ContactFirstName]] |
Client’s first name |
| [[ContactGender]] |
Client’s gender |
| [[ContactLastName]] |
Client’s last name |
| [[ContactName]] |
Client’s first name and last name |
| [[ContactPhone]] |
Client’s primary phone number |
| [[ContactPhone2]] |
Client’s secondary phone number |
| [[ContactPostalAddress]] |
Client’s postal address |
| [[CurrentDate]] |
Current date formatted as dd mmm yyyy, e.g., 01 Jan 2020 |
| [[NDISNumber]] |
Client’s NDIS number |
| [[OrgAddress]] |
Subscriber organisation’s postal address |
| [[OrgName]] |
Subscriber organisation’s name |
| [[PlanEndDate]] |
Plan end date as defined in the engagement formatted as dd mmm yyyy, e.g., 01 Jan 2020 |
| [[PlanManagerEmail]] |
Plan manager’s email address |
| [[PlanManagerName]] |
Plan manager’s name |
| [[PlanManagerPhone]] |
Plan manager’s phone number |
| [[PlanStartDate]] |
Plan start date as defined in the engagement formatted as dd mmm yyyy, e.g., 01 Jan 2020 |
| [[ProviderEmail]] |
Subscriber organisation’s email address |
| [[ProviderPhone]] |
Subscriber organisation’s primary phone number |
| [[ProviderPhone2]] |
Subscriber organisation’s secondary phone number |
| [[RecipientCheckbox]] |
The place where the recipient is presented with an optional checkbox. This is only used when emailing the client. It should be the same colour as the background. |
| [[RecipientTextbox]] |
The place where the recipient is presented with a textbox that the user is required to fill out. This is only used when emailing the client. It should be the same colour as the background. |
| [[RecipientTextboxOptional]] |
The place where the recipient is presented with an optional textbox. This is only used when emailing the client. It should be the same colour as the background. |
| [[Relationship]] |
Relationship between the representative + the client |
| [[RepresentativeEmail]] |
Representative’s email address |
| [[RepresentativeName]] |
Representative’s first name + last name |
| [[RepresentativePhone]] |
Representative’s primary phone number |
| [[RepresentativePhone2]] |
Representative’s secondary phone number |
| [[RepresentativePostalAddress]] |
Representative’s postal address |
| [[SenderCheckbox]] |
The place where the sender is presented with an optional checkbox. This is only used when emailing the client. It should be the same colour as the background. |
| [[SenderSignature]] |
The place where the sender signs. This is only used when emailing the client. Must be on a separate line. |
| [[SenderTextboxOptional]] |
The place where the sender is presented with an optional textbox. This is only used when emailing the client. It should be the same colour as the background. |
| [[SenderTextbox]] |
The place where the sender is presented with a textbox that the user is required to fill out. This is only used when emailing the client. It should be the same colour as the background. |
| [[Signature]] |
The place where the recipient signs. This is only used when emailing the client. Must be on a separate line. |
When saving the document ensure it is named correctly as this is the name that will appear in GENIUS when users select the relevant agreement template. You can enable automatic renaming of your service agreement by enabling ‘Rename agreement document when generated’.
When enabled, you can set the default agreement document name using the additional tags:
| [[ClientLastName]] |
Client’s last name |
| [[ClientFirstName]] |
Client’s first name |
| [[DocumentName]] |
Document’s name |
NB: Digital formal signatures on service agreements have a $2 fee per signature.
Attach the template by selecting the ’Choose file’ button under ‘UPLOAD FILE’ or by dragging + dropping the document onto the ‘Choose file’ button. Only .docx files are permitted to be uploaded.
Download agreement

Remove agreement
- Select the ‘Remove’ icon
- Select ‘Save + close’
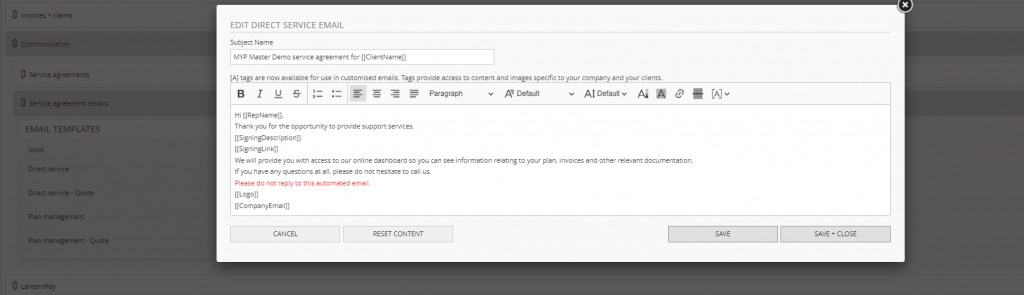
Edit service agreement email template
Service agreements sent through GENIUS will use one out of four different templates, depending on the agreement type selected:
- Selecting ‘Direct service’ in the agreement type will use the Direct service template
- When sending a service agreement as a quote, these will use the Direct service – Quote template
- Selecting ‘Plan management’ in the agreement type will use the Plan management template
- When sending a service agreement as a quote, these will use the Plan management – Quote template
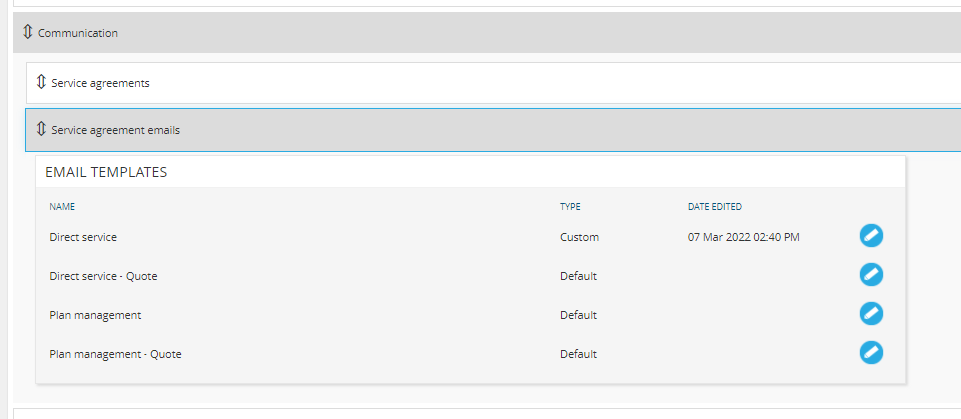
To edit each template, select the blue edit icon and complete your changes in the editor.
Edit monthly budget report email template
Monthly budget reports sent through GENIUS will use the template nominated through GENIUS communication settings.
To edit the monthly budget report email template, select the blue edit icon and complete your changes in the editor.

Edit cost centres settings
NB: These settings only apply if you use Xero as your accounting software.
- Navigate to GENIUS > Settings > Cost centres via the side navigation menu
- Select whether invoice cost centres are synced to Xero
- If enabled, select the account from the drop-down menu in the ‘XERO TRACKING CATEGORIES’ panel
- Select the applicable tracking categories from the drop-down menus
NB: You must have 2 tracking categories registered in Xero.
- Select the ‘Create’ icon and add in your cost centres
- Select the links for ‘External software primary cost centre’ + ‘External software secondary cost centre’