Appointments System offers an efficient scheduling and invoicing solution for Managers, Administrators and Frontline Allied Health professionals. Effortlessly manage your workforce and client engagements with simple one-off participant set-up and a simplified NDIA claiming process.
CRM
- Ensure all staff exist within the Self-Client. For more information, refer to Administer Staff
- Administer Clients. For more information, refer to Administer Clients + Contacts
- Ensure Locations have been customised. For more information, refer to Customise Teams + Locations
- Administer ‘Case Notes’ Project in ARM Pro for each Client that will be present in Appointments System. For more information, refer to Manage Projects
- Administer Tasks to Client Program – Tasks should represent each Program the Client will be involved in.
E.G. Speech Pathology/Occupational Therapy/Physiotherapy. For more information, refer to Manage Project Tasks
GENIUS
- Ensure Cost Centres have been customised. For more information, refer to GENIUS Settings
- Build out Client Engagements in GENIUS (Appointments System will identify Client’s Schedule of Support and use this to populate associated line items when creating ‘Base Schedule’ and invoicing).
Appointments
Appointments System can be accessed via the Navigation Menu or by navigating to PocketWatch > myShifts and selecting ‘myAppointments‘.
Appointments Menu

The following functionalities can be accessed via the menu:
- Staff Schedules
- Base Schedules
- Claims
- My Appointments
- Settings
Administer Program Library
Menu > Settings > Programs
Each Allied Health service offered should be created as a ‘Program’.
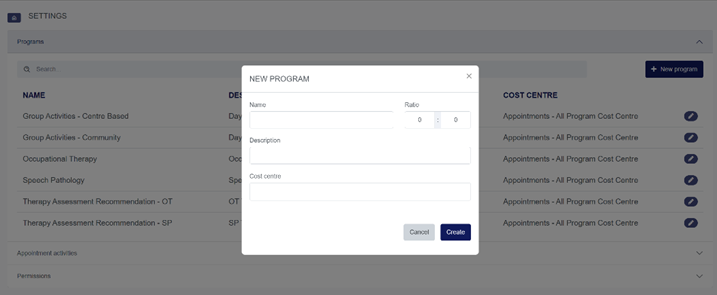
- Select ‘+ New Program’
- Enter ‘Program Name’
- Enter ‘Ratio’
- Enter ‘Description’
- Select ‘Cost Centre’ from drop down
- Select ‘Create’
Administer Activities Library
Menu > Settings > Appointment Activities
Each appointment will be made up of various ‘Activities’. Every task that staff engage in before, during, and following an appointment should be accounted for by an ‘Activity’.
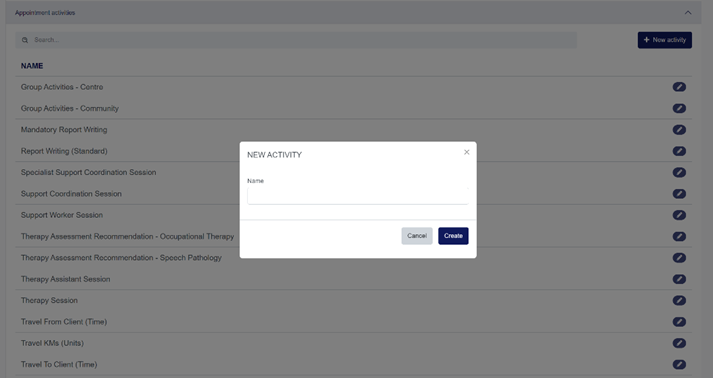
- Select ‘+ New Activity’
- Assign Activity ‘Name’
- Select ‘Create’
Administer Adhoc Task Items
Menu > Settings > Adhoc Task Items
Adhoc Tasks can be created by users with the appropriate permissions. When creating an Adhoc Task, the user will be required to select the relevant ‘Adhoc Task Item’ from the options in this window.

- Select ‘New Adhoc Task Item’
- Assign Task ‘Name’
- Select ‘Create’
Administer Tags
Menu > Settings > Tags
Tags can be created in settings and applied to appointments to identify additional appointment information.

- Select ‘New Tag’
- Assign Tag ‘Name’
- Select ‘Create’
Administer Staff Permissions
Menu > Settings
Permissions for Appointments System are located within Appointments > Settings (not ARM Pro).
‘Administrator – Access all areas’ permission will provide staff access to, visibility of, and full permissions across Appointments System. Staff with this permission can assign ALL permission types to other users. Staff without this permission will not be able to see the ‘Programs’ and ‘Activities’ Libraries, or create/edit ‘Base’ and ‘Staff’ Schedules.
‘Support Worker’ permissions can be applied in part, or full, giving you flexibility to determine which staff can claim appointments and/or administer (book) appointments.
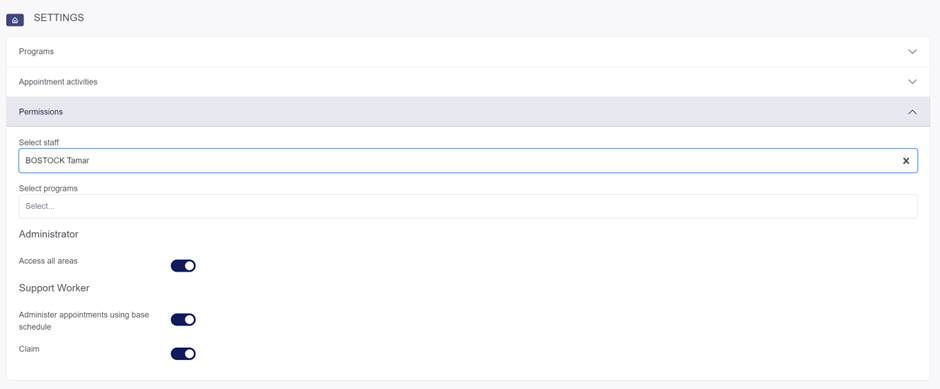 Example of enabled permissions
- Select ‘Staff’ member
- Select ‘Program/s’ (if applicable)
- Toggle required permissions ‘on’ or ‘off’
Administer Staff Schedules
Menu > Staff Schedules
‘Staff Schedules’ determine the availability, or, time period in which appointments can be made, for each staff member. Only staff that exist within the Self-Client will be available for selection in Appointments System.
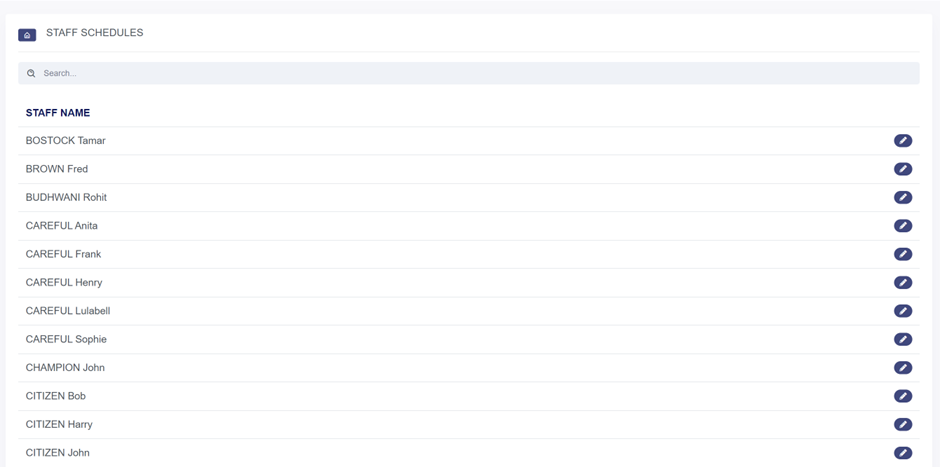
- Use the ‘Edit’ icon to edit relevant ‘Staff Schedule’
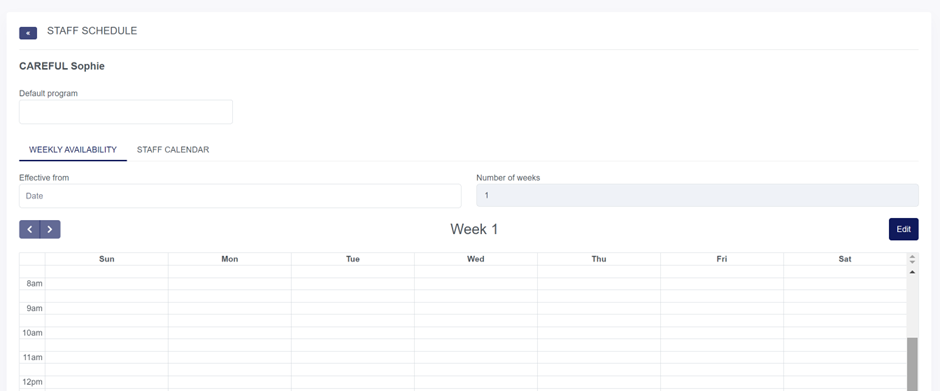
- Select ‘Edit’
- Select ‘Effective from’
- Select ‘Number of weeks’
- EXAMPLE: Staff who have the same availability every week would be created with ‘1 week’
- EXAMPLE: Staff who have availability that alternates week on/week off would be created with ‘2 weeks’
(E.G. week 1 – three days/week 2 – five days)
- ‘Click and drag’ on calendar to populate availability windows
- Select ‘Save’
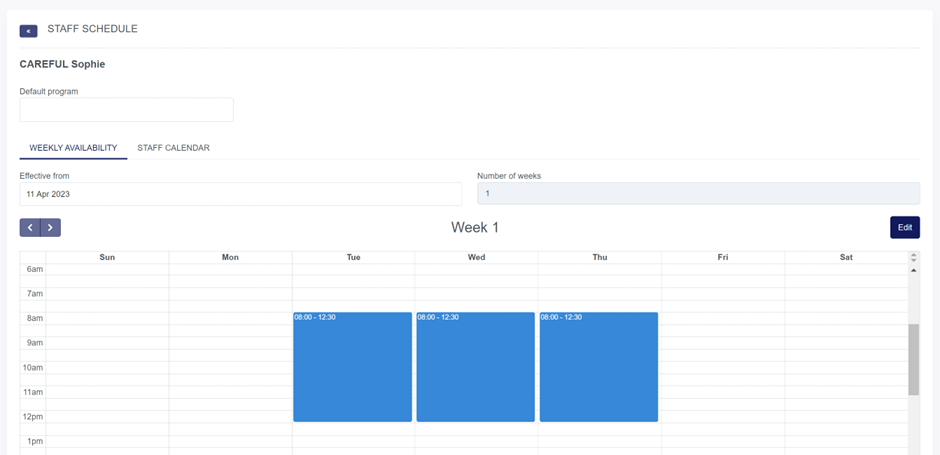 Example of Staff Schedule
Administer Base Schedules
Menu > Base Schedules
Each Client in Appointments System will require a minimum of one ‘Base Schedule’ prior to the scheduling of their appointments. A Client’s ‘Base Schedule’ will account for every ‘Program’ that they are engaged in – a Client participating in multiple Allied Health services will require multiple ‘Base Schedules’.
E.G. – Participant A requires Speech Pathology, Occupational Therapy and Physiotherapy. Participant A will require a ‘Base Schedule’ for Speech Pathology, a ‘Base Schedule’ for Occupational Therapy, and a ‘Base Schedule’ for Physiotherapy.
A ‘Base Schedule’ is made up of a series of ‘Activities’ that will outline every (billable or non-billable) task required of the staff member, and/or Client. This includes ‘Activities’ such as Report Writing and Travel charged to Client.
NB: Only staff who have the ‘Administrator – Access all areas’ permission will have access to ‘Base Schedules’. If a ‘Base Schedule’ is flagging as ‘Obsolete’ it is because there are one or more ‘Groups’ that are not using the most current version of the Client’s Schedule of Support. To rectify this, the user will re-create the ‘Base Schedule’ and delete the ‘obsolete’ version. This will rectify the status of the ‘Base Schedule’.

- Use the ‘Edit’ icon to edit relevant ‘Base Schedule’
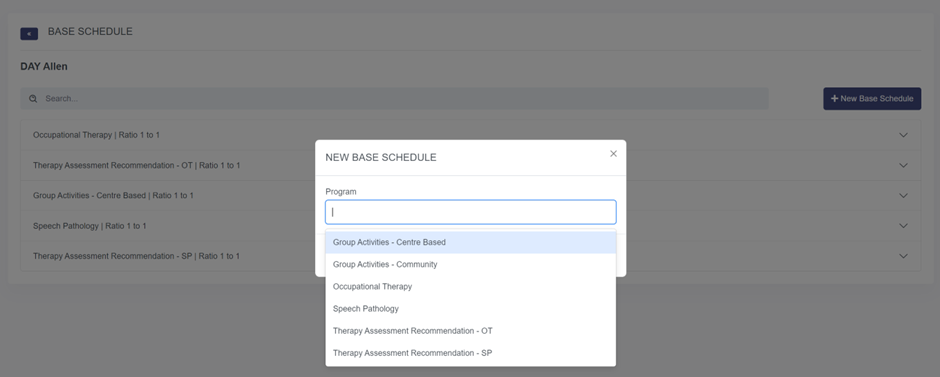
- Select ‘+ New Base Schedule’
- Select ‘Program’ from the drop down
- Select ‘Create’

- Define ‘Description’ (if required)
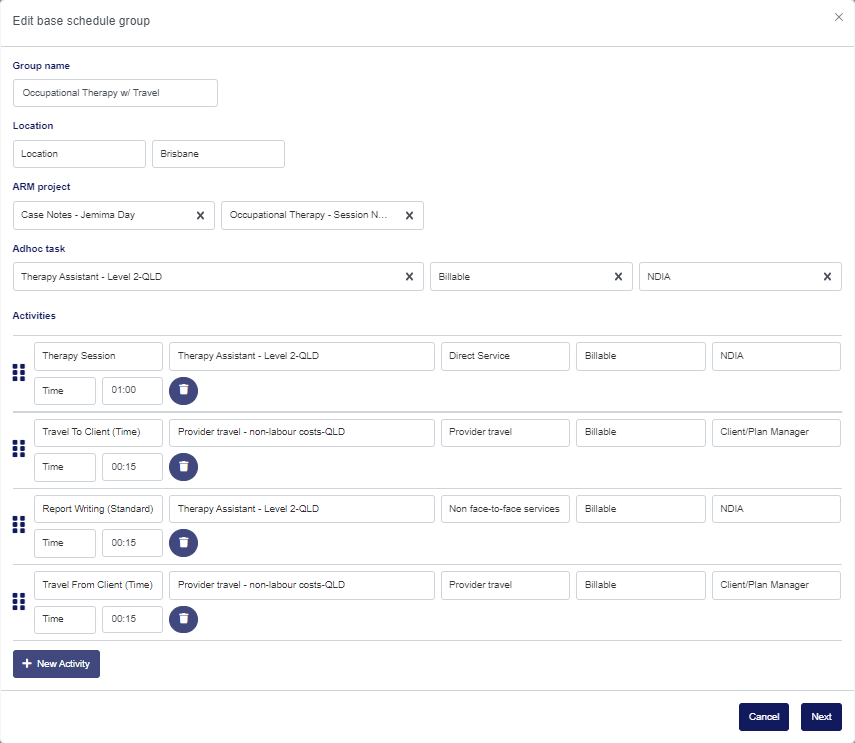
- Assign ‘Group name’
- Select ‘Location’
- “Organisational site” will populate list of pre-set ‘Locations’ as per CRM
- “Participant address” will populate Client’s address as per CRM
- “Custom address” will allow the user to enter in a unique address
- Select ‘ARM Project’ – use ‘Case Notes’ Project previously created
- Select ‘ARM Task’
- Adhoc Tasks – Select ‘Line item’ from the drop down – available fields will populate based on Participant’s Schedule of Support within GENIUS
- Select ‘Billing type’
- Select ‘Invoice type’
- Appointment Base Schedule – Select ‘Activity’ from the drop down
- Select ‘Line item’ from the drop down – available fields will populate based on Participant’s Schedule of Support within GENIUS
- Select ‘Claim type’
- Select ‘Billing type’
- Select ‘Invoice type’
- Select ‘Time’ or ‘Unit’
- Time (hh:mm – E.G. session length)
- Unit (for KM travelled)
- Select ‘+ New Activity’ (to input additional ‘Activities’ as required)
- Select ‘Save’
Administer Program Groups
Multiple ‘Program Groups’ can be created within a ‘Base Schedule’. For example, Participant A attends one Occupational Therapy session a week. Three out of four sessions are conducted by a Therapy Assistant. Once every four weeks, Participant A will attend a session conducted by a Senior Therapist. In addition, once a year, the Senior Therapist is required to submit a Participant Report to the NDIS. In this example, users can administer one ‘Base Schedule’ for the ‘Occupational Therapy Program’ to Participant A, and simply create three ‘Groups’ under this ‘Base Schedule’ to account for the ‘Therapy Assistant’, ‘Senior Therapist’, and ‘Annual Report’ appointment types.
- Select ‘+ New Group’
- Complete fields as required
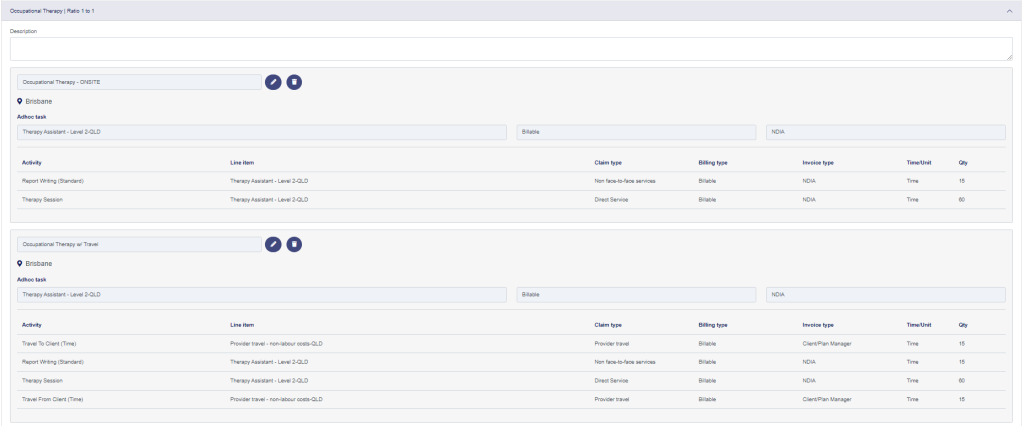 Example of Base Schedule with multiple Groups
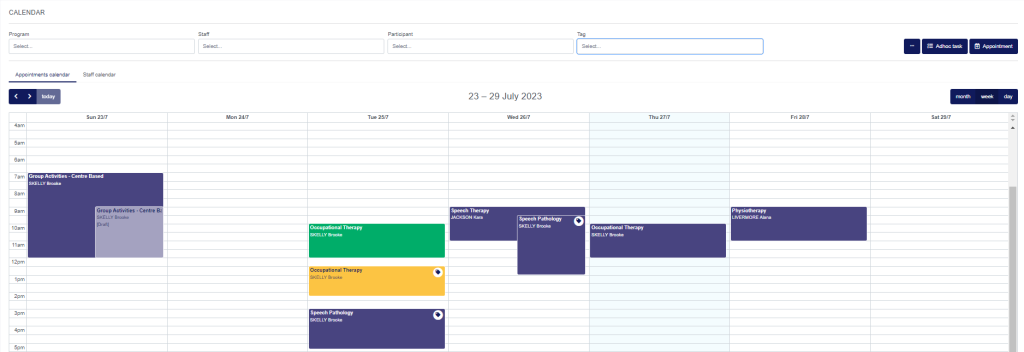
Appointments Calendar
Calendar > Appointments Calendar
The ‘Appointments Calendar’ provides you with the functionality to view and filter appointments by ‘Program’, ‘Staff’ and ‘Participant’ types (or no filter at all). Calendar layout can be selected for month/week/day view.
- Select ‘Program’ from the drop down
- Select ‘Staff’ (multiple selections possible)
- Select ‘Participant’ (multiple selections possible)
- Select ‘Tag’ (multiple selections possible)
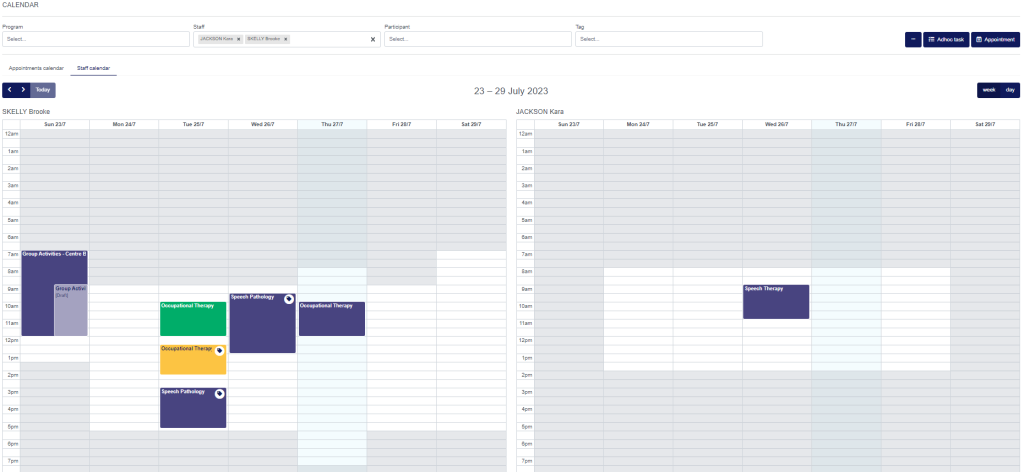
Staff Calendar
Calendar > Staff Calendar
The ‘Staff Calendar’ provides you with the functionality to view and filter appointments by ‘Program’, ‘Staff’ and ‘Participant’ types. The ‘Staff Schedule’ for selected staff will be applied to the calendar view within this window. Multiple staff can be applied to the ‘Staff’ filter, providing efficient availability comparison across your workforce.
- Select ‘Program’ from the drop down
- Select ‘Staff’ (multiple selections possible)
- Select ‘Participant’ (multiple selections possible)
- Select ‘Tag’ (multiple selections possible)
Administer Appointments
New appointments can be created from the ‘Appointments Calendar’, ‘Staff Calendar’ or ‘My Appointments’ windows. To create a new appointment, click and drag the time period directly on the calendar, or select ‘+ Appointment’.
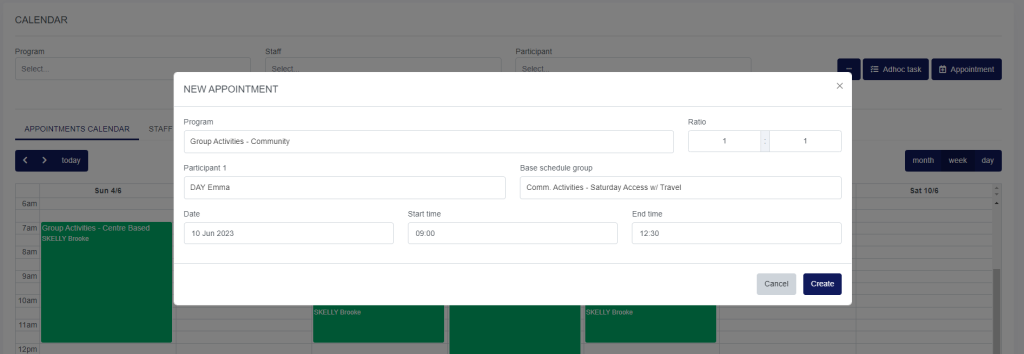
- Select ‘Program’ from the drop down
- ‘Ratio’ will populate based on settings
- Select ‘Participant’ from the drop down
- Select ‘Base Schedule Group’ from the drop down
- Select ‘Date’
- Select ‘Start time’
- ‘End time’ will populate based on duration of session as per ‘Base Schedule’
- Select ‘Create’
Please note: when creating an appointment with multiple participants – if not all participant places are filled, the appointment can still be saved, but will be saved in a ‘Draft Status’. The user can later reopen the appointment to add in the additional participants.
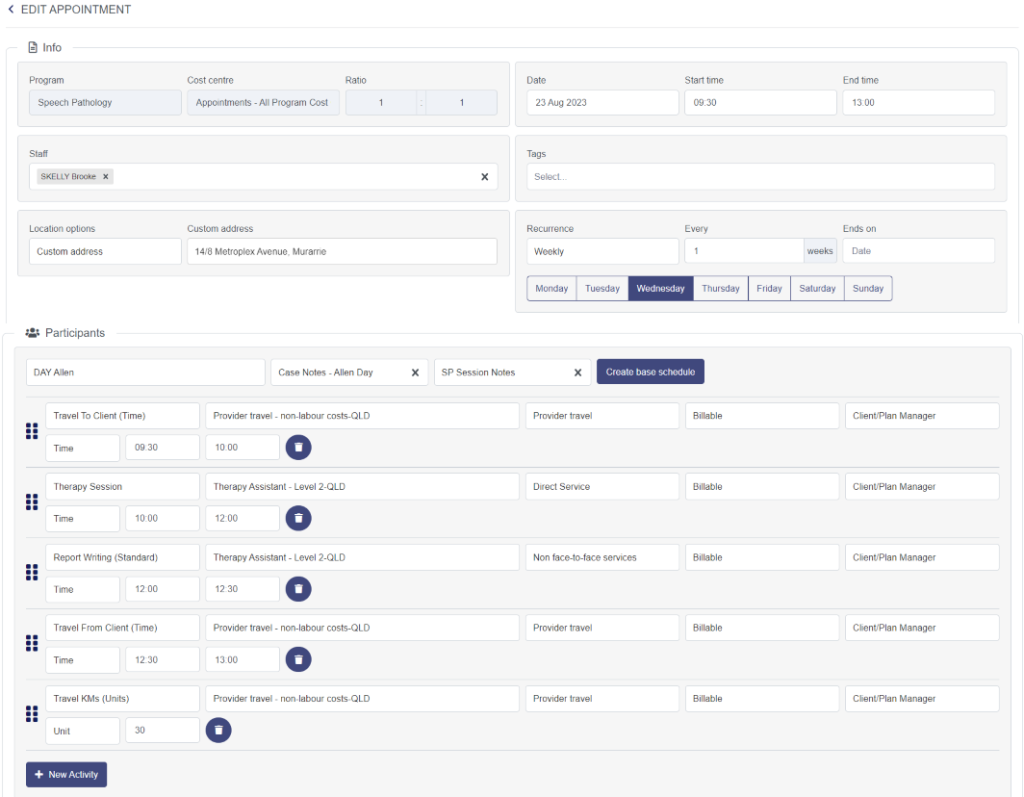
NB: The appointment will auto-populate all ‘Activities’ as per ‘Base Schedule Group’.
- Select ‘Staff’ – if this field is left blank, the appointment will be labelled ‘open’ when viewed in the calendar
- Select ‘Tags’
- Edit ‘Location’ if required
- “Organisational site” will populate list of pre-set ‘Locations’ as per CRM
- “Participant address” will populate Client’s address as per CRM
- “Custom address” will allow the user to enter in a unique address
- Select ‘Recurrence’
- Select ‘Save’
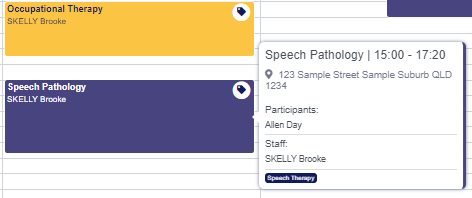
Tags
Appointments with Tags can be identified by the accompanying tag-like icon that is displayed.
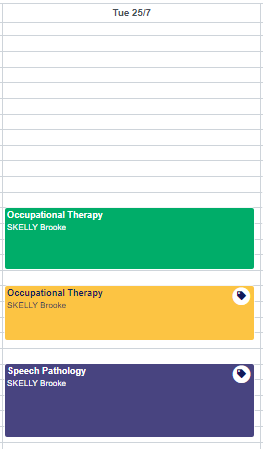
Users can then hover over the relevant appointment to generate a pop-out window which will display an extended view of appointment information.
My Appointments
Menu > My Appointments
The ‘My Appointments’ calendar is where a user can manage appointments for which they are they staff member assigned. This calendar can be displayed in ‘Month’, ‘Week’, ‘Day’, and ‘Detail’ format.
At the completion of an appointment, the staff member responsible is required to review the appointment details and mark ‘Complete’ to confirm that the appointment is ready to be sent for claim. Green coloured appointments have been marked ‘Complete’ and are ready for ‘Claim’, or have already been claimed. Orange coloured appointments have been opened and review commenced (E.G. ‘Attendance’ recorded), but not yet completed. Grey appointments are awaiting review.
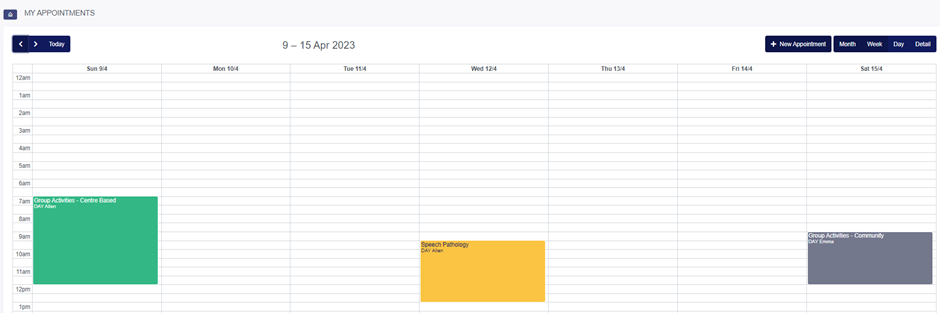 Example of ‘My Appointments’ calendar displayed in ‘Week’ format
- Select relevant appointment
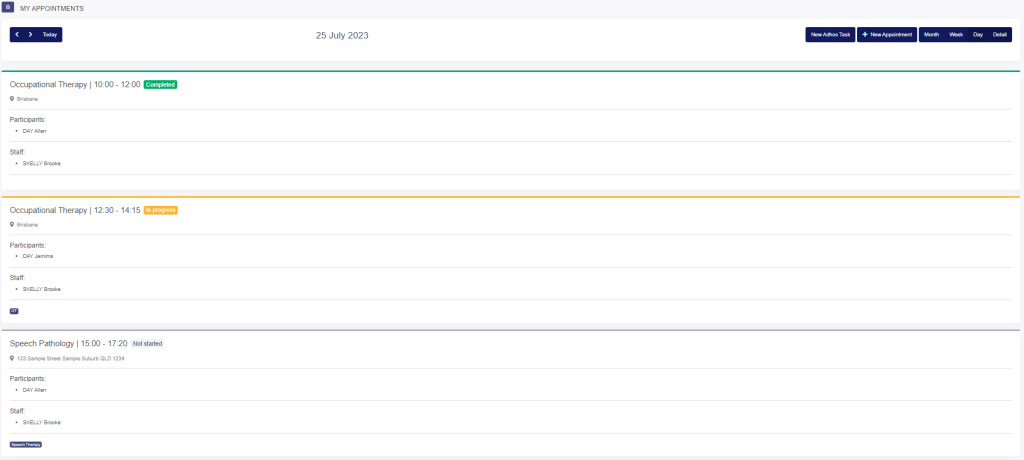 Example of ‘My Appointments’ calendar displayed in ‘Detail’ format
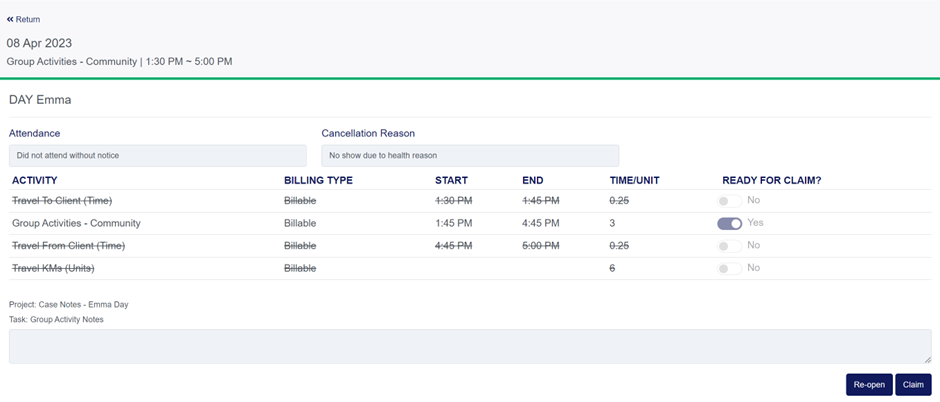
Completing Appointments
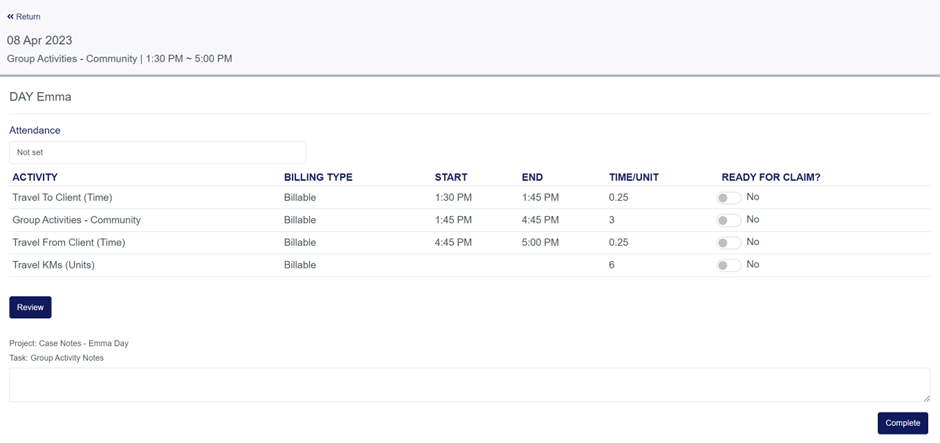
- Select ‘Attendance’
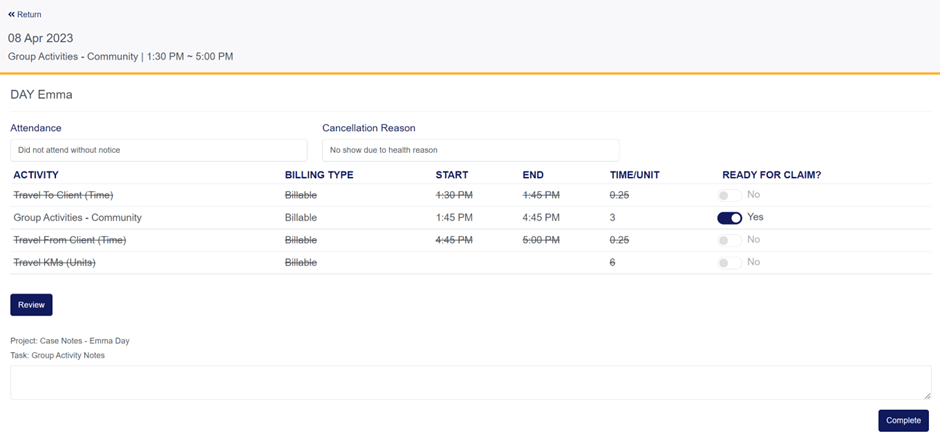
- ‘Not Attended’ will prompt user to enter a ‘Cancellation Reason’
- Select ‘Review’
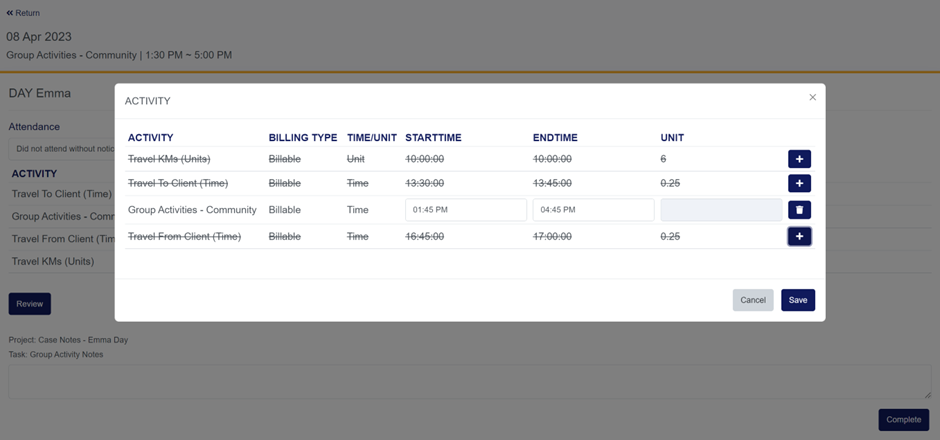
- Activities can be edited or deleted. Select relevant field requiring edit, or ‘Delete’ icon if a particular item is not to be included in the claim (E.G. were not completed in session)
- Enter ‘Case Notes’ into the provided field – the associated ‘Project’ and ‘Task’ will be identified above the text box
- Toggle ‘Ready For Claim’ to ‘Yes’
- Select ‘Complete’
- If the user has the permission to ‘Claim’ enabled, this option will become available immediately
Administer Adhoc Task
‘Adhoc Tasks’ can be created from the ‘Appointments Calendar’, ‘Staff Calendar’ or ‘My Appointments’ windows. To create a new ‘Adhoc Task’ select ‘+ Adhoc Task’.
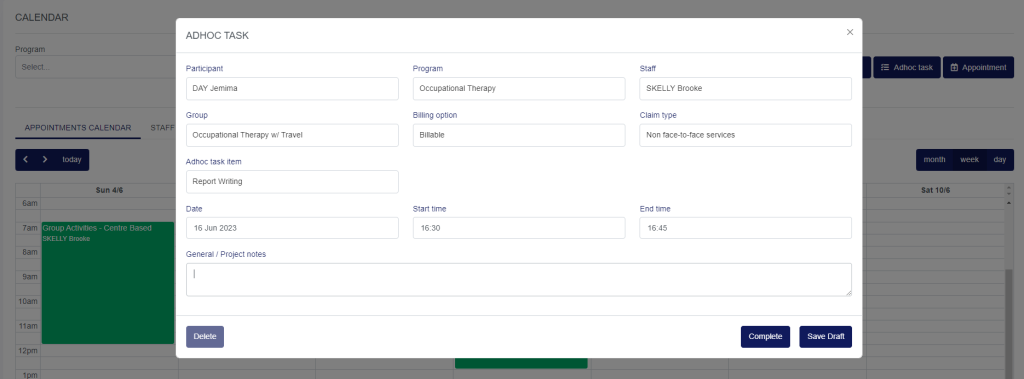
- Select ‘Participant’
- Select ‘Program’
- Select ‘Staff’ (will prepopulate based on logged-in user)
- Select ‘Group’
- Select ‘Billing option’
- Select ‘Claim type’
- Select ‘Adhoc task item’
- Select ‘Date’
- Select ‘Start time’
- Select ‘End time’
- Complete ‘General/Project notes’ as required
- Select ‘Complete’
- If the user has the permission to ‘Claim’ enabled, this option will become available immediately
- Select ‘Save Draft’
- Task will be saved on calendar at relevant date and time and can later be reopened to complete and claim
Claiming – My Appointments
Menu > My Appointments
Claiming an appointment will only be possible for users with the ‘Claim’ permission enabled. Once an appointment has been marked ‘Complete’, the user will then be able to select ‘Claim’ – sending the invoice through to GENIUS. Users with the ‘Administrator – Access all Areas’ Permission will be able to complete, re-open and claim appointments conducted by other staff by selecting the relevant staff member from the drop down and locating the specific appointment requiring attention.
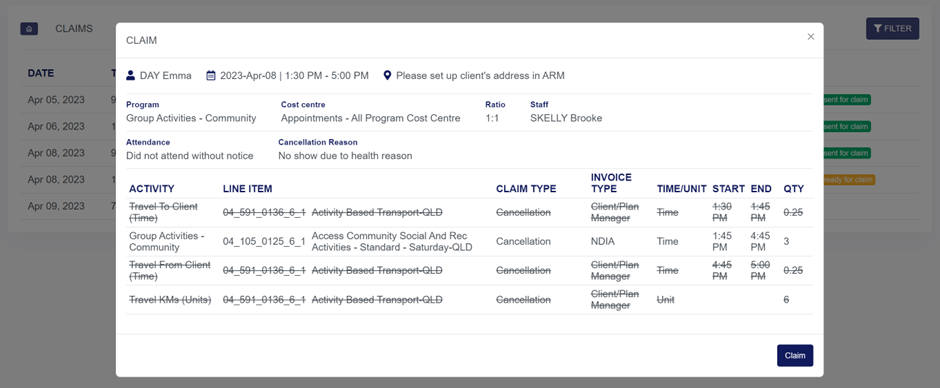
 Example of a completed, ready to claim, invoice
Claiming – Claims
Menu > Claims
All claims can be reviewed within the ‘Claims’ section. Claims are categorised by three status types: ‘No Record’, ‘Completed and ready for claim’ and ‘Completed and sent for claim’. Filter functionality will allow users to search claims by ‘Date’, ‘Program’, ‘Staff’, ‘Participant’, ‘Claim Source’ (Appointment or Adhoc Task), and ‘Status’. Once an appointment or adhoc task has been marked ‘Complete’, it is available to be claimed within the ‘Claims’ window.
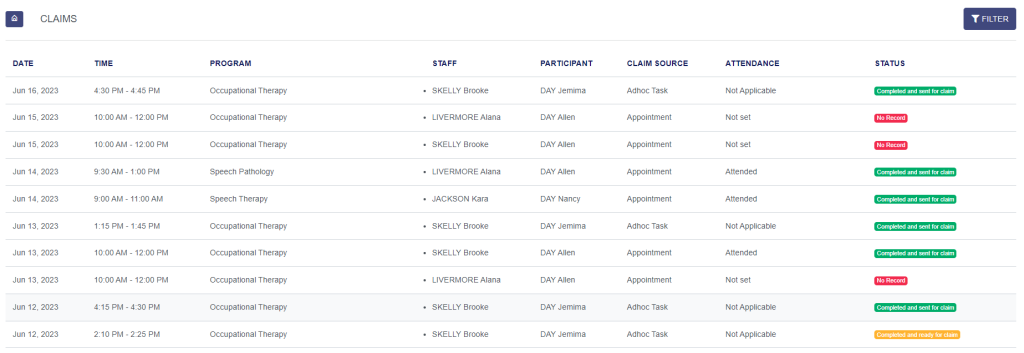
- Select relevant appointment or adhoc task
- Select ‘Claim’
- Invoice will be sent to GENIUS
Reporting
The PocketWatch ‘Staff Activity Report’ with relevant data from The Appointments System. For more information, refer to Generate Reports.
Processing Invoices
Invoices will be created in GENIUS for all ‘Completed and sent for claim’ appointments. Invoices can then be processed as per best practice guide. For more information, refer to GENIUS.
Updates to Schedules of Support
When a participant ‘Base Schedule’ is created in Appointments, the line items that are used are mapped to the existing Schedule of Support in GENIUS. When that Schedule of Support is ceased and replaced by a new Schedule of Support, the Appointments system will flag warnings to identify this to the user.
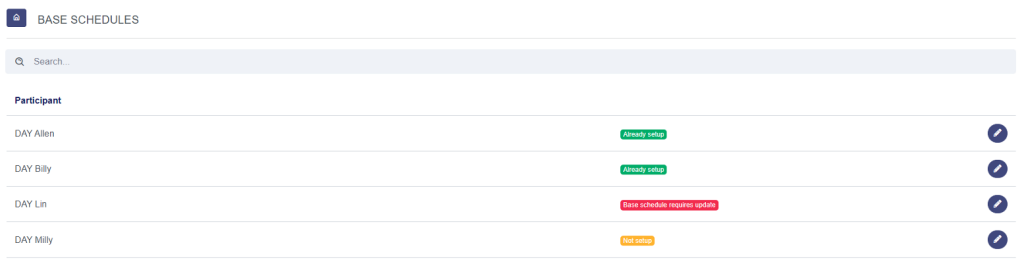
Base Schedules
Where the system identifies that the participants current ‘Base Schedule’ is mapped to a ceased Schedule of Support, the status of the affected Base Schedule will be updated to ‘Base schedule requires update’ to alert the user.
- ‘Edit’ the relevant participant

- Expand the relevant Base Schedule
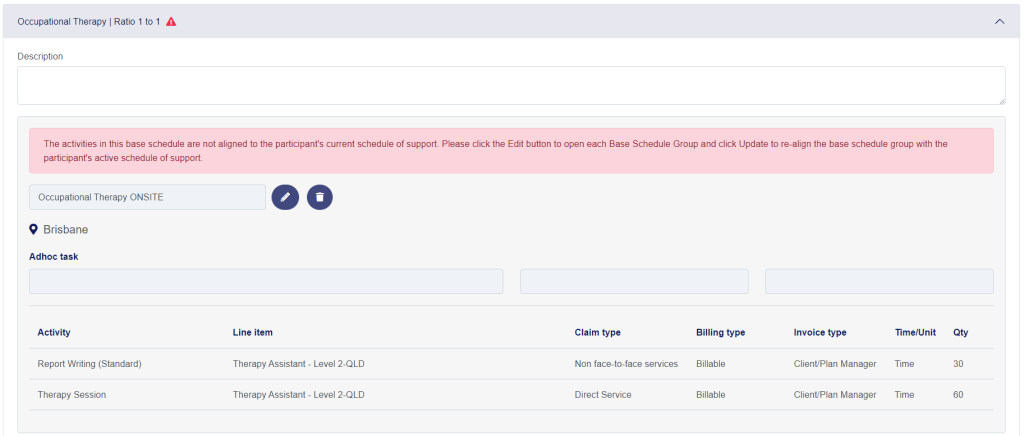

- Select ‘Update’
- Where the system cannot directly map the new line items, a notification will flag informing the user that “The line items could not be matched. Please review empty line items before saving.” In this situation, please select the appropriate line items from the drop-down of each affected Activity
- Select ‘Next’
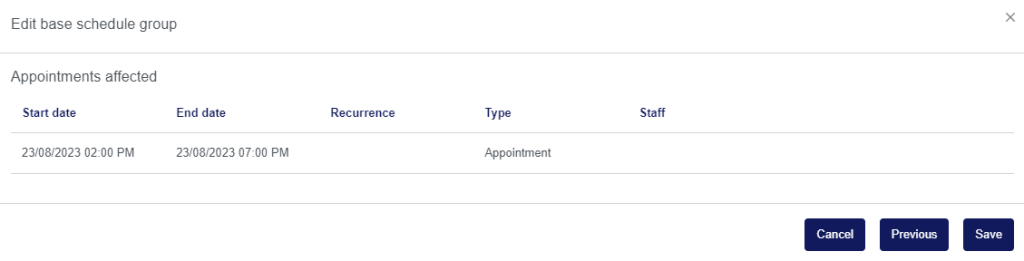
- Confirm system identification of ‘Affected appointments’
- Select ‘Save’
Creation of New Appointment
Where the system identifies that the participants current ‘Base Schedule’ is mapped to a ceased Schedule of Support at the time of the user creating a new appointment, the following warning will display:

- Select ‘Update’
- Where the system cannot directly map the new line items, a notification will flag informing the user that “The line items could not be matched. Please review empty line items before saving.” In this situation, please select the appropriate line items from the drop-down of each affected Activity
- Select ‘Save’
Management of Existing and/or Recurring Appointments
Where there are existing appointments and/or appointment series that has been created with a Base Schedule mapped to a ceased Schedule of Support, a small warning notification will flag on the affected appointment in the ‘Appointments Calendar’ view. See: Speech Pathology appointment, Wednesday 05/07.
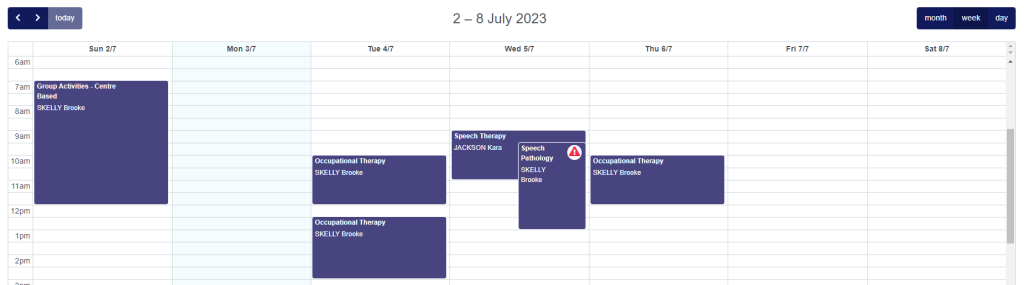 Example of appointment affected by Schedule of Support update
- Select affected appointment
- Select ‘Update schedule of support’
- Where the system cannot directly map the new line items, a notification will flag informing the user that “The line items could not be matched. Please review empty line items before saving.” In this situation, please select the appropriate line items from the drop-down of each affected Activity
- Select ‘Save’
When updating appointments not part of a recurrence series:
- Select ‘This appointment’
- Select ‘Submit’
When updating appointments that are part of a recurrence series:
- Select ‘All unconducted past and future appointments’
- Select ‘Submit’